Difference between revisions of "The Ghimlyt Dark"
Jump to navigation
Jump to search
StrykerXIV (talk | contribs) |
StrykerXIV (talk | contribs) |
||
| Line 11: | Line 11: | ||
| tomestones = 80 mendacity + 50 genesis | | tomestones = 80 mendacity + 50 genesis | ||
| entrance = Eorzean Alliance HQ | | entrance = Eorzean Alliance HQ | ||
| entrance-coordinates = | | entrance-coordinates = 6.2, 6.1 | ||
| req-quest = ???? | | req-quest = ???? | ||
| patch = 4.5 | | patch = 4.5 | ||
Revision as of 16:29, 11 January 2019
The Ghimlyt Dark
- Level
- 70
- Item Level
- 360
- Difficulty
- Normal
- Party size
- Light Party
4 man • 1 1
1  2
2 
- Unsyncing
- Allowed
- Time limit
- 90 minutes
- Roulette
- Expert
- Tomestones
- Req. quest
 ????
????- Entrance
- Eorzean Alliance HQ (X:6.2, Y:6.1)
- Patch
- 4.5
“For those who dare travel twixt Aldenard and Ilsabard, there is but one path, and it leads through Ghimlyt. A confluence of harsh terrain and aetheroclimatic conditions have shrouded the land in perpetual darkness, and it is here the decisive battle for Eorzea begins. But can the Warrior of Light prevail in this land long since lost to the light?
— In-game description
The Ghimlyt Dark is a level 70 dungeon introduced in patch 4.5 with Stormblood.
Objectives
- Arrive on the Field of Dust: 0/1
- Clear the Field of Dust: 0/1
- Arrive at the Impact Crater: 0/1
- Clear the Impact Crater: 0/1
- Arrive at the Provisional Imperial Landing: 0/1
- Defeat Julia and Annia: 0/1
Bosses
There are three bosses in The Ghimlyt Dark.
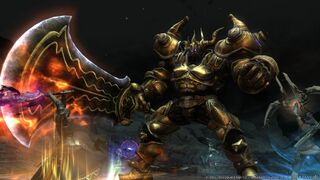
 Mark III-B Magitek Colossus
- Jarring Blow: Tankbuster that hits a wide arc in front of the boss.
- Ceruleum Vent: Moderate damage on the entire party.
- Magitek Ray: Stack marker on one player.
- Exhaust: Line attack in the direction of a random player.
- Wild Fire Beam: A targeted AoE on each player, spread to avoid overlapping damage.
- Magitek Slash: The Colossus slams its sword down, dealing damage in a cone area and leaving behind a fiery puddle that inflicts Burns while standing in it. The Colossus will rotate and slam down repeatedly until it has covered the entire arena. The first puddle will dissipate as the Colossus turns to make the final strike.
 Prometheus
- Nitrospin: Moderate damage on the entire party. Prometheus always casts this ability first, surrounding the arena in fire.
- Unbreakable Cermet Drill: Tankbuster.
- Needle Gun: 90 degree Cone directly in front of the boss.
- Oil Shower: 270 degree Cone directly behind the boss, hitting everywhere Needle Gun doesn't.
- After a few attacks, Prometheus will burrow underground and a section of the wall surrounding the arena will glow red. After a delay, a fiery blast will launch from the red area to the opposite wall, dealing damage. The attack lingers, continuing to deal damage for a few seconds. The second time Prometheus uses this attack, it will first cast Freezing Missile.
- Freezing Missile: Four proximity AoEs that hit at each cardinal direction.
 Annia Quo Soranus and Julia Quo Soranus
As the battle begins, whichever sister was attacked first will remain in the arena, while the other will support from outside the arena, untargetable. Annia utilizes a fist weapon, while Julia has a gunblade.
- Delta Trance: Annia's tankbuster.
- Innocence: Julia's tankbuster.
- Artificial Plasma: Used by both sisters. Deals moderate damage to the entire party.
- Commence Air Strike: Used by Julia. Eight Ceruleum tanks will drop from the sky, four on the outer edge, and four inside. Occasionally, Julia will use Roundhouse to knock the tanks around, with the added effect of dealing damage to and knocking back players in melee range. Regardless of if she uses Roundhouse or not, she will then follow up with Heirsbane targeting a tank to detonate it, dealing damage in a large area around the tank and causing all other tanks in the radius to also detonate.
- Order to Bombard: Used by Annia. Three large AoEs will cover the arena, leaving small safe spots at the edge of the arena, while Julia and Annia perform Crossbones and Angry Salamander
- Crossbones: Used by Julia. Carving four "X"es into the air that travel across the arena to deal damage. When used as part of Order to Bombard, each X unerringly targets a player and inflicts knockback when it hits.
- Heirsbane: Used by Julia. Marks a random player with a crosshair, then deals moderate damage to the target a short time after.
- Angry Salamander: Used by Annia. A Line attack in the direction of a random player.
- Stunning Sweep: Used by Annia. She jumps to a random player, then begins casting. Deals damage to players in melee range.
- The Order: Used by Julia. Julia moves to the center of the arena and surrounds herself with four Crossbones projectiles. Ground AoEs will appear beneath each player, while the Crossbones launch in a cross pattern.
- After the first sister is defeated, the two will perform Crosshatch, launching a Crossbones projectile back and forth across the arena, their path denoted by very narrow lines appearing. After this attack, the two will tag out and the fight will continue.
- When the other sister is defeated, they will perform Crosshatch again with the addition of Covering Fire, an AoE targeting each player that requires the party spread out to avoid overlap.
- Once the second cast of Crosshatch is complete, the two will regain 20% of their HP and begin casting Imperial Authority at the center of the arena. This attack will wipe the party if either are allowed to finish casting.
Loot
 Mark III-B Magitek Colossus
 Prometheus
 Annia Quo Soranus and Julia Quo Soranus
Additional Loot
 Treasure Coffer 1 (X: 5.9 Y: 14.6)
 Treasure Coffer 2 (X: 11.6 Y: 12.2)
 Treasure Coffer 3 (X: 13.9 Y: 11.8)
 Treasure Coffer 4 (X: 17.6 Y: 8.9)
 Treasure Coffer 5 (X: 18.5 Y: 7.6)
 Additional Coffer Items
- Dzo Horn
- Earth Crystal
- Earth Shard
- Fire Crystal
- Fire Shard
- Gagana Skin
- Gazelle Hide
- Gazelle Horn
- Gyuki Hide
- Halgai Mane
- Ice Crystal
- Ice Shard
- Lightning Crystal
- Lightning Shard
- Manzasiri Hair
- Marid Hide
- Moth Scales
- Muud Suud Horn
- Rhino Beetle Carapace
- Tiger Skin
- Water Crystal
- Water Shard
- Wind Crystal
- Wind Shard
Images
Gear Images
Dungeon Images


