Difference between revisions of "Zadnor"
JohnnySolas (talk | contribs) |
(Add maximum holster capacity per resistance rank) |
||
| (51 intermediate revisions by 6 users not shown) | |||
| Line 1: | Line 1: | ||
{{ | {{see also|The Dalriada|The Bozjan Southern Front}} | ||
| | {{Duty infobox | ||
| | | name = Zadnor | ||
| | |||
| weather = fair skies, rain, wind, thunder, snow | | weather = fair skies, rain, wind, thunder, snow | ||
| | | description = The IVth Legion has retreated to the barren plateaus of Zadnor, their imperial flagship looming ominously on the horizon. What they hope to gain from their newfound base of operations remains to be seen, but the Resistance refuses to stand idle. As both sides are pushed to their limit, who will emerge the victor as the battle for Bozja reaches its bloody climax? | ||
| image = Zadnor banner.png | |||
| type = Field Operation | |||
| level = 71 | |||
| level-sync = 80 | |||
| ilvl = 0 | |||
| ilvl-sync = 430 | |||
| size = flex72 | |||
| unsync = n | |||
| time-limit = 180 | |||
| roulette = | |||
| tomestones = | |||
| entrance = Gangos | |||
| entrance-coordinates = 6.4, 5.7 | |||
| req-quest = A New Playing Field | |||
| patch = 5.55 | |||
| release = shadowbringers | | release = shadowbringers | ||
| echo = varies | |||
}} | }} | ||
This is an instanced area that up to 72 players can explore simultaneously, and is the second major battlefield of two in the [[Save the Queen: Blades of Gunnhildr]] storyline. Like [[the Bozjan Southern Front]], Zadnor is a instanced encounter wherein players assist the Bozjan Resistance in their continued effort to reclaim their homeland from the IVth Imperial Legion. | |||
==Unlock== | |||
== | *[[Quest]]: {{questlink|feature|A New Playing Field}} | ||
* | |||
*Level: Disciple of War or Magic level 80 | *Level: Disciple of War or Magic level 80 | ||
*Starting NPC: [[Marsak]] in [[Gangos]] (X:6.4 Y:5.7) | *Starting NPC: [[Marsak]] in [[Gangos]] (X:6.4 Y:5.7) | ||
*Prerequisite: Players must first complete the main story quest {{questlink|main|Futures Rewritten}} and have completed the quest {{questlink|feature|Fit for a Queen}}. | *Prerequisite: Players must first complete the main story quest {{questlink|main|Futures Rewritten}} and have completed the quest {{questlink|feature|Fit for a Queen}}. | ||
==Mechanics== | |||
All duty-specific mechanics (e.g., forming parties, level sync) are identical to those of the [[Bozjan Southern Front]]. For more information, see that page. | |||
Mettle is obtained in much greater quantities in this duty than in the Bozjan Southern Front or [[Delubrum Reginae]], making this the ideal location to farm mettle. However, the other Save the Queen duties are sources of useful Lost Actions and other rewards that are not found in Zadnor. | |||
==Advancement - Mettle and Resistance Rank== | ==Advancement - Mettle and Resistance Rank== | ||
| Line 24: | Line 40: | ||
===Features unlocked by Resistance Rank=== | ===Features unlocked by Resistance Rank=== | ||
{| | |||
'''Note:''' Completion of the quest {{questlink|feature|Let Me Holster That for You}} grants an additional 10 capacity to the maximum holster capacity shown below. | |||
{| {{STDT| mech1}} | |||
|- | |- | ||
! Rank !! Mettle Required !! New Features / Content Unlocked | ! Rank !! Mettle Required !! Maximum Holster Capacity !! New Features / Content Unlocked | ||
|- | |- | ||
| 16 || 1124000 || {{questlink|feature|Resolve Unshaken}}, can appraise | | 16 || {{mettle|1124000}} || 72 || {{questlink|feature|Resolve Unshaken}}, can appraise {{item icon|Forgotten Fragment of History}}, {{item icon|Forgotten Fragment of Rage}}, {{item icon|Forgotten Fragment of Ferocity}} | ||
|- | |- | ||
| 17 || 1930000 || | | 17 || {{mettle|1930000}} || 74 || | ||
|- | |- | ||
| 18 || 2790000 || {{questlink|feature|Where Eagles Roost}}, Access to The Western Plateau (Second Area), can appraise | | 18 || {{mettle|2790000}} || 76 || {{questlink|feature|Where Eagles Roost}}, Access to [[The Western Plateau]] (Second Area), can appraise {{item icon|Forgotten Fragment of Moonlight}}, {{item icon|Forgotten Fragment of Hope}}, {{item icon|Forgotten Fragment of Artistry}} | ||
|- | |- | ||
| 19 || 4435000 || | | 19 || {{mettle|4435000}} || 78 || | ||
|- | |- | ||
| 20 || 6163000 || {{questlink|feature|Reaching Out}} | | 20 || {{mettle|6163000}} || 80 || {{questlink|feature|Reaching Out}} | ||
|- | |- | ||
| 21 || 8663000 || | | 21 || {{mettle|8663000}} || 82 || | ||
|- | |- | ||
| 22 || 11471000 || {{questlink|feature|In Their Shadow}}, Access to The Northern Plateau (Third Area), can appraise | | 22 || {{mettle|11471000}} || 84 || {{questlink|feature|In Their Shadow}}, Access to [[The Northern Plateau]] (Third Area), can appraise {{item icon|Forgotten Fragment of Desperation}}, {{item icon|Forgotten Fragment of Tenacity}}, {{item icon|Forgotten Fragment of Inspiration}} | ||
|- | |- | ||
| 23 || 15602000 || {{questlink|feature|Renewed Focus}} | | 23 || {{mettle|15602000}} || 86 || {{questlink|feature|Renewed Focus}} | ||
|- | |- | ||
| 24 || 20516000 || | | 24 || {{mettle|20516000}} || 88 || | ||
|- | |- | ||
| 25 || 25870000 || {{questlink|feature|March of the Bloody Queen}}, Access to [[The Dalriada]], can appraise | | 25 || {{mettle|25870000}} || 89 || {{questlink|feature|March of the Bloody Queen}}, Access to [[The Dalriada]], can appraise {{item icon|Forgotten Fragment of Heroism}}, {{item icon|Forgotten Fragment of Cunning}}, {{item icon|Forgotten Fragment of Revelation}} | ||
|} | |} | ||
==[[ | ==Resistance Honors== | ||
Players who have reached the maximum Resistance rank can receive honors to permanently increase their strength when undertaking duties in [[Save the Queen]] areas. | |||
===Requirements=== | |||
After reaching Resistance rank 25 and completing the quest {{questlink|feature|March of the Bloody Queen}}, speak with the [[Resistance Councilor]] in Zadnor (X:35.7 Y:34.9). | |||
== | ===Receiving Honors=== | ||
After amassing sufficient mettle, players can speak with the Resistance Councilor to receive Proofs of Mettle in exchange for all of their stored mettle. It costs 20 million mettle to obtain 3 Proofs of Mettle. These may then be exchanged for three varieties of Resistance honors: Suns of Fortitude, Suns of Valor, or Suns of Succor. The number of proofs of mettle required to exchange for each Sun starts at one and increases by one every two of that Sun obtained, up to a maximum of five proofs of mettle needed. | |||
{| {{STDT| mech1 align-center}} | |||
{| {{STDT|mech1 align- | |- | ||
! Ray Rank !! Proofs of Mettle Cost !! Cumulative Proofs Cost | |||
|- | |||
| 1 || 1 || 1 | |||
|- | |||
| 2 || 1 || 2 | |||
|- | |||
| 3 || 2 || 4 | |||
|- | |||
| 4 || 2 || 6 | |||
|- | |||
| 5 || 3 || 9 | |||
|- | |||
| 6 || 3 || 12 | |||
|- | |- | ||
| 7 || 4 || 16 | |||
|- | |- | ||
| | | 8 || 4 || 20 | ||
|- | |- | ||
| | | 9 || 5 || 25 | ||
|- | |- | ||
| | | 10 || 5 || 30 | ||
|} | |} | ||
<!--[[File:Resistance Honors1.png]]--> | |||
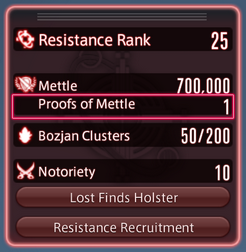
The number of proofs in your possession can be confirmed at any time via the HUD. | |||
[[File:Resistance Honors2.png]] | |||
===Effects=== | |||
*Ray of Fortitude - Increases maximum HP (+5% per stack). | |||
*Ray of Valor - Increases damage dealt (+3% per stack). | |||
*Ray of Succor - Increases healing potency (+10% per stack). | |||
The more of these honors in your possession (up to the cap of 10 each), the greater their effect. The number and types of each Sun in possession will be displayed as permanent buffs that are not lost on death. These effects are only active in Save the Queen duties. | |||
Obtaining 10 of each Sun will complete the [[Suns of Bozja]] achievement, which unlocks "The Emblazoned" title. | |||
==[[The Dalriada]]== | |||
The ''Dalriada'' is a special engagement that takes place on a separate map and serves as the "finale" to [[Zadnor]]. Available after reaching Resistance Rank 25 and completing the prerequisite quests, it is a raid dungeon that allows up to a maximum of 48 players, and is accessed in the same way as [[Castrum Lacus Litore]] is in the [[Bozjan Southern Front]]. When it pops, click the Register button in the Resistance Recruitment list, and if you are selected, click Commence. | |||
==Overworld Enemies== | |||
===Zone 1: [[The Southern Plateau]]=== | |||
*(I) [[Zadnor Beetle]] | |||
*(I) [[Zadnor Hippogryph]] | |||
*(I) [[4th Legion Nimrod]] | |||
*(II) [[Zadnor Ziz]] | |||
*(II) [[Zadnor Gaur]] | |||
*(II) [[4th Legion Infantry]] | |||
*(II) {{weather icon|thunder}} [[Lightning Sprite]] | |||
*(III) [[Zadnor Dhalmel]] | |||
*(III) {{weather icon|night}} [[Zadnor Bhoot]] | |||
*(III) [[4th Legion Gunship]] | |||
*(III) [[4th Legion Hexadrone]] | |||
*(III) {{weather icon|rain}} [[Water Sprite]] | |||
*(IV) {{weather icon|blizzards}} [[Ice Sprite]] | |||
*(V) {{weather icon|night}} [[Zadnor Dullahan]] | |||
*(V) {{weather icon|wind}} [[Wind Sprite]] | |||
*(★) [[Vinegaroon Executioner]] | |||
*(★) [[Anancus]] | |||
*(★) [[Stratogryph]] | |||
===Zone 2: [[The Western Plateau]]=== | |||
*(I) [[Zadnor Crawler]] | |||
*(I) [[Zadnor Stoneshell]] | |||
*(I) [[4th Legion Death Machine]] | |||
*(II) [[Zadnor Exoray]] | |||
*(II) [[Zadnor Abaddon]] | |||
*(II) [[4th Legion Armored Weapon]] | |||
*(II) {{weather icon|wind}} [[Wind Sprite]] | |||
*(III) [[Zadnor Grizzly]] | |||
*(III) {{weather icon|night}} [[Zadnor Banshee]] | |||
*(III) [[4th Legion Satellite]] | |||
*(III) [[4th Legion Colossus]] | |||
*(III) {{weather icon|blizzards}} [[Ice Sprite]] | |||
*(IV) [[Zadnor Sasquatch]] | |||
*(IV) [[Zadnor Coeurl]] | |||
*(IV) [[Zadnor Leshy]] | |||
*(IV) {{weather icon|thunder}} [[Lightning Sprite]] | |||
*(V) {{weather icon|night}} [[Zadnor Gourmand]] | |||
*(V) {{weather icon|rain}} [[Water Sprite]] | |||
*(★) [[Earth Eater]] | |||
*(★) [[Aglaophotis]] | |||
*(★) [[Lord Ochu]] | |||
===Zone 3: [[The Northern Plateau]]=== | |||
*(I) [[Zadnor Wamouracampa]] | |||
*(I) [[Zadnor Cliffmole]] | |||
*(I) [[4th Legion Roader]] | |||
*(II) [[Zadnor Yamaa]] | |||
*(II) [[Zadnor Raptor]] | |||
*(II) [[4th Legion Rearguard]] | |||
*(II) {{weather icon|rain}} [[Water Sprite]] | |||
*(III) [[Zadnor Wamoura]] | |||
*(III) {{weather icon|night}} [[Imperial Dead]] | |||
*(III) [[4th Legion Cavalry]] | |||
*(III) [[4th Legion Helldiver]] | |||
*(III) {{weather icon|thunder}} [[Lightning Sprite]] | |||
*(IV) [[Zadnor Harpy]] | |||
*(IV) [[Zadnor Lycanthrope]] | |||
*(IV) [[Zadnor Decotitus]] | |||
*(IV) {{weather icon|wind}} [[Wind Sprite]] | |||
*(V) [[Zadnor Wivre]] | |||
*(V) [[Zadnor Golem]] | |||
*(V) [[Zadnor Gagana]] | |||
*(V) {{weather icon|night}} [[Zadnor Haunt]] | |||
*(V) {{weather icon|blizzards}} [[Ice Sprite]] | |||
*(★) [[Glyptodon]] | |||
*(★) [[Molten Scorpion]] | |||
*(★) [[Vapula]] | |||
==FATEs== | |||
{{see also|Zadnor FATEs}} | |||
{{:Zadnor FATEs}} | |||
==[[Lost Actions]]== | |||
'''[[Offensive Lost Actions|Offensive]]''' | |||
'''[[Defensive Lost Actions|Defensive]]''' | |||
'''[[Restorative Lost Actions|Restorative]]''' | |||
'''[[Beneficial Lost Actions|Beneficial]]''' | |||
'''[[Tactical Lost Actions|Tactical]]''' | |||
'''[[Detrimental Lost Actions|Detrimental]]''' | |||
'''[[Item-related Lost Actions|Item-related]]''' | |||
==[[Forgotten Fragments]]== | |||
{{#lsth:Forgotten Fragments|Ranks 16-25}} | |||
==[[Field Records]]== | ==[[Field Records]]== | ||
{{#lsth:Field Records|Zadnor}} | {{#lsth:Field Records|Zadnor}} | ||
==Shops & Services== | |||
{{merchant list|Zadnor}} | |||
==Rewards== | |||
*{{Bozjan cluster}} [[Bozjan Cluster]]s | |||
*{{Item icon|Zadnor Lockbox}} | |||
*{{Item icon|Bozjan Mythril Coin}}s | |||
*{{Item icon|Bozjan Platinum Coin}}s | |||
==Achievements== | |||
This duty is associated with the following [[achievements]]: | |||
{| {{STDT| mech1 sortable align-left}} | |||
{{achievement table header}} | |||
{{achievement table row|No Man's Land I}} | |||
{{achievement table row|No Man's Land II}} | |||
{{achievement table row|No Man's Land III}} | |||
{{achievement table row|No Man's Land IV}} | |||
{{achievement table row|Critical Role I}} | |||
{{achievement table row|Critical Role II}} | |||
{{achievement table row|Critical Role III}} | |||
{{achievement table row|Critical Role IV}} | |||
{{achievement table row|Test Complete}} | |||
{{achievement table row|Might Makes Right}} | |||
{{achievement table row|Untamed}} | |||
{{achievement table row|Close Encounters of the Zadnoran Kind}} | |||
{{achievement table row|Sharper than Blades}} | |||
{{achievement table row|Hell to Pay I}} | |||
{{achievement table row|Hell to Pay II}} | |||
{{achievement table row|Hell to Pay III}} | |||
{{achievement table row|No Need for Triage I}} | |||
{{achievement table row|No Need for Triage II}} | |||
{{achievement table row|No Need for Triage III}} | |||
{{achievement table row|Mapping the Realm: Zadnor}} | |||
{{achievement table row|Annals of Liberation}} | |||
|} | |||
==Images== | ==Images== | ||
<gallery mode="packed"> | <gallery mode="packed"> | ||
File:The Diablo Armament.jpg|The Diablo Armament | |||
File:Menenius render.png|Menenius | |||
File:Zadnor5.jpeg | File:Zadnor5.jpeg | ||
File:Zadnor4.jpeg | File:Zadnor4.jpeg | ||
File:Zadnor3.jpeg | File:Zadnor3.jpeg | ||
File:Zadnor2.jpeg | File:Zadnor2.jpeg | ||
File:Zadnor1. | File:Zadnor1.png | ||
</gallery> | </gallery> | ||
<gallery | <gallery heights=225px widths=400px mode=packed> | ||
Zandor Gear.jpg | Zandor Gear.jpg | ||
Zadnor guide map1.jpg | Zadnor guide map1.jpg | ||
Zadnor map.PNG | |||
</gallery> | </gallery> | ||
[[Category:Save the Queen]] | |||
==External Links== | |||
*[https://docs.google.com/spreadsheets/d/e/2PACX-1vTBt7Gb6qjwpi7YTBsCA1K6s_xVz_Zv_FAaz1qzLldsRY_4SrbMTM39EWHKPnAJshESFxDiG-_0Gt8l/pubhtml Bozja Ultimate spreadsheet by Vega Novus] | |||
*[https://docs.google.com/spreadsheets/d/12OTz5WzRtuNDrRRuvu9OSl-5SQkIEyN6SsySf0BLESQ/edit#gid=1138845215 EXP and Mettle acquisition spreadsheet] | |||
{{Duties nav|Field Operation}} | |||
[[Category:Field Operations]] [[Category:Shadowbringers]] [[Category:Save the Queen]] [[Category:Patch 5.5 Features]] | |||
Latest revision as of 13:05, 30 May 2024
- See also: The Dalriada and The Bozjan Southern Front
Zadnor
- Level
- 71 (Sync: 80)
- Item Level
- 0 (Sync: 430)
- Difficulty
- Normal
“The IVth Legion has retreated to the barren plateaus of Zadnor, their imperial flagship looming ominously on the horizon. What they hope to gain from their newfound base of operations remains to be seen, but the Resistance refuses to stand idle. As both sides are pushed to their limit, who will emerge the victor as the battle for Bozja reaches its bloody climax?
— In-game description
Zadnor is a level 71 field operation introduced in patch 5.55 with Shadowbringers.
This is an instanced area that up to 72 players can explore simultaneously, and is the second major battlefield of two in the Save the Queen: Blades of Gunnhildr storyline. Like the Bozjan Southern Front, Zadnor is a instanced encounter wherein players assist the Bozjan Resistance in their continued effort to reclaim their homeland from the IVth Imperial Legion.
Unlock
- Quest:
 A New Playing Field
 - Level: Disciple of War or Magic level 80
- Starting NPC: Marsak in Gangos (X:6.4 Y:5.7)
- Prerequisite: Players must first complete the main story quest
 Futures Rewritten and have completed the quest
  Fit for a Queen.
Mechanics
All duty-specific mechanics (e.g., forming parties, level sync) are identical to those of the Bozjan Southern Front. For more information, see that page.
Mettle is obtained in much greater quantities in this duty than in the Bozjan Southern Front or Delubrum Reginae, making this the ideal location to farm mettle. However, the other Save the Queen duties are sources of useful Lost Actions and other rewards that are not found in Zadnor.
Advancement - Mettle and Resistance Rank
Mettle and Resistance rank are similar in concept to experience and leveling, respectively. Mettle is earned by completing skirmishes and critical engagements, and on reaching a certain amounts of mettle, you will be able to increase your resistance rank by talking to the commander. Increasing your Resistance Rank is needed to progress within the front, and unlocks additional features.
Features unlocked by Resistance Rank
Note: Completion of the quest ![]() Let Me Holster That for You grants an additional 10 capacity to the maximum holster capacity shown below.
Let Me Holster That for You grants an additional 10 capacity to the maximum holster capacity shown below.
| Rank | Mettle Required | Maximum Holster Capacity | New Features / Content Unlocked |
|---|---|---|---|
| 16 | 72 | ||
| 17 | 74 | ||
| 18 | 76 | ||
| 19 | 78 | ||
| 20 | 80 | ||
| 21 | 82 | ||
| 22 | 84 | ||
| 23 | 86 | ||
| 24 | 88 | ||
| 25 | 89 |
Resistance Honors
Players who have reached the maximum Resistance rank can receive honors to permanently increase their strength when undertaking duties in Save the Queen areas.
Requirements
After reaching Resistance rank 25 and completing the quest ![]() March of the Bloody Queen, speak with the Resistance Councilor in Zadnor (X:35.7 Y:34.9).
March of the Bloody Queen, speak with the Resistance Councilor in Zadnor (X:35.7 Y:34.9).
Receiving Honors
After amassing sufficient mettle, players can speak with the Resistance Councilor to receive Proofs of Mettle in exchange for all of their stored mettle. It costs 20 million mettle to obtain 3 Proofs of Mettle. These may then be exchanged for three varieties of Resistance honors: Suns of Fortitude, Suns of Valor, or Suns of Succor. The number of proofs of mettle required to exchange for each Sun starts at one and increases by one every two of that Sun obtained, up to a maximum of five proofs of mettle needed.
| Ray Rank | Proofs of Mettle Cost | Cumulative Proofs Cost |
|---|---|---|
| 1 | 1 | 1 |
| 2 | 1 | 2 |
| 3 | 2 | 4 |
| 4 | 2 | 6 |
| 5 | 3 | 9 |
| 6 | 3 | 12 |
| 7 | 4 | 16 |
| 8 | 4 | 20 |
| 9 | 5 | 25 |
| 10 | 5 | 30 |
The number of proofs in your possession can be confirmed at any time via the HUD.
Effects
- Ray of Fortitude - Increases maximum HP (+5% per stack).
- Ray of Valor - Increases damage dealt (+3% per stack).
- Ray of Succor - Increases healing potency (+10% per stack).
The more of these honors in your possession (up to the cap of 10 each), the greater their effect. The number and types of each Sun in possession will be displayed as permanent buffs that are not lost on death. These effects are only active in Save the Queen duties.
Obtaining 10 of each Sun will complete the Suns of Bozja achievement, which unlocks "The Emblazoned" title.
The Dalriada
The Dalriada is a special engagement that takes place on a separate map and serves as the "finale" to Zadnor. Available after reaching Resistance Rank 25 and completing the prerequisite quests, it is a raid dungeon that allows up to a maximum of 48 players, and is accessed in the same way as Castrum Lacus Litore is in the Bozjan Southern Front. When it pops, click the Register button in the Resistance Recruitment list, and if you are selected, click Commence.
Overworld Enemies
Zone 1: The Southern Plateau
- (I) Zadnor Beetle
- (I) Zadnor Hippogryph
- (I) 4th Legion Nimrod
- (II) Zadnor Ziz
- (II) Zadnor Gaur
- (II) 4th Legion Infantry
- (II) Lightning Sprite
- (III) Zadnor Dhalmel
- (III) Zadnor Bhoot
- (III) 4th Legion Gunship
- (III) 4th Legion Hexadrone
- (III) Water Sprite
- (IV) Ice Sprite
- (V) Zadnor Dullahan
- (V) Wind Sprite
- (★) Vinegaroon Executioner
- (★) Anancus
- (★) Stratogryph
Zone 2: The Western Plateau
- (I) Zadnor Crawler
- (I) Zadnor Stoneshell
- (I) 4th Legion Death Machine
- (II) Zadnor Exoray
- (II) Zadnor Abaddon
- (II) 4th Legion Armored Weapon
- (II) Wind Sprite
- (III) Zadnor Grizzly
- (III) Zadnor Banshee
- (III) 4th Legion Satellite
- (III) 4th Legion Colossus
- (III) Ice Sprite
- (IV) Zadnor Sasquatch
- (IV) Zadnor Coeurl
- (IV) Zadnor Leshy
- (IV) Lightning Sprite
- (V) Zadnor Gourmand
- (V) Water Sprite
- (★) Earth Eater
- (★) Aglaophotis
- (★) Lord Ochu
Zone 3: The Northern Plateau
- (I) Zadnor Wamouracampa
- (I) Zadnor Cliffmole
- (I) 4th Legion Roader
- (II) Zadnor Yamaa
- (II) Zadnor Raptor
- (II) 4th Legion Rearguard
- (II) Water Sprite
- (III) Zadnor Wamoura
- (III) Imperial Dead
- (III) 4th Legion Cavalry
- (III) 4th Legion Helldiver
- (III) Lightning Sprite
- (IV) Zadnor Harpy
- (IV) Zadnor Lycanthrope
- (IV) Zadnor Decotitus
- (IV) Wind Sprite
- (V) Zadnor Wivre
- (V) Zadnor Golem
- (V) Zadnor Gagana
- (V) Zadnor Haunt
- (V) Ice Sprite
- (★) Glyptodon
- (★) Molten Scorpion
- (★) Vapula
FATEs
- See also: Zadnor FATEs
Bozjan Mythril Coins and Bozjan Platinum Coins will only drop after completing The Dalriada for the first time.
Zone 1: The Southern Plateau
Zone 2: The Western Plateau
Zone 3: The Northern Plateau
Spawning Critical Engagements
Critical Engagements and the FATEs preceding them do not spawn on their own. A sufficient amount of 4th Legion magitek machines need to be defeated to trigger a CE or CE chain. There are certain limitations:
- Each CE/CE chain as a cooldown of one hour
- Only one CE/CE chain can be active in Zadnor at the same time. The Dalriada is exempt from this.
- CEs/CE chains can be queued like Notorious Monsters in Eureka
The specific magitek machines that spawn a CE or CE chain can be pre-farmed. Killing sufficient numbers of corresponding machine will essentially queue the CE/CE chain, even if it is on cooldown or blocked by another CE. The CE will then start as soon as the blocking condition is lifted. Below is a table of the CE/CE chains in Zadnor with their corresponding triggering magitek machine.
Lost Actions
Forgotten Fragments
Field Records
Shops & Services
| Merchant Name | Merchant Location |
|---|---|
| Resistance Provisioner | (X:35.7, Y:34.3) |
| Resistance Quartermaster | (X:34.7, Y:35) |
| Resistance Supplier | (X:35.9, Y:34.2) |
Rewards
Achievements
This duty is associated with the following achievements:
| Name | Points | Task | Reward | Patch |
|---|---|---|---|---|
| No Man's Land I | 5 | Successfully complete 10 skirmishes in Bozja. | - | 5.35 |
| No Man's Land II | 5 | Successfully complete 50 skirmishes in Bozja. | - | 5.35 |
| No Man's Land III | 5 | Successfully complete 100 skirmishes in Bozja. | - | 5.35 |
| No Man's Land IV | 10 | Successfully complete 500 skirmishes in Bozja. | 5.35 | |
| Critical Role I | 10 | Complete 10 critical engagements in Bozja. | - | 5.35 |
| Critical Role II | 10 | Complete 50 critical engagements in Bozja. | - | 5.35 |
| Critical Role III | 10 | Complete 100 critical engagements in Bozja. | - | 5.35 |
| Critical Role IV | 20 | Complete 500 critical engagements in Bozja. | 5.35 | |
| Test Complete | 10 | Defeat Hypertuned Dabog in a duel in Zadnor. | 5.55 | |
| Might Makes Right | 10 | Defeat Menenius sas Lanatus in a duel in Zadnor. | 5.55 | |
| Untamed | 10 | Defeat Lyon the Beast King in a duel in Zadnor. | 5.55 | |
| Close Encounters of the Zadnoran Kind | 20 | Obtain the achievements Test Complete, Might Makes Right and Untamed. | 5.55 | |
| Sharper than Blades | 20 | Obtain the achievements Close Encounters and Close Encounters of the Zadnoran Kind. | 5.55 | |
| Hell to Pay I | 10 | Clear the Dalriada in Zadnor. | - | 5.55 |
| Hell to Pay II | 10 | Clear the Dalriada in Zadnor 10 times. | - | 5.55 |
| Hell to Pay III | 20 | Clear the Dalriada in Zadnor 50 times. | 5.55 | |
| No Need for Triage I | 5 | Resurrect another player in a Save the Queen area 10 times. | - | 5.35 |
| No Need for Triage II | 5 | Resurrect another player in a Save the Queen area 100 times. | - | 5.35 |
| No Need for Triage III | 10 | Resurrect another player in a Save the Queen area 500 times. | 5.35 | |
| Mapping the Realm: Zadnor | 10 | Discover every location in Zadnor. | - | 5.55 |
| Annals of Liberation | 10 | Complete all Zadnor entries in your field record. | - | 5.55 |

