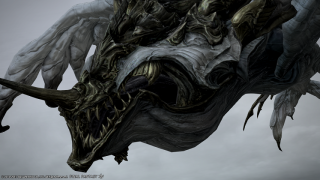
The Limitless Blue (Hard)
 This article is about the story-mode Main Scenario trial. For the level 60 challenge-mode trial, see The Limitless Blue (Extreme).
The Limitless Blue (Hard)
- Level
- 57 (Sync: 58)
- Difficulty
- Normal
- Party size
- Full Party
8 man • 2 2
2  4
4 
- Unsyncing
- Allowed
- Time limit
- 60 minutes
- Duty Finder
- Trials (Heavensward)
- Roulette
- Trials
- Req. quest
 Bolt, Chain, and Island
- Entrance
- The Sea of Clouds (X:19.5, Y:11.7, Z:2.2)
- Location
- The Limitless Blue
- Region
- Abalathia's Spine
- Patch
- 3.0
 The Echo
- On wipe: +10% (max +50%)
“Inspiration often finds us in surprising ways. So it was that a casual mention of skyfishing helped Cid Garlond conceive a plan to lure out Bismarck, the Lord of the Mists, by using the Enterprise to tow an island through the Sea of Clouds. After binding the beast with chains fired from dragonkillers, he hopes you can engage it in the traditional fashion. Though the plan is somewhat sound in theory, there is no telling how effective it will be in practice. Nevertheless, the engineer has seen you through many dangerous situations in the past, so at least the odds are in his favor...
— In-game description
The Limitless Blue (Hard) is a level 57 trial introduced in patch 3.0 with Heavensward.
Strategy
 Lord of the Mists: Bismarck
Bismarck is a fairly unusual trial in that, for most of the encounter players won't actually be damaging the primal itself, but rather dealing with all manner of adds. The fight itself takes place upon a floating rock which has its own separate HP bar, if this bar drops to around 24% then the raid will wipe. Players should also be wary of falling off of the edge of the platform, which will cause death. Before beginning the fight players should take note of the shield device, as well as the two harpoons on either side.
Phase 1
The fight begins with Bismarck instantly dealing a damaging blow to the platform as well as spawning two adds (Vuk'maii Vundu, Lan'maii Vundu). Players should deal with the adds (which can cause knockback) while avoiding any AoEs. Periodically players will see Bismarck do a specific dive animation, this is the signal that the shield device should be activated as Bismarck is about to ram the platform. Failing to activate the shield device, or activating it too early, will lead to an increased amount of damage being taken by the platform.
After a set amount of time a message will appear stating that the harpoons are active, players should activate these as soon as possible, failing to do so will lead to Bismarck disabling them and leading to another cycle. Once both harpoons are active Bismarck will be chained to the side of the platform and its Chitin Carapace will be targetable. Players can only cause damage to the chitin while physically on Bismarck, though this will also cause a minor DoT to appear on said players. Players should ideally destroy the chitin in one cycle (although two cycles is fine) as failing to destroy it quick enough will cause Bismarck to pull away and repeat its initial actions (adds, ramming the platform etc.).
Phase 2
Once its chitin has been destroyed Bismarck will pull away from the platform again and summon two larger adds (Ul'sanuwa, So'sanuwa). Each tank should establish aggro on one and spread them apart (they will tether and receive a significant Vulnerability Down buff if near of each other). The tanks should face them away from other players, as they have a frontal cleave. At the same time tornadoes will appear and should be avoided. Bismarck will also periodically summon a set of exploding bubbles which players should avoid. After a certain amount of time or after both adds are killed, Bismarck will return and cast a raid wide AoE before once returning to the side of the platform. During this the shield device will also break, essentially setting a harder limit on how long the encounter can last. If any of the adds are still alive, this attack will most likely cause a wipe.
Phase 3
This functions largely like Phase 1, although Bismarck will summon four adds and without the shield generator the damage to the island cannot be reduced. With the chitin destroyed Bismarck's Corona can now be attacked directly when chained. The key mechanic in this phase is the two Vapor Bubble adds. Bismarck will alternate between thunder and rain in that order. When the weather is thunder, defeating the Vapor adds will result in a lightning attack striking a random player for heavy damage for each add destroyed. Conversely, if they are left alive, the lightning strike will instead attack the adds, destroying them. If players are stacked for the lightning attack, the combined damage will be fatal enough to potentially cause a wipe. If the adds are not defeated during the rain phase, they will get a ![]() Damage Up buff, increasing the power of their auto attacks substantially.
Damage Up buff, increasing the power of their auto attacks substantially.
Loot
- Bismarck Card (Drops at a fixed rate.)
- Bismarck's Baleen Drops directly from boss, must be synced
Dialogue
Cid: Get ready, everyone! Here it comes!
Cid: Use the field generator!
If the island goes, so do you!
System: The dragonkillers are readied!
Cid: What in the seven hells was that!?
On your guard!
Cid: I'm detecting a huge increase in─
Oh gods, brace yourselves!
Cid: Dammit! We've lost the generator!
System: Bismarck seizes control of the clouds...
System: The dragonkillers are readied!

