The Howling Eye (Extreme)
The Howling Eye (Extreme) is a level 50 trial that requires the player to defeat Garuda (Extreme). It requires a full party of 8 players and average item level (iLevel) of 65 and above. To unlock the trial, player must be on the quest Galeforce Warning and should have completed Primal Nature and defeated Titan (Hard).
- Players can start the questline by talking to Urianger at The Waking Sands (x6,y6).
- Players will receive 25 Tomestones of Philosophy and 19 Tomestones of Mythology for the completion of trial.
Strategy
Phase 1
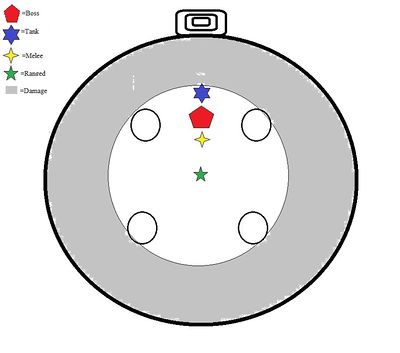
As soon as you pull you'll have 20 seconds before she enters phase 1. This is a good time to blow DPS cooldowns as there is no movement everyone will be alive. Melee should be near the Boss and Ranged should stack up right in between the pillars, as shown in the Phase 1 positioning below. After these 20 seconds she will cast Calm Within the Storm, which is the purple AOE around the edge of the arena which you would have seen from Hard mode. Tanks and melee should run into the center of the arena, then everyone should hide behind the pillars for the Mistral Shriek. The first one comes from the North, so make sure you are on the south side of the pillars. When she returns it'd be best to position to like below:

The central and clumped positioning is so that Frictions cast on melee or the Ranged do not damage the pillars, as they are still vitally important for surviving Reckoning later.
As soon as she returns she will summon Razor plumes (which explode for about 2000 damage) and 1 Satin plume. Every DPS and the Offtank need to be ready for this. It's best to have 2 DPS focusing down the satin plume as the rest kill Razor Plumes.
When the plumes are down do as much damage to the boss as possible because if you hit 70% you'll enter phase 2. If you don't manage to trigger phase 2 she will teleport away and do another Mistral Shriek from the east, so use the pillars accordingly.
- TL;DR: Dps Boss -> Hide behind Pillars -> Kill Plumes -> DPS boss-> Be ready to hide behind pillars if you don't trigger phase 2
Phase 2
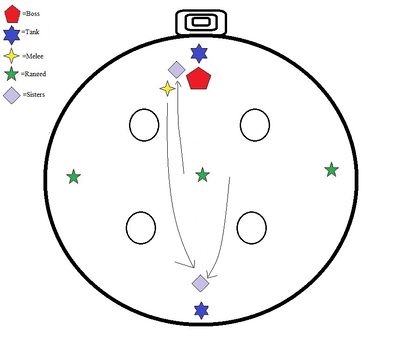
Phase 2 is when Garuda will summon her two minions, Chirada and Suprana. The first thing you'll notice are the lines connecting them. Chirada will always have a green line and Suprana will have red. These colored lines put a shield on Garuda until the adds are dead and a scaling buff if they tanked close to each other. This means your main tank will need to pull Suprana to the north and tank her as well as Garuda. The off tank will pull Chirada to the south, reference the position below:

The whole phase is DPS race to kill the adds before Garuda casts Reckoning. If even 1 add is alive Reckoning will deal 9k damage. DPS down Chirada first then move on to Suprana. Any spare time should be spent DPSing Garuda.
- TL;DR: Suprana and Garuda tanked North -> Chirada taken far south -> Dps Chirada -> DPS Suprana -> DPS Boss -> Survive Reckoning
Phase 3
In Phase 3 the plumes will return but you won't have to protect any pillars. Within the Razor Plumes that spawn there will be a Spiny Plume. This Spiny Plume must be kept alive as it's vital later on in the phase. Have the offtank taunt the Spiny Plume and keep aggro on it with non-damage abilities (flash, etc). This Plume will deal no damage but will apply a stacking debuff on the tank, Thermal Low, which will cause large AoE damage if it reaches 3 stacks. Tanks will need to provoke the Plume off of each other accordingly.
When Garuda teleports away she will cast an unavoidable Mistral Shriek. This is where the Spiny Plume comes into play - all DPS must switch to the Spiny Plume and kill it. It will leave a large AoE patch on the floor which will turn into bubble. This bubble will grant everyone standing inside massive wind resistance to enable them to survive the Shriek.
- TL;DR: Kill Razor Plumes -> Taunt Spiny Plume between tanks -> DPS Garuda -> Garuda teleports -> Kill Spiny Plume -> Avoid Aoe -> Run into bubble.
Phase 4
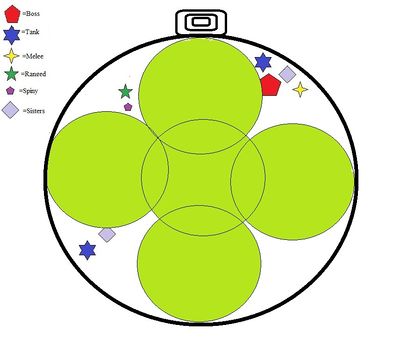
This is the final phase of the encounter. After casting Shriek Garuda will teleport to the middle again, dropping an AoE. All non tanks should run to the North-East to start with to avoid the AoE. She will then summon the Twins again (Suprana to the west, Chirata to the east). The tanks should pull their respective targets to a position to like below:

The rest of the phase is similar to phase 2, avoid as much damage as possible whilst killing Chirada then Suprana. However, another spiny plume will spawn and after a set time Garuda will cast Reckoning again. You will need to use the plume's shield to survive it. It's vital to have the tanks topped up when this happens.
- TL;DR: Get in position -> Pull Twins -> Kill Chirada -> Kill Suprana -> DPS Garuda -> Kill Spiny Plume -> Hide in bubble.
After phase 4 it'll revert back to phase 3 until Garuda is defeated.
Loot
| Item | Icon | Slot | Level | iLvl | Job | Def | Magic Def | Stats |
|---|---|---|---|---|---|---|---|---|
| Vortex Ring Of Aiming | Ring | 50 | 90 | Bard | 1 | 1 | Dexterity +13, Critical Hit Rate +11, Skill Speed +16 | |
| Vortex Ring Of Casting | Ring | 50 | 90 | Black Mage Summoner |
1 | 1 | Intelligence +13, Determination +8, Accuracy +16 | |
| Vortex Ring Of Fending | Ring | 50 | 90 | Warrior Paladin |
1 | 1 | Vitality +15, Critical Hit Rate +11, Determination +11 | |
| Vortex Ring Of Healing | Ring | 50 | 90 | White Mage Scholar |
1 | 1 | Mind +13, Spell Speed +11, Determination +11 | |
| Vortex Ring Of Striking | Ring | 50 | 90 | Dragoon Monk |
1 | 1 | Strength +13, Accuracy +11, Critical Hit Rate +16 |
Lore
An attack by the primal Garuda has annihilated an entire brigade of Twin Adders, with the sole survivor left to tell a tale writ in terror and misery. Garuda's powers are far greater than they should be; left with few options and all but one of them almost certain failures, the Order of the Twin Adder turns to the Scions of the Seventh Dawn, so that they may summon a Warrior of Light.
