Difference between revisions of "Copperbell Mines (Hard)"
Andrealinia (talk | contribs) m (Just standardised layout) |
|||
| Line 1: | Line 1: | ||
{{#ev:youtube|eByLJAFrDg0| | {{TOCRIGHT}} | ||
[[File:copperbell mines hard2.jpg| | {{#ev:youtube|eByLJAFrDg0|350|right}} | ||
[[File:copperbell mines hard1.jpg| | {{See also|Copperbell Mines)}} | ||
[[File:copperbell mines hard2.jpg|350px|right]] | |||
[[File:copperbell mines hard1.jpg|350px|right]] | |||
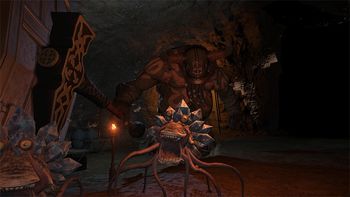
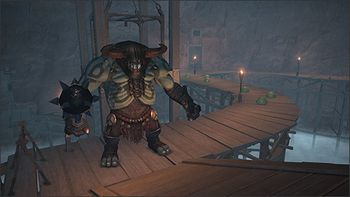
Copperbell Mines (Hard) is a level 50 [[dungeons|dungeon]] released in [[Patch Notes|patch]] 2.1. It is the hard mode of [[Copperbell Mines]] dungeon and requires a light party of 4 players with iLvl (item level) of 48 or higher. Copperbell Mines (Hard) is unlocked after completing [[The Praetorium]] and started the [[quests|quest]] [[Out of Sight, Out of Mine]]. | Copperbell Mines (Hard) is a level 50 [[dungeons|dungeon]] released in [[Patch Notes|patch]] 2.1. It is the hard mode of [[Copperbell Mines]] dungeon and requires a light party of 4 players with iLvl (item level) of 48 or higher. Copperbell Mines (Hard) is unlocked after completing [[The Praetorium]] and started the [[quests|quest]] [[Out of Sight, Out of Mine]]. | ||
| Line 30: | Line 32: | ||
Occasionally, a Sand Worm will spawn. When the text "The abyss worm is searching for fodder" appears on screen, one of the players should pick up the object Crystallized Rock and place it somewhere in the sand. Players should move away from the rock to avoid taking damage from the Sand Worm. If the rock is not placed, the Sand Worm will cast Bottomless Desert and pull all players to the middle of the room and deal heavy damage to all players. | Occasionally, a Sand Worm will spawn. When the text "The abyss worm is searching for fodder" appears on screen, one of the players should pick up the object Crystallized Rock and place it somewhere in the sand. Players should move away from the rock to avoid taking damage from the Sand Worm. If the rock is not placed, the Sand Worm will cast Bottomless Desert and pull all players to the middle of the room and deal heavy damage to all players. | ||
==Loot== | ==Loot== | ||
===Accessories=== | |||
{| class="wikitable sortable" style="text-align:center" width="75%" | {| class="wikitable sortable" style="text-align:center" width="75%" | ||
|- | |- | ||
!Item | !Item | ||
!Icon | !Icon | ||
!Level | !Item Level | ||
!Requirement | !Requirement | ||
!Slot | !Slot | ||
! | !Defence | ||
!Magic Defence | !Magic Defence | ||
!Stats and Attributes | !Stats and Attributes | ||
|- | |- | ||
|[[ | |[[Hoplite Wristlets]] ||[[File:hoplite wristlets icon1.png]] || 60 || [[Disciples of War]] <br /> Level 50 || Wrists || 1 || 1 ||align = "left" | [[Vitality]] +8, [[Accuracy]] +11, [[Parry]] +8 | ||
|- | |- | ||
|[[ | |[[Strategos Earrings]] || [[file:strategos earrings icon1.png]]|| 60 || [[Disciples of Magic]] <br /> Level 50 || Earrings || 1 || 1 ||align = "left" | [[Mind]] +8, [[Piety]] +5, [[Spell Speed]] +11 | ||
|- | |- | ||
|[[ | |[[Toxotes Wristlets]] || [[file:toxotes wristlets icon1.png]]|| 60 || [[classes|All Classes]] <br /> Level 50 || Wrists || 1 || 1 ||align = "left" | [[Dexterity]] +8, [[Skill Speed]] +8, [[Determination]] +8 | ||
|} | |||
===Armour=== | |||
{| class="wikitable sortable" style="text-align:center" width="75%" | |||
|- | |- | ||
!Item | |||
!Icon | |||
!Item Level | |||
!Requirement | |||
!Slot | |||
!Defence | |||
!Magic Defence | |||
!Stats and Attributes | |||
|- | |- | ||
|[[ | |[[Blessed Gown]] || [[file:blessed gown icon1.png]]||60 || [[Conjurer|CNJ]], [[White Mage|WHM]], [[Scholar|SCH]] <br /> Level 50 || Body || 53 || 100 ||align = "left" | [[Vitality]] +16, [[Mind]] +16, [[Piety]] +10, [[Critical Hit Rate]] +24 | ||
|- | |- | ||
|[[ | |[[Lord's Plate Belt]] || [[file:lords plate belt icon1.png]]|| 60 || [[Gladiator|GLA]], [[Marauder|MRD]], [[Paladin|PLD]], [[Warrior|WAR]] <br /> Level 50 || Waist || 92 || 92 ||align = "left" | [[Strength]] +8, [[Vitality]] +8, [[Determination]] +8, [[Parry]] +8 | ||
|- | |- | ||
|[[ | |[[Thick Skirt]] || [[file:thick skirt icon1.png]]|| 60 || [[Lancer|LNC]], [[Dragoon|DRG]] <br /> Level 50 || Legs || 100 || 53 ||align = "left" | [[Strength]] +16, [[Vitality]] +18, [[Accuracy]] +24, [[Determination]] +12 | ||
|- | |- | ||
|[[War Mesail]] || [[File:war mesail icon1.png]] | |[[Thick Sollerets]] || [[file:thick sollerets icon1.png]]|| 60 || [[Lancer|LNC]], [[Dragoon|DRG]] <br /> Level 50 || Feet || 72 || 38 ||align = "left" | [[Strength]] +10, [[Vitality]] +11, [[Critical Hit Rate]] +11, [[Determination]] +10 | ||
|- | |||
|[[War Mesail]] || [[File:war mesail icon1.png]]|| 60 || [[Pugilist|PGL]], [[Monk|MNK]] <br /> Level 50 || Head || 55 || 55 ||align = "left" | [[Strength]] +10, [[Vitality]] +11, [[Critical Hit Rate]] +15, [[Skill Speed]] +11 | |||
|- | |- | ||
|} | |} | ||
=== Minions === | |||
*[[Slime Puddle]] | |||
==Lore== | ==Lore== | ||
Thanks to the valiant efforts of Eorzea's adventurers, the horrific hecatoncheires were purged from Copperbell Mines. Amajina & Sons Mineral Concern would waste no time in resuming efforts to expand the mines donward in an attempt to tap yet-undiscovered veins of valuable metal. | Thanks to the valiant efforts of Eorzea's adventurers, the horrific hecatoncheires were purged from Copperbell Mines. Amajina & Sons Mineral Concern would waste no time in resuming efforts to expand the mines donward in an attempt to tap yet-undiscovered veins of valuable metal. | ||
Revision as of 15:27, 31 January 2014
- See also: Copperbell Mines)
Copperbell Mines (Hard) is a level 50 dungeon released in patch 2.1. It is the hard mode of Copperbell Mines dungeon and requires a light party of 4 players with iLvl (item level) of 48 or higher. Copperbell Mines (Hard) is unlocked after completing The Praetorium and started the quest Out of Sight, Out of Mine.
- Players are awarded with 100 Tomestones of Philosophy and 50 Tomestones of Mythology for completing Copperbell Mines (Hard).
Bosses
Hecatoncheir Mastermind
Hecatoncheir Mastermind will use Darkfire every 45 - 60 seconds. The fire will cover a portion of the platform, forcing players to move down further down the bridge. Whenever Hecatoncheir uses Darkfire, a Flamebeau (bomb type monster) spawns. The Flamebeau will attempt to move towards the fire. Kill the Flamebeau ASAP. If it reaches the burning ground, it will explode and kill all players. If it is left alone it will self-destruct and wipe the party. Stun the bomb if necessary.
- Do not let Flamebeau touch the burning ground casted by the boss.
- Kill Flamebeau ASAP or it will explode and insta-kill the entire party.
Gogmagolem
Gogmagolem is a spriggan operating a rock giant. The boss not only has very high defense, it will also move back and forth in the boss room.
In the boss room, there is a object named Improved Blasting Device. One of your party member should operate the Device to spawn a Waymaker Bomb. That player should pick up the bomb. When it says it is going to explode in 5 seconds, place it in the path of the Gogmagolem. This is the main method of damaging the boss. Black bombs will also spawn near the Blasting Device and the center of the room. These will Self-Destruct, so move away quickly.
The other DPS should focus on killing all of the Kindling Sprites that spawn around the edges of the room.
When the Golem dies, the spprigan named Biggy will spawn. Kill Biggy and move away from very large bombs because these bombs will explode in a very large radius.
Ouranos
Non-tank players should not stand in front of the boss. Avoid its circular AoE attacks and kill Giga adds when they spawn.
Occasionally, a Sand Worm will spawn. When the text "The abyss worm is searching for fodder" appears on screen, one of the players should pick up the object Crystallized Rock and place it somewhere in the sand. Players should move away from the rock to avoid taking damage from the Sand Worm. If the rock is not placed, the Sand Worm will cast Bottomless Desert and pull all players to the middle of the room and deal heavy damage to all players.
Loot
Accessories
| Item | Icon | Item Level | Requirement | Slot | Defence | Magic Defence | Stats and Attributes |
|---|---|---|---|---|---|---|---|
| Hoplite Wristlets | 60 | Disciples of War Level 50 |
Wrists | 1 | 1 | Vitality +8, Accuracy +11, Parry +8 | |
| Strategos Earrings | 60 | Disciples of Magic Level 50 |
Earrings | 1 | 1 | Mind +8, Piety +5, Spell Speed +11 | |
| Toxotes Wristlets | 60 | All Classes Level 50 |
Wrists | 1 | 1 | Dexterity +8, Skill Speed +8, Determination +8 |
Armour
| Item | Icon | Item Level | Requirement | Slot | Defence | Magic Defence | Stats and Attributes |
|---|---|---|---|---|---|---|---|
| Blessed Gown | 60 | CNJ, WHM, SCH Level 50 |
Body | 53 | 100 | Vitality +16, Mind +16, Piety +10, Critical Hit Rate +24 | |
| Lord's Plate Belt | 60 | GLA, MRD, PLD, WAR Level 50 |
Waist | 92 | 92 | Strength +8, Vitality +8, Determination +8, Parry +8 | |
| Thick Skirt | 60 | LNC, DRG Level 50 |
Legs | 100 | 53 | Strength +16, Vitality +18, Accuracy +24, Determination +12 | |
| Thick Sollerets | 60 | LNC, DRG Level 50 |
Feet | 72 | 38 | Strength +10, Vitality +11, Critical Hit Rate +11, Determination +10 | |
| War Mesail | 60 | PGL, MNK Level 50 |
Head | 55 | 55 | Strength +10, Vitality +11, Critical Hit Rate +15, Skill Speed +11 |
Minions
Lore
Thanks to the valiant efforts of Eorzea's adventurers, the horrific hecatoncheires were purged from Copperbell Mines. Amajina & Sons Mineral Concern would waste no time in resuming efforts to expand the mines donward in an attempt to tap yet-undiscovered veins of valuable metal. The dark depths of Copperbell Mines would reveal not precious ore, however, but a faction of the hecatoncheires clan yet to be expelled from the mines. Adventurers the realm over must band together once more to rid Copperbell Mines of these brutish barbarians once and for all.
Freed from three hundred years of imprisonment, the hecatoncheires seized and held control of Copperbell Mines, until Eorzea’s adventurers put an end to their revolt. Amajina & Sons Mineral Concern resumed operations almost immediately, dispatching engineers into the deepest shafts. However, in a not altogether surprising development, the engineers have gone missing, and another band of hecatoncheires is believed to be responsible.

