Difference between revisions of "The Howling Eye (Extreme)"
| Line 61: | Line 61: | ||
==Solo strategy (level 70+)== | ==Solo strategy (level 70+)== | ||
With a high player level (70 | With a high player level (70+) and high-end gear, The Howling Eye (Extreme) can be finished solo or with a small party. To do so, enter the trial unsynced by selecting "[[Unrestricted Party]]" in the duty finder options. | ||
With sufficient defenses, healing and damage, the fight's mechanics can be largely ignored, and all damage focused on Garuda. | With sufficient defenses, healing and damage, the fight's mechanics can be largely ignored, and all damage focused on Garuda. | ||
Revision as of 01:49, 24 October 2022
- See also: The Howling Eye, The Howling Eye (Hard) and The Weapon's Refrain (Ultimate)
The Howling Eye (Extreme)
- Level
- 50 (Sync: 50)
- Item Level
- 65
- Difficulty
- Extreme
- Party size
- Full Party
8 man • 2 2
2  4
4 
- Unsyncing
- Allowed
- Time limit
- 60 minutes
- Roulette
- Mentor
- Tomestones
 20
20 - Req. quest
 Gale-force Warning
- Location
- The Howling Eye
- Region
- Coerthas
- Patch
- 2.1
“An attack by the primal Garuda has annihilated an entire brigade of Twin Adder, with the sole survivor left to tell a tale writ in terror and misery. Garuda's powers are far greater than they should be; left with few options and all but one of them almost certain failures, the Order of the Twin Adder turns to the Scions of the Seventh Dawn, so that they may summon a Warrior of Light.
— In-game description
The Howling Eye (Extreme) is a level 50 trial introduced in patch 2.1.
Strategy
 Lady of the Vortex: Garuda
Phase 1
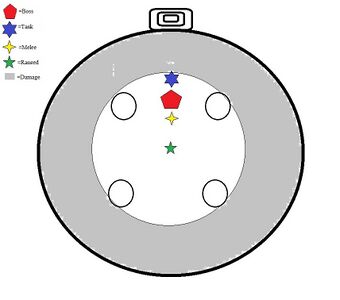
This is very similar to the other versions - however, when the Razor Plumes appear, make sure to kill the Satin Plume first. Otherwise, the Satin Plume will sleep everyone.
Phase 2
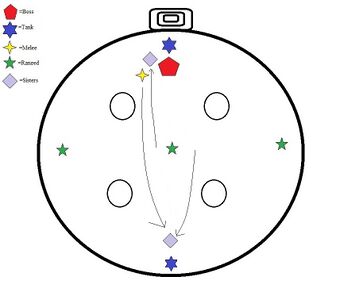
Garuda will spawn two adds, Chirada and Suparna. The off-tank should hold Chirada while the main tank should hold Suparna. Separate them and kill one at a time. Generally you will be killing Chirada first.
At the end of this phase Garuda will teleport to the center and cast Reckoning. There's no dodging this, so stack up in the center. This will wipe if too many stones are destroyed.
Phase 3
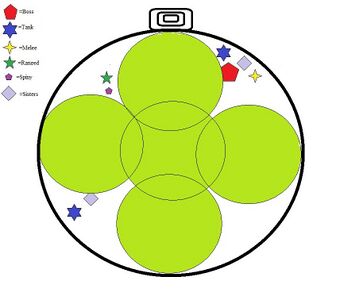
Garuda will destroy the pillars, and summon more Razor Plumes. This time they will have a Spiny Plume with them. Kill the Razor Plumes, but do not kill the Spiny Plume. The Spiny Plume will apply "Thermal Low" to the tank it is agro'd on. Tanks must swap agro on the spiny plume at 2 stacks. At 3 stacks of "Thermal Low" the party will wipe.
When Garuda vanishes, kill the Spiny Plume. This will create a shield that will protect you from wiping when Garuda reappears. Dodge the Spiny Plume's AoE when it dies and hide under its shield.
Phase 4
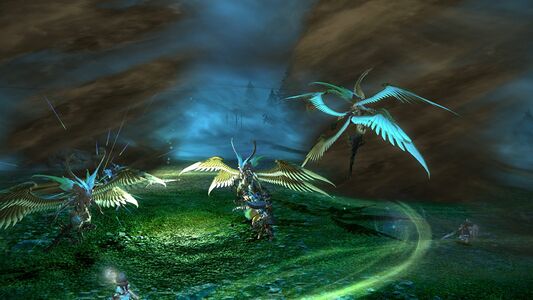
Garuda will summon a Spiny Plume, Chirada and Suparna, and a large number of green whirlwinds.
There are safe spots in the northwest, northeast, southwest, and southeast to stand to avoid the whirlwinds.
As in Phase 2, separate Chirada and Suparna, kill them one at a time. Garuda will vanish once they both die.
As in Phase 3, avoid killing the Spiny Plume until Garuda vanishes, then hide under its shield. The Spiny Plume will act just like it did in phase 3 with the "Thermal Low" stacks.
You'll cycle between Phase 3 and Phase 4 until Garuda dies.
Attack Images
Solo strategy (level 70+)
With a high player level (70+) and high-end gear, The Howling Eye (Extreme) can be finished solo or with a small party. To do so, enter the trial unsynced by selecting "Unrestricted Party" in the duty finder options.
With sufficient defenses, healing and damage, the fight's mechanics can be largely ignored, and all damage focused on Garuda.
Loot
- Garuda Card (Drops at a fixed rate.)
 Treasure Coffer
| Name | Type | Item Level | Rarity | Quantity |
|---|---|---|---|---|
| Vortex Ring of Fending | Ring | 90 | Blue | 1 |
| Vortex Ring of Slaying | Ring | 90 | Blue | 1 |
| Vortex Ring of Aiming | Ring | 90 | Blue | 1 |
| Vortex Ring of Casting | Ring | 90 | Blue | 1 |
| Vortex Ring of Healing | Ring | 90 | Blue | 1 |
| Vortex Feather | Material | N/A | Basic | 1 |
| Xanthos Whistle | Other | N/A | Basic | 1 |
| Nightmare Whistle | Other | 1 | Basic | 1 |
| Faded Copy of Fallen Angel | Orchestrion Roll | N/A | Basic | 1 |


