Difference between revisions of "Thornmarch (Hard)"
Freedom4556 (talk | contribs) m |
Freedom4556 (talk | contribs) m (→Phase 2) |
||
| Line 51: | Line 51: | ||
===Phase 2=== | ===Phase 2=== | ||
MT gets hate on King as soon as he comes up (you can attack him while he's charming momento moogle) and pulls him to the very edge. MT will also provoke the WAR and keep shield lobbing/tomahawking | MT gets hate on King as soon as he comes up (you can attack him while he's charming momento moogle) and pulls him to the very edge. MT will also provoke the WAR and keep shield lobbing/tomahawking both while kiting in a semi-circle fashion around the edge. This is all the main tank does the entire fight. Keep the WAR and the king out of the BRD songs and keep running back and forth along the edge of the circle path. | ||
The rest of the party proceeds along the kill order with the OT saving their stun for BLM flare. | The rest of the party proceeds along the kill order with the OT saving their stun for BLM flare. | ||
Revision as of 05:28, 14 March 2022
- See also: Thornmarch (Extreme)
Thornmarch (Hard)
- Level
- 50 (Sync: 50)
- Item Level
- 54
- Difficulty
- Normal
- Party size
- Full Party
8 man • 2 2
2  4
4 
- Unsyncing
- Allowed
- Time limit
- 60 minutes
- Roulette
- Trials
- Tomestones
 12
12 - Req. quest
 You Have Selected Regicide
- Patch
- 2.1
“Good King Moggle Mog, the Twelfth of His Name, has once more been called forth by the Mogglesguard. Though the king is not considered a primal in the strictest sense, he poses a threat not unlike that of the beastman gods, in that his influence could corrupt his people's peaceful nature. And so, like those other aether-starved beings, he too must be felled for the sake of the realm.
— In-game description
Thornmarch (Hard) is a level 50 trial introduced in patch 2.1.
Strategy
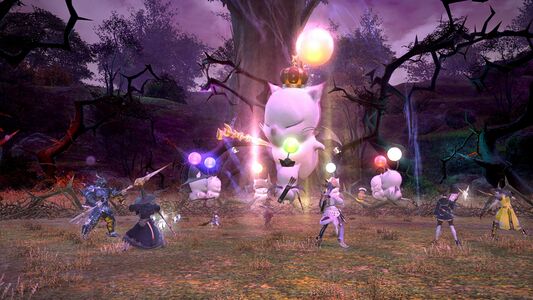
 Primal: Good King Moggle Mog XII
There are 2 phases and a kill priority for all of the moogles which is the same in both phases. The priority is BLM > WHM > BRD > ROG > ARC > PLD > WAR > King. (This is simply the way I've always done it. I'm not sure if you can kill the King before any of the other ones, or what happens if you do. If you can, and nothing bad happens, kill King before WAR). You want to put King towards the end because the King spell Momento Moogle/Mori will do party wide damage based on how many of the minions are alive at the time.
If you mark moogles in phase 1, the marks will stay on them in phase 2. So have someone mark them BLM(1), WHM(2), BRD(3), ROG(4), ARC(5), PLD(X1), WAR(X2).
Phase 1
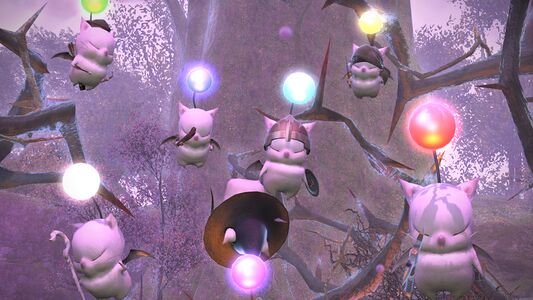
Moogles will pop up as a function of time. At the start, only the PLD is on the Battlefield. 20 seconds after engaging, the ARC and BLM enter. 30 seconds more, the WHM, ROG and WAR join. And 40 seconds after the BRD pops in. Once the seven have popped, you have roughly 60 seconds before all seven respawn and group together to summon the King.
Moogles in order of Phase 1 appearance:
 Whiskerwall Kupdi Koop (PLD) light blue pom: Uses Spinning Mogshield, a circular AoE attack around him. Also charms players.
 Pukla Puki the Pomburner (BLM) purple pom: Casts Flare which has a large range and needs to be stunned or silenced. Ring is a big orange ring on the ground. King gets meteor when she dies. Avoidable. Somewhat responsive to hate.
 WoolyWart Kupu Kogi (ARC) light green pom: Sits in a corner of the battlefield randomly targeting a player. The targeted player will be identified by a large floating Crosshair above them. After a short delay he will use Eagle Eye Shot, a five hit ranged attack that may deal considerable damage.
 Furryfoot Kupli Kipp (WHM) white pom: Casts holy and cures moogles. King gets holy when he dies. I think holy does less damage the further you are away from it, but not sure. Doesn't respond to hate.
 Pukna Pako the Tailturner (ROG) yellow pom: Randomly targets a player, then running up and stabbing them. She also spreads a large circle that does heavy poison damage around her feet, lasts a good while.
 Ruffletuft Kupta Kapa (WAR) red pom: AoE cone that does some damage. Decent hitting auto attack. Large AoE Steel Cyclone as the fight goes on and some moogles die. Simply get out of the large circle if you're not a tank. Circle is black with a green outline. King gets this when he dies. Responds to hate.
 Puksi Piko the Shaggysong (BRD) blue pom: Has an attack bonus song to other moogles and a damage song that does AoE around her. Somewhat responsive to hate.
For the fight, have everyone try to kill PLD before the other moogles pop. Avoid the circle stun that it does. If the other moogles pop, go for the BLM while MT finishes the PLD off solo. ARC and BLM pop next. MT will finish PLD and start to work on ARC who will go to the outside and sit there. The rest of the party proceeds on the kill order with the OT trying to tank as many of the other moogles as possible and keeping them off of healers. MT will pick up the WAR and keep soloing the ARC while positioning the WAR so that his overpower is oriented outside of the circle. Ignore the WAR for this entire phase. Just keep him overpowering the outside and solo the ARC. The group will continue killing moogles and finish the ARC off just in time for them to summon the King.
Only the WAR should be alive when King is summoned meaning that Momento Moogle will do very little damage. If more than the WAR is alive by the time they summon, you will take more damage, with 3 moogles up being a wipe.
Phase 2
MT gets hate on King as soon as he comes up (you can attack him while he's charming momento moogle) and pulls him to the very edge. MT will also provoke the WAR and keep shield lobbing/tomahawking both while kiting in a semi-circle fashion around the edge. This is all the main tank does the entire fight. Keep the WAR and the king out of the BRD songs and keep running back and forth along the edge of the circle path.
The rest of the party proceeds along the kill order with the OT saving their stun for BLM flare.
The whole fight is a damage check. The king will do momento moogle in phase 2 to check how many moogles are alive and if too many are alive, you will all die because your damage was too slow.
As long as the king's line attack and the WAR's aoe are as far from the rest of the party as possible and facing the outside, you should have no trouble winning.
Loot
- Good King Moggle Mog XII Card (Drops at a fixed rate.)
- Moggle Mog XII's Whisker
 Treasure Coffer
| Name | Type | Item Level | Rarity | Quantity |
|---|---|---|---|---|
| Morbid Mogblade | Gladiator's Arm | 75 | Blue | 1 |
| Malignant Mogaxe | Marauder's Arm | 75 | Blue | 1 |
| Monstrous Mogsword | Dark Knight's Arm | 75 | Blue | 1 |
| Melancholy Mogfork | Lancer's Arm | 75 | Blue | 1 |
| Murderous Mogfists | Pugilist's Arm | 75 | Blue | 1 |
| Maliferous Mogtana | Samurai's Arm | 75 | Blue | 1 |
| Mortal Mogknives | Rogue's Arm | 75 | Blue | 1 |
| Mischievous Mogbow | Archer's Arm | 75 | Blue | 1 |
| Menacing Mog Gun | Machinist's Arm | 75 | Blue | 1 |
| Maleficent Mogstaff | Two-handed Thaumaturge's Arm | 75 | Blue | 1 |
| Majestic Mogtome | Arcanist's Grimoire | 75 | Blue | 1 |
| Manipulative Mogfoil | Red Mage's Arm | 75 | Blue | 1 |
| Mighty Mogrod | Two-handed Conjurer's Arm | 75 | Blue | 1 |
| Munificent Mogtome | Scholar's Arm | 75 | Blue | 1 |
| Moonlit Moglobe | Astrologian's Arm | 75 | Blue | 1 |
| Mogpon Coffer (IL 75) | Other | N/A | Basic | 1 |
Lore
Legend holds that, in a time long forgotten, mooglekind abided in the heavens as loyal servants of the gods.
However, a war of deific proportions would erupt, triggered by a feud over a single goblet of wine. Growing weary of the conflict, the reigning moogle monarch, Good King Moggle Mog XII, resolved to lead his people to the realm of mortals in secret, that they might again know a life of peace.
Alas, the distance to the land below proved too great for little moogle wings. After much deliberation, it was decided that the journey must be made by rope, the longest that has ever been woven. So it was that the king grasped onto one end of this lifeline as his subjects, one after the next, half clambered, half slid their way to the Promised Land. In this manner all the moogles were able to arrive at their destination, whole of body and joyous of spirit. That is, all of them save for Good King Moggle Mog XII, who had not the means to lower himself.
Mourning their lost king and touched by his sacrifice, the moogles have since abstained from naming a successor to the crown. Even now, they hold fast to the belief that their beloved monarch will one day return before them in all his might and majesty.


