Difference between revisions of "The Copied Factory"
m |
|||
| Line 69: | Line 69: | ||
===[[File:Aggressive difficulty r6.png|link=]] [[Engels]]=== | ===[[File:Aggressive difficulty r6.png|link=]] [[Engels]]=== | ||
* Marx Smash: Large AOE inflicting Vuln Up. | |||
** Raises one arm (left/right): Left or right half, same side as raised arm | |||
** Raises both arms high: Back half, then a quarter on left and right (only center is safe) | |||
** Raises both arms low: Front half, then middle half (only sides are safe) | |||
===[[File:Aggressive difficulty r6.png|link=]] [[9S-operated Walking Fortress]]=== | ===[[File:Aggressive difficulty r6.png|link=]] [[9S-operated Walking Fortress]]=== | ||
Revision as of 19:24, 2 November 2019
The Copied Factory
- Level
- 80
- Item Level
- 435
- Difficulty
- Normal
- Party size
- Alliance
24 man • 3 6
6  15
15 
- Unsyncing
- Allowed
- Time limit
- 120 minutes
- Roulette
- Alliance Raids
- Tomestones
- Req. quest
 On the Threshold
- Patch
- 5.1
“Anogg and Konogg's explosive efforts have at last opened a path from Komra's excavation tunnels into an expanse of enigmatic ruins─but if the equally enigmatic 2P is to be believed, it will not be the inert and rusting relics of a long-dead civilization that await within, but life unlike any this world has ever seen...
— In-game description
The Copied Factory is a level 80 raid introduced in patch 5.1 with Shadowbringers.
It is the first part of YoRHa: Dark Apocalypse.
Objectives
Bosses
 Serial-jointed Command Model
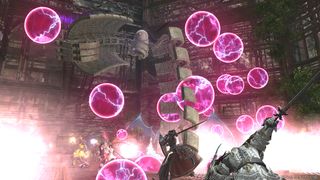
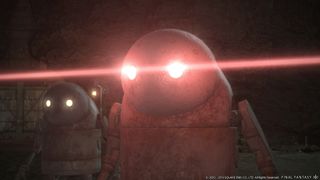
At various times throughout the entire fight, cannons on all sides of the platform will perform various attacks. They will release pink orbs that float across the platform. Touching an orb will OHKO most players. They will also draw red lasers to targeted players, who must continue moving to kite the beams away from the rest of the raid. During later phases, lasers will cover the entire platform, with each section being slightly delayed from the previous, so players must be attentive to which section dropped from the ceiling first and avoid them in order.
Energy Bombardment : The boss will throw several orbs into the sky, which will then come down around him. These put out effect markers and are fairly easy to avoid.
Energy Assault Cone AOE attack that sprays orbs across the platform. When the boss begins casting this, run behind him.
Forceful Impact: Tankbuster
Sidestriking Spin hits in a long rectangle on each side of the boss.
Centrifugal Spin hits in a long rectangle to the front and back of the boss.
Spotlights will drop from the ceiling at intervals during the fight. During this phase, the floor will have boxes with arrows drawn in squares that designate the path that each spotlight moves in. The spotlights will drop circular AOE orbs as they traverse their patch, so players must find a safe section and move as the spotlights go along their route.
Shockwave is a room-wide push centered on the boss. This will be cast when the spotlights are out, so players need to make sure that the area they are going to be pushed into will be free from the AOE circles being released by the spotlights.
 Hobbes
In this fight, each platform has completely different mechanics based on which one they are on, as well as the position of the rotating machine arm above the raid floor.
Platform Specific Mechanics Group A ??
Group B will be on a platform that has conveyer belts on it. These will, at random, activate and push party members in the indicated direction. During this phase, if any person touches the wall they will be OHKO.
Group C's platform has four large round grates on it, and periodically hot oil will pulse up through the floor. The party must dance between the circles and the non-circle part of the platform, depending on which part of the grate is open, so they aren't hit.
Attacks by the Machine If the large box is dropped on your platform, position yourself at a corner so the walls don't crush you when it opens. Tethers will come out and attach to random players, and if any individual player has more than one tether it will quickly kill that person, so intercept extras if you are free.
If the claw is over your platform AOE attacks will begin radiating around the platform in the direction indicated by the marker.
If the flame vents are over your platform there will be fire spread over the platform at intervals, which can be easily avoided by running to the far sides edges.
While the above mechanics are happening, you will also be managing the boss's main attacks:
Laser Resistance Test Room wide AOE
Ring Laser Stand in the exact middle of the platform to avoid incoming AOE circles
Laser Sight Stack for high, shared damage laser attack.
Short-Range Missile Marks players for spread AOE on hit.
(This is an incomplete list, I will try and finish it soon)
At 50%~ health attacks will begin stacking, and each party will have to manage multiple mechanics at the same time.
 Engels
- Marx Smash: Large AOE inflicting Vuln Up.
- Raises one arm (left/right): Left or right half, same side as raised arm
- Raises both arms high: Back half, then a quarter on left and right (only center is safe)
- Raises both arms low: Front half, then middle half (only sides are safe)
 9S-operated Walking Fortress
Loot
 Serial-jointed Command Model
| Name | Type | Item Level | Rarity | Quantity |
|---|---|---|---|---|
| YoRHa Type-51 Boots of Aiming | Feet | 460 | Blue | 1 |
| YoRHa Type-51 Boots of Casting | Feet | 460 | Blue | 1 |
| YoRHa Type-51 Boots of Fending | Feet | 460 | Blue | 1 |
| YoRHa Type-51 Boots of Healing | Feet | 460 | Blue | 1 |
| YoRHa Type-51 Boots of Maiming | Feet | 460 | Blue | 1 |
| YoRHa Type-51 Boots of Scouting | Feet | 460 | Blue | 1 |
| YoRHa Type-51 Boots of Striking | Feet | 460 | Blue | 1 |
| YoRHa Type-51 Cap of Casting | Head | 460 | Blue | 1 |
| YoRHa Type-51 Cap of Healing | Head | 460 | Blue | 1 |
| YoRHa Type-51 Cap of Striking | Head | 460 | Blue | 1 |
| YoRHa Type-51 Headband of Fending | Head | 460 | Blue | 1 |
| YoRHa Type-51 Headband of Maiming | Head | 460 | Blue | 1 |
| YoRHa Type-51 Hood of Aiming | Head | 460 | Blue | 1 |
| YoRHa Type-51 Hood of Scouting | Head | 460 | Blue | 1 |
 Hobbes
| Name | Type | Item Level | Rarity | Quantity |
|---|---|---|---|---|
| YoRHa Type-51 Gloves of Aiming | Hands | 460 | Blue | 1 |
| YoRHa Type-51 Gloves of Casting | Hands | 460 | Blue | 1 |
| YoRHa Type-51 Gloves of Fending | Hands | 460 | Blue | 1 |
| YoRHa Type-51 Gloves of Healing | Hands | 460 | Blue | 1 |
| YoRHa Type-51 Gloves of Maiming | Hands | 460 | Blue | 1 |
| YoRHa Type-51 Gloves of Scouting | Hands | 460 | Blue | 1 |
| YoRHa Type-51 Gloves of Striking | Hands | 460 | Blue | 1 |
| YoRHa Type-51 Halfslops of Maiming | Legs | 460 | Blue | 1 |
| YoRHa Type-51 Halfslops of Scouting | Legs | 460 | Blue | 1 |
| YoRHa Type-51 Halfslops of Striking | Legs | 460 | Blue | 1 |
| YoRHa Type-51 Trousers of Aiming | Legs | 460 | Blue | 1 |
| YoRHa Type-51 Trousers of Casting | Legs | 460 | Blue | 1 |
| YoRHa Type-51 Trousers of Fending | Legs | 460 | Blue | 1 |
| YoRHa Type-51 Trousers of Healing | Legs | 460 | Blue | 1 |
 Engels
| Name | Type | Item Level | Rarity | Quantity |
|---|---|---|---|---|
| YoRHa Type-51 Boots of Aiming | Feet | 460 | Blue | 1 |
| YoRHa Type-51 Boots of Casting | Feet | 460 | Blue | 1 |
| YoRHa Type-51 Boots of Fending | Feet | 460 | Blue | 1 |
| YoRHa Type-51 Boots of Healing | Feet | 460 | Blue | 1 |
| YoRHa Type-51 Boots of Maiming | Feet | 460 | Blue | 1 |
| YoRHa Type-51 Boots of Scouting | Feet | 460 | Blue | 1 |
| YoRHa Type-51 Boots of Striking | Feet | 460 | Blue | 1 |
| YoRHa Type-51 Coat of Aiming | Body | 460 | Blue | 1 |
| YoRHa Type-51 Jacket of Fending | Body | 460 | Blue | 1 |
| YoRHa Type-51 Jacket of Healing | Body | 460 | Blue | 1 |
| YoRHa Type-51 Jacket of Maiming | Body | 460 | Blue | 1 |
| YoRHa Type-51 Jacket of Scouting | Body | 460 | Blue | 1 |
| YoRHa Type-51 Jacket of Striking | Body | 460 | Blue | 1 |
| YoRHa Type-51 Robe of Casting | Body | 460 | Blue | 1 |
 9S-operated Walking Fortress
Rewards
You can receive only one reward item per week for completing duties in the Copied Factory.
In the event you are awarded an item from the loot list, you relinquish your right to vie for all remaining items regardless of whether you selected Need or Greed.
- Reward eligibility is reset every Tuesday at 12:00 a.m. (PST)
Each party in the alliance will receive its own treasure chest, the contents of which will be identical regardless of the route taken.
- Players cannot open a treasure chest belonging to another party.
Completion Reward
Upon completing the Copied Factory, players can also earn a separate reward once per week: two Cracked Stellaclusters and one Manufactured Coin. The Manufactured Coin can be exchanged with Fathard in Eulmore (X:10.2 Y:11.7) for items used to enhance equipment purchased with Allagan tomestones of Phantasmagoria.


