Difference between revisions of "The Keeper of the Lake"
Freedom4556 (talk | contribs) (→Images) |
Freedom4556 (talk | contribs) m (→Gear Images) |
||
| Line 135: | Line 135: | ||
==Images== | ==Images== | ||
===Gear Images=== | ===Gear Images=== | ||
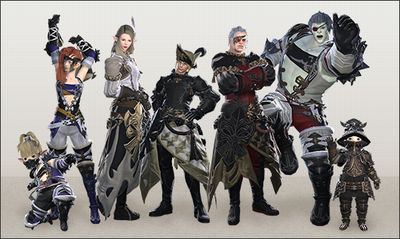
[[File:Patch 2.5 Dungeon gear.png|400px]] | [[File:Patch 2.5 Dungeon gear.png|center|400px]] | ||
===Dungeon Images=== | ===Dungeon Images=== | ||
Revision as of 07:06, 1 November 2021
The Keeper of the Lake
- Level
- 50 (Sync: 50)
- Item Level
- 90
- Difficulty
- Normal
- Party size
- Light Party
4 man • 1 1
1  2
2 
- Unsyncing
- Allowed
- Time limit
- 90 minutes
- Roulette
- Level 50/60/70"Level 50/60/70" is not in the list (Expert, Leveling, Main Scenario, Trials, Guildhests, Frontline, Mentor, Normal Raids, Alliance Raids, High-level Dungeons, ...) of allowed values for the "Is available for duty roulette" property.
- Tomestones
 100
100 - Req. quest
 The Rising Chorus
- Entrance
- Mor Dhona (X:28, Y:14)
- Patch
- 2.5
“Fifteen years ago, in the skies above Silvertear Falls, the invading forces of the XIVth Legion were set upon by a host of dragons. Leading the charge was Midgardsormr, legendary king of kings, who engaged the Garlean flagship, the Agrius, in battle. In the end, both Midgardsormr and his foe fell to the earth, and their tangled remnants stand as a memorial to that day─a ruined airship, and the charred corpse of the wyrm lord who brought it low, forever devoid of life...
— In-game description
The Keeper of the Lake is a level 50 dungeon introduced in patch 2.5.
Unlock
- Quest:
 The Rising Chorus
 - Quest-giver Location: Tataru - The Rising Stones (x6,y5) in Revenant's Toll, Mor Dhona
- Prerequisites: Main Scenario Quest
 Best Laid Schemes
Bosses
 Einhander
The flying enemies will drop big and small canisters to the boss-area. Any partymember can hit the small canisters away from the boss and the rest of the party. The big canisters will stay still. The boss does AoE-breaths that ignite the canisters it hits and those canisters will explode after burning for a while. Small canisters do damage to nearby targets, but big canisters deal moderate damage to the whole party. Usually party can deal with 1 big canister exploding, but two can be fatal so you may want to have Einhander use his abilities to trigger the affect of each medium canister as it spawns and allow your healer to heal through the damage (DPS might be able to destroy the big canisters before they explode, not sure). Medium canister explosions will chain into each other, so if your room has more than one medium canister up as one is trigger, expect a wipe.
Occasionally, Einhander will suck all of the canisters in the room towards him, the tank should either reposition Einhander away from the canisters or the DPS should quickly knock them away again.
The boss switches between two (?) forms and will disappear briefly while switching between each form. There is an obvious tell each time as Einhander will hold a different weapon in his talons. When holding the rod, Einhander gains a new cone attack which will knock anyone affected across the room. When holding a mini-gun, Einhander gains a new line AoE. DPS and Healers should be aware if they are in the same line of sight as a medium canister, as this ability will trigger them to explode.
Blue Mages can learn the spell "Flame Thrower" from Einhander. Einhander is also susceptible to the blue mage spells Missile and Level 5 Death.
 Magitek Gunship
The boss will summon adds two times. First time he summons 4 cohorts and second time he summons a big robot. All of the adds should be killed. The Gunship has a Flamethrower attack that comes out in a cone infront of him and remains active for a few seconds, so tanks should be mindful not to move back into it too early. Sometimes the boss will target a random party member and fly to the edge of the arena. After a while, he will charge towards the party member, dropping fiery circular AoE's on the ground. Party member who is targeted should stay near the edge of the arena, so that the AoE doesn't cover the middle of the fight. As the fight continues, the boss will charge two party members in a row.
 Midgardsormr
The boss itself is the big dragon head that does not need to be tanked. He does a couple of different AoE attacks. He will revive one of the two dragons at the time. Party should focus on killing these dragons as Midgardsormr is invulnerable during that time. These dragons also have their own AoE attacks as well as breath attacks so DPS should be mindful not to stand in front of the dragons. The first dragon that spawns has to be tanked far away from Midgardsomr, while the second dragon has to be tanked close to Midgardsomr. After the first dragon is revived, Midgardsormr will begin using a new AoE attack that alternates between approximately half of the room closest to Midgarsormr and later the further half. Tanks should try to position the dragons on either the east or west point of the room to make dodging these attacks easier. At some point an add will spawn who carries a shield-generator, this add will look similar to the dragons which drop the cannisters in the Einhander fight. DPS should focus these instantly, since the Midgardsormr will charge up an insta-kill AoE at that time. The Shield generator needs to be interacted with in order for the shield to become available and all members of the party must be inside the bubble to avoid being instantly killed. Repeat with the second dragon and second shield-generator. In this second phase however, Midgarsormr gains a new AoE ability which begins as a small circle which will expand outward two times, taking up a large portion of the room. Each time a dragon is killed, Midgarsormr will lose around 45% of his health. After both dragons are killed, quickly DPS any of his remaining health.
Bestiary
Loot
 Einhander
| Name | Type | Item Level | Rarity | Quantity |
|---|---|---|---|---|
| Bogatyr's Armillae of Aiming | Bracelets | 100 | Green | 1 |
| Bogatyr's Armillae of Casting | Bracelets | 100 | Green | 1 |
| Bogatyr's Armillae of Healing | Bracelets | 100 | Green | 1 |
| Bogatyr's Ring of Aiming | Ring | 100 | Green | 1 |
| Bogatyr's Ring of Casting | Ring | 100 | Green | 1 |
| Bogatyr's Ring of Healing | Ring | 100 | Green | 1 |
| Bogatyr's Thighboots of Casting | Feet | 100 | Green | 1 |
| Bogatyr's Thighboots of Healing | Feet | 100 | Green | 1 |
| Picaroon's Armillae of Slaying | Bracelets | 100 | Green | 1 |
| Picaroon's Leggings of Maiming | Feet | 100 | Green | 1 |
| Picaroon's Leggings of Scouting | Feet | 100 | Green | 1 |
| Picaroon's Leggings of Striking | Feet | 100 | Green | 1 |
| Picaroon's Ring of Slaying | Ring | 100 | Green | 1 |
| Varlet's Armillae | Bracelets | 100 | Green | 1 |
| Varlet's Ring | Ring | 100 | Green | 1 |
| Varlet's Sabatons | Feet | 100 | Green | 1 |
 Magitek Gunship
| Name | Type | Item Level | Rarity | Quantity |
|---|---|---|---|---|
| Picaroon's Earrings of Slaying | Earrings | 100 | Green | 1 |
| Bogatyr's Earrings of Aiming | Earrings | 100 | Green | 1 |
| Bogatyr's Earrings of Casting | Earrings | 100 | Green | 1 |
| Picaroon's Necklace of Slaying | Necklace | 100 | Green | 1 |
| Bogatyr's Necklace of Aiming | Necklace | 100 | Green | 1 |
| Bogatyr's Necklace of Casting | Necklace | 100 | Green | 1 |
| Bogatyr's Necklace of Healing | Necklace | 100 | Green | 1 |
| Varlet's Armillae | Bracelets | 100 | Green | 1 |
| Bogatyr's Armillae of Casting | Bracelets | 100 | Green | 1 |
| Bogatyr's Armillae of Healing | Bracelets | 100 | Green | 1 |
| Varlet's Ring | Ring | 100 | Green | 1 |
| Bogatyr's Ring of Aiming | Ring | 100 | Green | 1 |
| Bogatyr's Ring of Healing | Ring | 100 | Green | 1 |
| Name | Type | Item Level | Rarity | Quantity |
|---|---|---|---|---|
| Varlet's Sallet | Head | 100 | Green | 1 |
| Picaroon's Headgear of Maiming | Head | 100 | Green | 1 |
| Picaroon's Eyepatch of Striking | Head | 100 | Green | 1 |
| Bogatyr's Cap of Aiming | Head | 100 | Green | 1 |
| Bogatyr's Circlet of Healing | Head | 100 | Green | 1 |
| Picaroon's Belt of Maiming | Waist | 100 | Green | 1 |
| Picaroon's Belt of Scouting | Waist | 100 | Green | 1 |
| Bogatyr's Rope Belt of Casting | Waist | 100 | Green | 1 |
| Bogatyr's Rope Belt of Healing | Waist | 100 | Green | 1 |
 Midgardsormr
| Name | Type | Item Level | Rarity | Quantity |
|---|---|---|---|---|
| Bogatyr's Longcoat of Aiming | Body | 100 | Green | 1 |
| Bogatyr's Longcoat of Casting | Body | 100 | Green | 1 |
| Bogatyr's Longcoat of Healing | Body | 100 | Green | 1 |
| Bogatyr's Slops of Aiming | Legs | 100 | Green | 1 |
| Bogatyr's Slops of Casting | Legs | 100 | Green | 1 |
| Bogatyr's Slops of Healing | Legs | 100 | Green | 1 |
| Picaroon's Jacket of Maiming | Body | 100 | Green | 1 |
| Picaroon's Jacket of Scouting | Body | 100 | Green | 1 |
| Picaroon's Jacket of Striking | Body | 100 | Green | 1 |
| Picaroon's Trousers of Maiming | Legs | 100 | Green | 1 |
| Picaroon's Trousers of Scouting | Legs | 100 | Green | 1 |
| Picaroon's Trousers of Striking | Legs | 100 | Green | 1 |
| Silver Tears Orchestrion Roll |
Orchestrion Roll | N/A | Basic | 1 |
| Varlet's Breeches | Legs | 100 | Green | 1 |
| Varlet's Hauberk | Body | 100 | Green | 1 |


