Difference between revisions of "The Stone Vigil (Hard)"
Whitenorth (talk | contribs) |
(→link= Giruveganaus: additional move) |
||
| (31 intermediate revisions by 7 users not shown) | |||
| Line 1: | Line 1: | ||
{{ | {{other uses|the optional level 50 [[dungeon]]|the [[Main Scenario Quests|Main Scenario]] [[dungeon]]|The Stone Vigil}} | ||
{{Duty infobox | {{Duty infobox | ||
| name = The Stone Vigil (Hard) | | name = The Stone Vigil (Hard) | ||
| description = | | description = Ishgard's war against the Dravanian Horde rages on, and Lord Drillemont of House Durendaire means to reclaim a stronghold vital to the protection of Ishgard─the Stone Vigil. Though his forces stand with banners raised and blades at the ready, the watchtower now teems with heretics who would gladly embrace death if only to see knights of Ishgard suffer. It was an adventurer who slipped silently into those frosted halls in the dead of night to cull their ranks, and so it shall be once more. | ||
| image = The_Stone_Vigil_(Hard).png | | image = The_Stone_Vigil_(Hard).png | ||
| type = dungeon | | type = dungeon | ||
| Line 12: | Line 12: | ||
| size = 4man | | size = 4man | ||
| time-limit = 90 | | time-limit = 90 | ||
| roulette = level | | duty-finder = Dungeons (A Realm Reborn) | ||
| roulette = High-level Dungeons | |||
| tomestones = 70 Poetics | |||
| entrance = Coerthas Central Highlands | | entrance = Coerthas Central Highlands | ||
| entrance-coordinates = 7,11 | | entrance-coordinates = 7,11 | ||
| req-quest = Blood for Stone | | req-quest = Blood for Stone | ||
| modes = explorer | |||
| patch = 2.3 | | patch = 2.3 | ||
| release = A Realm Reborn | | release = A Realm Reborn | ||
}} | }} {{TOC limit|3}} | ||
==Objectives== | ==Objectives== | ||
#Slay Gorynich: 0/1 | #Slay [[Gorynich]]: 0/1 | ||
#Slay Cuca Fera: 0/1 | #Slay [[Cuca Fera]]: 0/1 | ||
#Obtain the main storage vault key: 0/1 | #Obtain the main storage vault key: 0/1 | ||
#Slay Giruveganaus: 0/1 | #Slay [[Giruveganaus]]: 0/1 | ||
==Enemies== | |||
* [[Storm Biast]] | |||
* [[Shield Dragon]] | |||
* [[Dragonfly Hunter]] | |||
* [[Watch Wyvern]] | |||
* [[Vigil Heir]] | |||
* [[Maundering Harrier]] | |||
* [[Craving Harrier]] | |||
* [[Raving Harrier]] | |||
* [[Haranguing Harrier]] | |||
* [[Jura Aevis]] | |||
* [[Gowrow]] | |||
* [[Sordes]] | |||
* [[Paleoaevis]] | |||
* [[Tursus]] | |||
==Bosses== | ==Bosses== | ||
{{#ev:youtube|whAPDPMTrkI| | {{#ev:youtube|whAPDPMTrkI|350|right|The Stone Vigil (Hard) Guide}} | ||
===[[File:Aggressive difficulty | ===[[File:Aggressive difficulty r5.png|link=]] [[Gorynich]]=== | ||
Gorynich fight is similar to the first boss fight in the normal Stone Vigil. | The Gorynich fight is similar to the first boss fight in the normal Stone Vigil. | ||
* '''Swinge''' - A large frontal cone AoE. Use {{action icon|Sprint}} to stay behind him to not get hit. | |||
* '''Rake''' - Cleaving tankbuster. This hits hard, so use damage mitigation on it. | |||
* '''Lion's Breath''' - Frontal cone AoE. | |||
When he spawns adds, the adds will automatically attack the healer. DPS should kill the adds ASAP, but the tank should NOT aggro them - these adds will perform an AoE on death (one is a large frontal cone, and the other is a large circle around them). If the boss is in range of these AoE's, it will gain {{buff|haste}} '''[[Haste]]''' and {{buff|damage up}} '''[[Damage Up]]'''. | |||
Try to tank the boss in a corner and place your healer away from him. | Try to tank the boss in a corner and place your healer away from him. | ||
Designate two people to be "stunners". The Boss has a | ===[[File:Aggressive difficulty r5.png|link=]] [[Cuca Fera]]=== | ||
For Cuca Fera, the players will operate 4 cannons in the 4 corners to the room to attack the boss. These cannons have two abilities: | |||
* '''Iron Kiss''' - deals some damage in a targeted circle area. | |||
* '''Spindly Finger''' - {{status effect|Stun}} [[Stun]]s enemies in a targeted circle area. Has a 30 second cooldown. | |||
Use Iron Kiss to damage the boss, but do NOT fire at it when it uses '''{{Action icon|Diamondback}}'''. While Diamondback is active, the boss will glow red, and your shots will be reflected back at you. | |||
Designate two people to be "stunners". The Boss has a room-wide AoE called '''Hard Stomp''' - use Spindly Finger to interrupt its casting. Two people rotating the stuns should be enough to let CD's recharge. | |||
The boss has also an attack where it sets itself on fire and spins toward a cannon. This can be avoided easily by disengaging from the cannon and walking away. | |||
When adds spawn, players should kill them with their cannons. Note that a cannon cannot hit targets too close to itself, so players should fire towards teammates to help clean up the mobs. | |||
Do not allow the NPCs to die. If all of them die, the boss will do an unstunnable Hard Stomp that instantly wipes the party. | |||
==== A Note regarding Unsynced ==== | |||
When running the dungeon with '''[[Unrestricted Party]]''' enabled, Cuca Fera's damage reduction will make it extremely tedious for players to defeat the boss solo, even at significantly higher levels. However, certain effects can bypass the damage reduction, allowing players to quickly dispatch the boss: | |||
* {{MCH}} [[Machinist]]'s {{action icon|Wildfire}} ('''accurate as of [[Patch 6.4]]''') | |||
* {{BLU}} [[Blue Mage]]'s {{action icon|Missile}} or {{action icon|Level 5 Death}} | |||
===[[File:Aggressive difficulty r6.png|link=]] [[Giruveganaus]]=== | |||
Giruveganaus is a fairly straightforward, if annoying, fight. The boss follows a random attack pattern, ignoring all enmity generation. All players must keep an eye out for one of Giruvenganaus' many tells in order to anticipate and dodge attacks. All of the boss's attacks not only hit for moderate-to-high damage, but also apply the debuff {{status effect|infirmity}} [[Infirmity]], which reduces healing from magical sources. | |||
Phase 1 consists of 3 attacks: | |||
* Burning shoulder tackle - Telegraphed by the boss lowering his shoulder. After about a second, he will charge forward, damaging all in his path. | |||
* Tail swipe - Rear cone attack, telegraphed by the boss pausing and raising his tail. | |||
* Claw swipe - Frontal cleaving attack, telegraphed the boss rearing up on his hind legs and raising one arm. | |||
It is highly recommended to stay to the flank of the boss, as this puts you in a "safe zone" between the range of his frontal cleave and tail swipe. At approx 60% health, phase 2 will begin. | |||
At the start of phase 2, Giruvenganaus will summon a clone of himself, with all the same attacks and stats as the original, and at full health. He will also gain 2 new attacks, which are shared with his clone: | |||
* Fireball - the boss will turn to face a random player and launch a fireball, hitting in a circular AoE where the target was standing. This is telegraphed by the boss raising his hands to his mouth, as well as a small flame appearing in his mouth as he turns toward his target. | |||
* Fire breath - the boss will breathe fire in a small frontal cone. There is no telegraph for this one, just try to avoid being in front of the boss. | |||
In this phase, it is best to ignore the clone in favor of bursting down the original boss, dodging attacks when necessary. Once the original is dead, focus on attacking the clone, who should follow soon afterward. | |||
==Loot== | ==Loot== | ||
{{see also|Ilvl 80 Dungeon Armor|Ilvl 80 Dungeon Accessories}} | |||
===[[File:Silver Coffer (small).png|link=]] [[Gorynich]]=== | |||
*{{Item reward|10|Allagan Tomestone of Poetics}} | |||
| | {{Drops list|Gorynich}} | ||
===[[File:Silver Coffer (small).png|link=]] [[Cuca Fera]]=== | |||
*{{Item reward|15|Allagan Tomestone of Poetics}} | |||
{{Drops list|Cuca Fera}} | |||
===[[File:Gold Coffer (small).png|link=]] [[Giruveganaus]]=== | |||
*{{Item reward|25|Allagan Tomestone of Poetics}} | |||
*{{Item icon|Blue Dragon Card}} (Drops at a fixed rate) | |||
{{Drops list|Giruveganaus}} | |||
===Other Loot=== | |||
| | ====[[File:Bronze Coffer (small).png|link=]] Treasure Coffer 1 (X: 11.4 Y: 9.0)==== | ||
{{Drops table header}} | |||
| | {{Drops table row|Sabatons of the Divine War}} | ||
| | {{Drops table row|Sabatons of Divine Wisdom}} | ||
{{Drops table row|Boots of the Divine Hero}} | |||
| | {{Drops table row|Boots of the Divine Light}} | ||
{{Drops table row|Crakows of Divine Death}} | |||
| | {{Drops table row|Crakows of the Divine Harvest}} | ||
| | {{Drops table row|Bracelets of the Divine War}} | ||
{{Drops table row|Bracelet of Divine Wisdom}} | |||
| | {{Drops table row|Bracelet of the Divine Light}} | ||
|- | {{Drops table row|Bracelet of Divine Death}} | ||
| | {{Drops table row|Bracelet of the Divine Harvest}} | ||
{{Drops table row|Ring of the Divine War}} | |||
{{Drops table row|Ring of Divine Wisdom}} | |||
{{Drops table row|Ring of the Divine Light}} | |||
{{Drops table row|Ring of Divine Death}} | |||
{{Drops table row|Ring of the Divine Harvest}} | |||
{{Drops table row|Stone Vigil Lumber}} | |||
{{Table footer}} | |||
====[[File:Bronze Coffer (small).png|link=]] Treasure Coffer 2 (X: 11.0 Y: 7.6)==== | |||
{{Drops table header}} | |||
{{Drops table row|Helm of the Divine War}} | |||
{{Drops table row|Mask of Divine Wisdom}} | |||
{{Drops table row|Eyepatch of the Divine Hero}} | |||
{{Drops table row|Hat of the Divine Light}} | |||
{{Drops table row|Monocle of Divine Death}} | |||
{{Drops table row|Circlet of the Divine Harvest}} | |||
{{Drops table row|Vambraces of the Divine War}} | |||
{{Drops table row|Vambraces of Divine Wisdom}} | |||
{{Drops table row|Cuffs of the Divine Hero}} | |||
{{Drops table row|Cuffs of the Divine Light}} | |||
{{Drops table row|Halfgloves of Divine Death}} | |||
{{Drops table row|Halfgloves of the Divine Harvest}} | |||
{{Drops table row|Earrings of the Divine War}} | |||
{{Drops table row|Earrings of Divine Wisdom}} | |||
{{Drops table row|Earrings of the Divine Light}} | |||
{{Drops table row|Earrings of Divine Death}} | |||
{{Drops table row|Earrings of the Divine Harvest}} | |||
{{Drops table row|Choker of the Divine War}} | |||
{{Drops table row|Choker of Divine Wisdom}} | |||
{{Drops table row|Choker of the Divine Light}} | |||
{{Drops table row|Choker of Divine Death}} | |||
{{Drops table row|Choker of the Divine Harvest}} | |||
{{Table footer}} | |||
====[[File:Bronze Coffer (small).png|link=]] Treasure Coffer 3 (X: 10.7 Y: 9.1)==== | |||
{{Drops table header}} | |||
{{Drops table row|Cuirass of the Divine War}} | |||
{{Drops table row|Cuirass of Divine Wisdom}} | |||
{{Drops table row|Shirt of the Divine Hero}} | |||
{{Drops table row|Shirt of the Divine Light}} | |||
{{Drops table row|Robe of Divine Death}} | |||
{{Drops table row|Robe of the Divine Harvest}} | |||
{{Drops table row|Breeches of the Divine War}} | |||
{{Drops table row|Breeches of Divine Wisdom}} | |||
{{Drops table row|Sarouel of the Divine Hero}} | |||
{{Drops table row|Sarouel of the Divine Light}} | |||
{{Drops table row|Tonban of Divine Death}} | |||
{{Drops table row|Tonban of the Divine Harvest}} | |||
{{Drops table row|Bracelets of the Divine War}} | |||
{{Drops table row|Bracelet of Divine Wisdom}} | |||
{{Drops table row|Bracelet of the Divine Light}} | |||
{{Drops table row|Bracelet of Divine Death}} | |||
{{Drops table row|Bracelet of the Divine Harvest}} | |||
{{Drops table row|Ring of the Divine War}} | |||
{{Drops table row|Ring of Divine Wisdom}} | |||
{{Drops table row|Ring of the Divine Light}} | |||
{{Drops table row|Ring of Divine Death}} | |||
{{Drops table row|Ring of the Divine Harvest}} | |||
{{Table footer}} | |||
====[[File:Bronze Coffer (small).png|link=]] Treasure Coffer 4 (X: 10.7 Y: 9.1)==== | |||
{{Drops table header}} | |||
{{Drops table row|Earrings of the Divine War}} | |||
{{Drops table row|Earrings of Divine Wisdom}} | |||
{{Drops table row|Earrings of the Divine Light}} | |||
{{Drops table row|Earrings of Divine Death}} | |||
{{Drops table row|Earrings of the Divine Harvest}} | |||
{{Drops table row|Choker of the Divine War}} | |||
{{Drops table row|Choker of Divine Wisdom}} | |||
{{Drops table row|Choker of the Divine Light}} | |||
{{Drops table row|Choker of Divine Death}} | |||
{{Drops table row|Choker of the Divine Harvest}} | |||
{{Table footer}} | |||
==Achievements== | |||
This duty is associated with the following [[achievements]]: | |||
{| {{STDT| mech1 sortable align-left}} | |||
{{achievement table header}} | |||
{{achievement table row|Remapping the Realm: Stone Vigil}} | |||
|} | |} | ||
==Images== | ==Images== | ||
<gallery | ===Gear Images=== | ||
[[File:Patch 2.3 Dungeon Gear1.png|center|400px]] | |||
===Dungeon Images=== | |||
<gallery mode=packed> | |||
File:Stone vigil hard3.png | |||
File:stone vigil hard1.jpg | File:stone vigil hard1.jpg | ||
File:stone vigil hard2.jpg | File:stone vigil hard2.jpg | ||
File:Stone vigil hard2.png | File:Stone vigil hard2.png | ||
File:the stone vigil hard map1.jpg | File:the stone vigil hard map1.jpg|Map | ||
</gallery> | </gallery> | ||
{{Duties nav|dungeon}} | {{Duties nav|dungeon}} | ||
Latest revision as of 05:02, 19 February 2025
 This article is about the optional level 50 dungeon. For the Main Scenario dungeon, see The Stone Vigil.
The Stone Vigil (Hard)
.png)
- Level
- 50 (Sync: 50)
- Item Level
- 70 (Sync: 110)
- Difficulty
- Hard
- Party size
- Light Party
4 man • 1 1
1  2
2 
- Unsyncing
- Allowed
- Time limit
- 90 minutes
- Duty Finder
- Dungeons (A Realm Reborn)
- Roulette
- High-level Dungeons
- Tomestones
 70
70 - Req. quest
 Blood for Stone
- Entrance
- Coerthas Central Highlands (X:7, Y:11)
- Modes
- Explorer
- Patch
- 2.3
“Ishgard's war against the Dravanian Horde rages on, and Lord Drillemont of House Durendaire means to reclaim a stronghold vital to the protection of Ishgard─the Stone Vigil. Though his forces stand with banners raised and blades at the ready, the watchtower now teems with heretics who would gladly embrace death if only to see knights of Ishgard suffer. It was an adventurer who slipped silently into those frosted halls in the dead of night to cull their ranks, and so it shall be once more.
— In-game description
The Stone Vigil (Hard) is a level 50 dungeon introduced in patch 2.3.
Objectives
- Slay Gorynich: 0/1
- Slay Cuca Fera: 0/1
- Obtain the main storage vault key: 0/1
- Slay Giruveganaus: 0/1
Enemies
- Storm Biast
- Shield Dragon
- Dragonfly Hunter
- Watch Wyvern
- Vigil Heir
- Maundering Harrier
- Craving Harrier
- Raving Harrier
- Haranguing Harrier
- Jura Aevis
- Gowrow
- Sordes
- Paleoaevis
- Tursus
Bosses
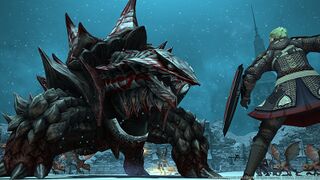
 Gorynich
The Gorynich fight is similar to the first boss fight in the normal Stone Vigil.
- Swinge - A large frontal cone AoE. Use
 Sprint to stay behind him to not get hit.
 - Rake - Cleaving tankbuster. This hits hard, so use damage mitigation on it.
- Lion's Breath - Frontal cone AoE.
When he spawns adds, the adds will automatically attack the healer. DPS should kill the adds ASAP, but the tank should NOT aggro them - these adds will perform an AoE on death (one is a large frontal cone, and the other is a large circle around them). If the boss is in range of these AoE's, it will gain ![]() Haste and
Haste and ![]() Damage Up.
Damage Up.
Try to tank the boss in a corner and place your healer away from him.
Cuca Fera
For Cuca Fera, the players will operate 4 cannons in the 4 corners to the room to attack the boss. These cannons have two abilities:
- Iron Kiss - deals some damage in a targeted circle area.
- Spindly Finger -
 Stuns enemies in a targeted circle area. Has a 30 second cooldown.
Use Iron Kiss to damage the boss, but do NOT fire at it when it uses ![]() Diamondback. While Diamondback is active, the boss will glow red, and your shots will be reflected back at you.
Diamondback. While Diamondback is active, the boss will glow red, and your shots will be reflected back at you.
Designate two people to be "stunners". The Boss has a room-wide AoE called Hard Stomp - use Spindly Finger to interrupt its casting. Two people rotating the stuns should be enough to let CD's recharge.
The boss has also an attack where it sets itself on fire and spins toward a cannon. This can be avoided easily by disengaging from the cannon and walking away.
When adds spawn, players should kill them with their cannons. Note that a cannon cannot hit targets too close to itself, so players should fire towards teammates to help clean up the mobs.
Do not allow the NPCs to die. If all of them die, the boss will do an unstunnable Hard Stomp that instantly wipes the party.
A Note regarding Unsynced
When running the dungeon with Unrestricted Party enabled, Cuca Fera's damage reduction will make it extremely tedious for players to defeat the boss solo, even at significantly higher levels. However, certain effects can bypass the damage reduction, allowing players to quickly dispatch the boss:
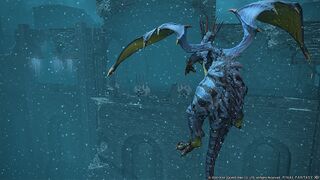
 Giruveganaus
Giruveganaus is a fairly straightforward, if annoying, fight. The boss follows a random attack pattern, ignoring all enmity generation. All players must keep an eye out for one of Giruvenganaus' many tells in order to anticipate and dodge attacks. All of the boss's attacks not only hit for moderate-to-high damage, but also apply the debuff ![]() Infirmity, which reduces healing from magical sources.
Infirmity, which reduces healing from magical sources.
Phase 1 consists of 3 attacks:
- Burning shoulder tackle - Telegraphed by the boss lowering his shoulder. After about a second, he will charge forward, damaging all in his path.
- Tail swipe - Rear cone attack, telegraphed by the boss pausing and raising his tail.
- Claw swipe - Frontal cleaving attack, telegraphed the boss rearing up on his hind legs and raising one arm.
It is highly recommended to stay to the flank of the boss, as this puts you in a "safe zone" between the range of his frontal cleave and tail swipe. At approx 60% health, phase 2 will begin.
At the start of phase 2, Giruvenganaus will summon a clone of himself, with all the same attacks and stats as the original, and at full health. He will also gain 2 new attacks, which are shared with his clone:
- Fireball - the boss will turn to face a random player and launch a fireball, hitting in a circular AoE where the target was standing. This is telegraphed by the boss raising his hands to his mouth, as well as a small flame appearing in his mouth as he turns toward his target.
- Fire breath - the boss will breathe fire in a small frontal cone. There is no telegraph for this one, just try to avoid being in front of the boss.
In this phase, it is best to ignore the clone in favor of bursting down the original boss, dodging attacks when necessary. Once the original is dead, focus on attacking the clone, who should follow soon afterward.
Loot
- See also: Ilvl 80 Dungeon Armor and Ilvl 80 Dungeon Accessories
 Gorynich
| Name | Type | Item Level | Rarity | Quantity |
|---|---|---|---|---|
| Feet | 80 | Green | 1 | |
| Feet | 80 | Green | 1 | |
| Bracelets | 80 | Green | 1 | |
| Bracelets | 80 | Green | 1 | |
| Bracelets | 80 | Green | 1 | |
| Bracelets | 80 | Green | 1 | |
| Bracelets | 80 | Green | 1 | |
| Feet | 80 | Green | 1 | |
| Feet | 80 | Green | 1 | |
| Ring | 80 | Green | 1 | |
| Ring | 80 | Green | 1 | |
| Ring | 80 | Green | 1 | |
| Ring | 80 | Green | 1 | |
| Ring | 80 | Green | 1 | |
| Feet | 80 | Green | 1 | |
| Feet | 80 | Green | 1 |
Cuca Fera
 Giruveganaus
- 25 Allagan Tomestone of Poetics

 Blue Dragon Card (Drops at a fixed rate)
| Name | Type | Item Level | Rarity | Quantity |
|---|---|---|---|---|
| Legs | 80 | Green | 1 | |
| Legs | 80 | Green | 1 | |
| Body | 80 | Green | 1 | |
| Body | 80 | Green | 1 | |
| Body | 80 | Green | 1 | |
| Body | 80 | Green | 1 | |
| Legs | 80 | Green | 1 | |
| Legs | 80 | Green | 1 | |
| Body | 80 | Green | 1 | |
| Body | 80 | Green | 1 | |
| Legs | 80 | Green | 1 | |
| Legs | 80 | Green | 1 |
Other Loot
 Treasure Coffer 1 (X: 11.4 Y: 9.0)
| Name | Type | Item Level | Rarity | Quantity |
|---|---|---|---|---|
| Feet | 80 | Green | 1 | |
| Feet | 80 | Green | 1 | |
| Feet | 80 | Green | 1 | |
| Feet | 80 | Green | 1 | |
| Feet | 80 | Green | 1 | |
| Feet | 80 | Green | 1 | |
| Bracelets | 80 | Green | 1 | |
| Bracelets | 80 | Green | 1 | |
| Bracelets | 80 | Green | 1 | |
| Bracelets | 80 | Green | 1 | |
| Bracelets | 80 | Green | 1 | |
| Ring | 80 | Green | 1 | |
| Ring | 80 | Green | 1 | |
| Ring | 80 | Green | 1 | |
| Ring | 80 | Green | 1 | |
| Ring | 80 | Green | 1 | |
| Material | N/A | Basic | 1 |
Treasure Coffer 2 (X: 11.0 Y: 7.6)
Treasure Coffer 3 (X: 10.7 Y: 9.1)
| Name | Type | Item Level | Rarity | Quantity |
|---|---|---|---|---|
| Body | 80 | Green | 1 | |
| Body | 80 | Green | 1 | |
| Body | 80 | Green | 1 | |
| Body | 80 | Green | 1 | |
| Body | 80 | Green | 1 | |
| Body | 80 | Green | 1 | |
| Legs | 80 | Green | 1 | |
| Legs | 80 | Green | 1 | |
| Legs | 80 | Green | 1 | |
| Legs | 80 | Green | 1 | |
| Legs | 80 | Green | 1 | |
| Legs | 80 | Green | 1 | |
| Bracelets | 80 | Green | 1 | |
| Bracelets | 80 | Green | 1 | |
| Bracelets | 80 | Green | 1 | |
| Bracelets | 80 | Green | 1 | |
| Bracelets | 80 | Green | 1 | |
| Ring | 80 | Green | 1 | |
| Ring | 80 | Green | 1 | |
| Ring | 80 | Green | 1 | |
| Ring | 80 | Green | 1 | |
| Ring | 80 | Green | 1 |
Treasure Coffer 4 (X: 10.7 Y: 9.1)
| Name | Type | Item Level | Rarity | Quantity |
|---|---|---|---|---|
| Earrings | 80 | Green | 1 | |
| Earrings | 80 | Green | 1 | |
| Earrings | 80 | Green | 1 | |
| Earrings | 80 | Green | 1 | |
| Earrings | 80 | Green | 1 | |
| Necklace | 80 | Green | 1 | |
| Necklace | 80 | Green | 1 | |
| Necklace | 80 | Green | 1 | |
| Necklace | 80 | Green | 1 | |
| Necklace | 80 | Green | 1 |
Achievements
This duty is associated with the following achievements:
| Name | Points | Task | Reward | Patch |
|---|---|---|---|---|
| 10 | Discover every location in the Stone Vigil (Hard). | - | 2.3 |
Images
Gear Images

Dungeon Images


Map


