Difference between revisions of "Hidden Gorge"
(update machina values to 7.1) |
|||
| (23 intermediate revisions by 5 users not shown) | |||
| Line 1: | Line 1: | ||
<div class="nav" style="width:750px;"> | |||
<div class="box"> | |||
<div class="heading" style="background-color:#CC0000; font-family: EasonPro, Times New Roman, serif !important; font-size:1.417em; color: #fff !important; text-shadow: rgba(0,0,0,0.75) 0 0 .25em; padding: 10px 0px 10px 0px !important;">Notice</div> | |||
<div class="wrapper" style="padding: 0px 5px 0px 5px"> | |||
<div> | |||
Players may experience extremely long queue times for Rival Wings outside of [[Moogle Treasure Trove Events]] owing to its high player count requirement and its lack of a Daily Challenge similar to [[Duty Roulette#Daily Challenge: Frontline|Daily Challenge: Frontline]]. It is recommended to research out-of-game PvP community resources such as forums or Discord for any upcoming Rival Wings events. | |||
</div></div></div></div> | |||
{{Duty infobox | |||
| name = Hidden Gorge | |||
| description = Developed by Amajina & Sons Mineral Concern at great cost, the mine at Hidden Gorge proved to be a flash in the pan, its veins running dry within a matter of years. For a time afterwards, the site in Thanalan lay abandoned, but now it has been revived as a training ground for adventurers. In tracks of steel the battle lines have been drawn, and Falcons and Ravens will lock beaks once more in a struggle for territorial supremacy! | |||
| image = hidden gorge.png | |||
| type = PvP | |||
| level = 30 | |||
| level-sync = | |||
| ilvl = | |||
| ilvl-sync = | |||
| difficulty = normal | |||
| size = | |||
| unsync = n | |||
| time-limit = 15 | |||
| roulette = | |||
| tomestones = 50 Poetics + 50 Causality + 20 Comedy | |||
| entrance = | |||
| entrance-coordinates = | |||
| req-quest = Earning Your Wings | |||
| patch = 4.55 | |||
| release = stormblood | |||
}} It is a [[Rival Wings]] mode. During a Hidden Gorge campaign, teams vie for control of supplies delivered by ceruleum engines. | |||
{{TOCRIGHT}} | {{TOCRIGHT}} | ||
[[File:hidden gorge1.jpg|400px|right]] | [[File:hidden gorge1.jpg|400px|right]] | ||
==In a Nutshell== | |||
While Hidden Gorge may seem overwhelming at first, it is easy to increase chances of winning with a few rules of thumb. | |||
* '''Beginning phase''': Go to the center station, take out enemies, use your Limit Break to build Soaring stacks, and take out more enemies. | |||
* '''Order of Battle''': Mount warmachina → Take the center station if a train is incoming shortly → Take the Goblin Mercenary → Escort allied Oppressors → Destroy enemy Oppressors → Destroy enemy Mammets | |||
* '''Kill Priority''': Oppressor ≧ Brute Justice ≧ Goblin Mercenary ≧ Mammets >>> Other >>>>>>> People | |||
* '''Avoid common mistakes''': | |||
:* A common pitfall are alliances not using accumulated CE on warmachina and subsequently being unable to gain Soaring stacks. Don't be afraid to mount warmachina (colloquially called 'meching up'). | |||
:* Don't fire Oppressor missiles at people. They are most effective against structures. | |||
==Overview== | ==Overview== | ||
[[File:hidden gorge2.jpg|400px|right]] | [[File:hidden gorge2.jpg|400px|right]] | ||
===Abandoning Matches=== | ===Abandoning Matches=== | ||
Players who abandon a Rival Wings campaign (not including players who join a match in progress or are vote kicked) will receive a penalty | Players who abandon a Rival Wings campaign (not including players who join a match in progress or are vote kicked) will receive a penalty and be unable to register for duties for 30 minutes. Any players inactive for a period of two minutes will automatically be removed from play. | ||
===Preparing for Battle=== | ===Preparing for Battle=== | ||
Rival Wings participants will be placed on one of two teams: the Falcons or the Ravens. Players will then begin the match at their teams' respective landing points. Matches will begin after a | Rival Wings participants will be placed on one of two teams: the Falcons or the Ravens. Players will then begin the match at their teams' respective landing points. Matches will begin after a 45-second countdown once all players are loaded in. | ||
===Chat=== | ===Chat=== | ||
The Say, Party, Alliance, Yell, Shout, Free Company, Linkshell, PvP Team, and Novice Network chat channels can be used during Rival Wings. | The Say, Party, Alliance, Yell, Shout, Free Company, Linkshell, PvP Team, and Novice Network chat channels can be used during Rival Wings. | ||
* Say, Yell, and Shout can only be used with players on the same team. | *Say, Yell, and Shout can only be used with players on the same team. | ||
===Retaliation=== | ===Retaliation=== | ||
| Line 32: | Line 53: | ||
===Mounts=== | ===Mounts=== | ||
Players are free to use mounts during Rival Wings campaigns. However, players taking damage while mounted will be inflicted with the | Players are free to use mounts during Rival Wings campaigns. However, players taking damage while mounted will be inflicted with the '''Hoofing It''' debuff, preventing using mounts for 5 seconds. This status cannot be cured with [[Purify (PvP)|Purify]]. | ||
* Flying | *Flying and pillion riding are disabled. | ||
===Return=== | ===Return=== | ||
Using Return will teleport players back to their landing point. Moreover, this action has no recast time during Rival Wings campaigns. | Using Return will teleport players back to their landing point. Moreover, this action has no recast time during Rival Wings campaigns. However, casting will be interrupted by attacks. | ||
==Victory Conditions, Cores and Towers== | ==Victory Conditions, Cores and Towers== | ||
===Rules of Engagement=== | ===Rules of Engagement=== | ||
The first team to destroy the core located on the opponent's base will be declared the winner. In the event neither team destroys a core, victory will be decided based on each team's remaining core HP, number of towers, and tower HP, in that order. | The first team to destroy the core located on the opponent's base will be declared the winner. In the event neither team destroys a core, victory will be decided based on each team's remaining core HP, number of towers, and tower HP, in that order. | ||
* In the event these values are the same for both teams, the match will end in a draw. | *In the event these values are the same for both teams, the match will end in a draw. | ||
===Cores and Towers=== | ===Cores and Towers=== | ||
====Cores==== | ====Cores==== | ||
Each team has a core located at its base, and the chief objective is to destroy the enemy's core. The core is protected by a magitek field emanating from two towers, so before you can strike at the core, you must first destroy at least one of the towers. With one tower destroyed, your team can begin to damage the core; however, damage will be significantly mitigated by the remainder of the magitek field until the second tower is eliminated. | Each team has a core located at its base, and the chief objective is to destroy the enemy's core. The core is protected by a magitek field emanating from two towers. Attempting to enter the enemy's base with both towers active will result in an instant KO, so before you can strike at the core, you must first destroy at least one of the towers. With one tower destroyed, your team can begin to damage the core; however, damage will be significantly mitigated by the remainder of the magitek field until the second tower is eliminated. | ||
[[File:hidden gorge cores1.png]] | [[File:hidden gorge cores1.png]] | ||
====Towers==== | ====Towers==== | ||
Each team has two towers that serve to protect their core. Each tower is also enveloped in a defensive field that mitigates damage taken by team members and restores their HP, | Each team has two towers that serve to protect their core. Each tower is also enveloped in a defensive field that mitigates damage taken by team members and gradually restores their HP by 4,000 per tick. Players can take advantage of the additional protection when hard-pressed by the opposing team, though machina attacks ignore the increased damage resistance. Destroying the enemy team's towers will remove the defensive fields, allow the core to be damaged, and grant ceruleum and Soaring stacks to all parties on your team. | ||
[[File:hidden gorge towers1.png]] | [[File:hidden gorge towers1.png]] | ||
====Display of Core and Tower HP==== | ====Display of Core and Tower HP==== | ||
A unique UI is used to display the HP of cores and towers. Because each team's core cannot be damaged until one or more of their towers are destroyed, only the HP of towers will be displayed at the start of a match. Once the core is exposed by the destruction of at least one tower, however, its HP will also be displayed. | A unique UI is used to display the HP of cores and towers. Because each team's core cannot be damaged until one or more of their towers are destroyed, only the HP of towers will be displayed at the start of a match. Once the core is exposed by the destruction of at least one tower, however, its HP will also be displayed. | ||
While cores and towers can be damaged by players directly, their high HP makes this unconventional outside of concentrated attacks from large groups. | |||
[[File:hidden gorge core tower hp1.jpg]] | [[File:hidden gorge core tower hp1.jpg]] | ||
| Line 59: | Line 82: | ||
==Advanced Rules== | ==Advanced Rules== | ||
===Machina=== | ===Machina=== | ||
Players can deploy three types of powerful machina in battle. | Players can deploy three types of powerful machina in battle. While Machina are useful tools, their actions have a casting bar and telegraph, and require infantry support for maximum effectiveness. | ||
====Cruise Chaser==== | ====Cruise Chaser==== | ||
[[File:hidden gorge cruise chaser1.png]] | [[File:hidden gorge cruise chaser1.png]] | ||
A next-generation machina ideal for combat against enemy players and machina. | A next-generation machina ideal for combat against enemy players and machina. These excel at guarding the north and south bridge chokepoints. | ||
*HP: | *HP: 300,000 | ||
*Required Ceruleum (CE): 50 | *Required Ceruleum (CE): 50 | ||
*Maximum Simultaneous Deployment: 6 | *Maximum Simultaneous Deployment: 6 | ||
| Line 73: | Line 96: | ||
'''Actions''' | '''Actions''' | ||
{| | {| {{STDT| sortable align-center}} | ||
|- | |- | ||
! Action Name | ! Action Name | ||
| Line 82: | Line 105: | ||
! Effect | ! Effect | ||
|- | |- | ||
|Spin Crusher || Instant || 3s || | |Spin Crusher || Instant || 3s || 250 EP || 0y<br>5y || Delivers an attack with a potency of 50,000 to all opposing warmachina in a cone before you. 5,000 when attacking a player, mammet, or object. | ||
|- | |- | ||
|Laser X Sword || | |Laser X Sword || 1.5s || 10s || 1000 EP || 0y<br>15y || Delivers an attack with a potency of 50,000 to all opposing players and warmachina in a cone before you. 5,000 when attacking a mammet or object. | ||
|- | |- | ||
|Optical Sight || | |Optical Sight || 1.5s || 5s || 500 EP || 50y<br>10y || Deals damage with a potency of 30,000 to all opposing players and warmachina near point of impact. 3,000 when attacking a mammet or object. | ||
|- | |- | ||
|Ceruleum Refill || Instant || 30s || 25 CE || 0y<br>0y || Uses 25 units of ceruleum fuel (CE) to restore | |Ceruleum Refill || Instant || 30s || 25 CE || 0y<br>0y || Uses 25 units of ceruleum fuel (CE) to restore 5000 EP to currently mounted warmachina. | ||
|- | |- | ||
|} | |} | ||
| Line 95: | Line 118: | ||
[[File:hidden gorge oppressor1.png]] | [[File:hidden gorge oppressor1.png]] | ||
A hulking machina engineered for siege warfare, it excels at wreaking havoc upon structures. | A hulking machina engineered for siege warfare, it excels at wreaking havoc upon structures. However, this machina is extremely slow and is almost helpless against infantry. 3000-tonze Missiles should be used only to attack structures as they will barely scratch infantry. | ||
*HP: | *HP: 600,000 | ||
*Required Ceruleum (CE): 50 | *Required Ceruleum (CE): 50 | ||
*Maximum Simultaneous Deployment: 2 | *Maximum Simultaneous Deployment: 2 | ||
| Line 103: | Line 126: | ||
'''Actions''' | '''Actions''' | ||
{| | {| {{STDT| sortable align-center}} | ||
|- | |- | ||
! Action Name | ! Action Name | ||
| Line 112: | Line 135: | ||
! Effect | ! Effect | ||
|- | |- | ||
|Steam Release || Instant || 5s || 50 EP || 0y<br>10y || Deals damage to all opposing players and warmachina nearby with a potency of | |Steam Release || Instant || 5s || 50 EP || 0y<br>10y || Deals damage to all opposing players and warmachina nearby with a potency of 10,000. 1,000 when attacking a mammet or object. | ||
Additional Effect: 15-yalm knockback | Additional Effect: 15-yalm knockback | ||
|- | |- | ||
|3000-tonze Missile || 2.5s || 15s || 200 EP || 75y<br>10y || Deals damage with a potency of | |3000-tonze Missile || 2.5s || 15s || 200 EP || 75y<br>10y || Deals damage with a potency of 1,000,000 to all objects near point of impact. 20,000 to opposing players, warmachina, or mammets. | ||
Potency decreases the greater the target's distance from point of impact, to a maximum of 30 yalms. | Potency decreases the greater the target's distance from point of impact, to a maximum of 30 yalms. | ||
|- | |- | ||
| Line 127: | Line 150: | ||
Boasting unrivaled power, Brute Justice dominates opposing players and machina on the battlefield, while also laying waste to structures with its lethal armaments. | Boasting unrivaled power, Brute Justice dominates opposing players and machina on the battlefield, while also laying waste to structures with its lethal armaments. | ||
*HP: | *HP: 450,000 | ||
*Required Ceruleum (CE): 50 | *Required Ceruleum (CE): 50 | ||
*Maximum Simultaneous Deployment: 2 | *Maximum Simultaneous Deployment: 2 | ||
| Line 133: | Line 156: | ||
'''Actions''' | '''Actions''' | ||
{| | {| {{STDT| sortable align-center}} | ||
|- | |- | ||
! Action Name | ! Action Name | ||
| Line 142: | Line 165: | ||
! Effect | ! Effect | ||
|- | |- | ||
|Flarethrower || | |Flarethrower || 2s || 10s || 50 EP || 0y<br>31y || Deals damage with a potency of 40,000 to all opposing players and warmachina in a cone before you. 4,000 when attacking a mammet or object. | ||
Additional Effect: Inflicts Burns on opposing players and warmachina | Additional Effect: Inflicts Burns on opposing players and warmachina | ||
Duration: | Potency: 10,000 | ||
Duration: 12s | |||
|- | |- | ||
|Double Rocket Punch || Instant || 3s || 25 EP || 50y<br>3y || Deals damage with a potency of | |Double Rocket Punch || Instant || 3s || 25 EP || 50y<br>3y || Deals damage with a potency of 60,000 to all objects near point of impact. 30,000 when attacking opposing players, warmachina, or mammets. | ||
Additional Effect: Stun | Additional Effect: Stun | ||
Duration: 3s | Duration: 3s | ||
|- | |- | ||
|Mega Beam || 2s || 15s || 100 EP || 0y<br>70y || Delivers damage with a potency of | |Mega Beam || 2s || 15s || 100 EP || 0y<br>70y || Delivers damage with a potency of 80,000 to all opposing players and warmachina in a straight line before you. 8,000 when attacking a mammet or object. | ||
Additional Effect: 30-yalm knockback | Additional Effect: 30-yalm knockback | ||
|- | |- | ||
| Line 172: | Line 196: | ||
Ceruleum (CE) is required to operate machina. Players can build up ceruleum stores for their party by collecting tanks in the field or defeating enemy players and mammets up to a maximum of 100 units. | Ceruleum (CE) is required to operate machina. Players can build up ceruleum stores for their party by collecting tanks in the field or defeating enemy players and mammets up to a maximum of 100 units. | ||
{| | {| {{STDT| sortable align-center}} | ||
|- | |||
! Action Type | |||
! colspan="2" | Recipient | |||
|- | |- | ||
|Claiming a ceruleum tank || Party || 10 | |Claiming a ceruleum tank || Party || 10 | ||
| Line 191: | Line 218: | ||
Only one machina may be operated per party at any given time, regardless of type. In the case of the Oppressor, however, the limit is two per team. Two Brute Justices can be deployed by each team per match, one becoming available for each tower you lose. | Only one machina may be operated per party at any given time, regardless of type. In the case of the Oppressor, however, the limit is two per team. Two Brute Justices can be deployed by each team per match, one becoming available for each tower you lose. | ||
* Warmachina can be deployed at any time once the requirements have been met. | *Warmachina can be deployed at any time once the requirements have been met. | ||
'''Resource Management''' | '''Resource Management''' | ||
| Line 197: | Line 224: | ||
When deploying a machina, its HP will be displayed in place of the player. Its HP cannot be restored by curative actions of teammates, nor will it restore automatically when out of combat. Machina actions will expend EP, a resource that can only be restored by using the Ceruleum Refill action. Be advised that use of this action will deplete your party's ceruleum stores. | When deploying a machina, its HP will be displayed in place of the player. Its HP cannot be restored by curative actions of teammates, nor will it restore automatically when out of combat. Machina actions will expend EP, a resource that can only be restored by using the Ceruleum Refill action. Be advised that use of this action will deplete your party's ceruleum stores. | ||
{| | {| {{STDT| sortable align-center}} | ||
|- | |- | ||
! Action Name | ! Action Name | ||
| Line 211: | Line 238: | ||
===Steam Cannon=== | ===Steam Cannon=== | ||
Two steam cannons | Two steam cannons are erected near each team's core. While they cannot be moved, they are powerful weapons which may prove useful in deterring enemy forces. Each cannon can be manned by one person at a time, though they are also susceptible to attack. | ||
[[File:hidden gorge steam cannon1.png]] | [[File:hidden gorge steam cannon1.png]] | ||
{| | {| {{STDT| sortable align-center}} | ||
|- | |- | ||
! Action Name | ! Action Name | ||
| Line 224: | Line 251: | ||
! Effect | ! Effect | ||
|- | |- | ||
|Cannonfire || 1.5s || 1s || - || 60y<br>6y || Deals damage with a potency of | |Cannonfire || 1.5s || 1s || - || 60y<br>6y || Deals damage with a potency of 20,000 to all opposing players and warmachina near point of impact. 2,000 when attacking a mammet or object. | ||
|- | |- | ||
|} | |} | ||
===Mammets=== | ===Mammets=== | ||
Mammets are clockwork soldiers programmed to seek out and destroy towers and cores. They emerge from their own core at regular intervals before striking out on a set route, and will remain in battle for a set duration. Upon detecting an enemy mammet, they will engage and attack until either side is destroyed. Mammets that arrive at an enemy tower or core will perform a powerful self-sacrificing attack. | Mammets are clockwork soldiers programmed to seek out and destroy towers and cores while ignoring players. They emerge from their own core at regular intervals before striking out on a set route, and will remain in battle for a set duration. Upon detecting an enemy mammet, they will engage and attack until either side is destroyed. Mammets that arrive at an enemy tower or core will perform a powerful self-sacrificing attack, dealing 400,000 damage. Mammets receive 50% less healing when targeted by players. | ||
'''Wind-up Viking''' | '''Wind-up Viking''' | ||
These mammets boast high HP and specialize in fighting at close quarters. | These mammets boast high HP and specialize in fighting at close quarters. | ||
[[File:hidden gorge wind-up viking1.png]] | |||
'''Wind-up Magus''' | '''Wind-up Magus''' | ||
These mammets specialize in long range combat with magic-based attacks. | These mammets specialize in long range combat with magic-based attacks. | ||
[[File:hidden gorge wind-up magus1.png]] | |||
'''Gaining Ceruleum from Mammets''' | '''Gaining Ceruleum from Mammets''' | ||
| Line 249: | Line 277: | ||
====Ceruleum Engines==== | ====Ceruleum Engines==== | ||
Ceruleum engines move across the map on rails at high speed, stopping at the loading stations in the center of the map. By taking control of the loading stations, teams can claim the supplies delivered by the ceruleum engines. | Ceruleum engines move across the map on rails at high speed, stopping at the loading stations in the center of the map. By taking control of the loading stations, teams can claim the supplies delivered by the ceruleum engines. | ||
[[File:hidden gorge ceruleum engines1.jpg]] | |||
'''Ceruleum Engines in Motion''' | '''Ceruleum Engines in Motion''' | ||
If you come into contact with a ceruleum engine while it is moving, you will incur potentially lethal damage. | If you come into contact with a ceruleum engine while it is moving, you will incur potentially lethal damage. | ||
A warning will sound to indicate the approach of a ceruleum engine. | A warning will sound to indicate the approach of a ceruleum engine. | ||
[[File:hidden gorge ceruleum engines2.jpg]] | |||
====Loading Stations==== | ====Loading Stations==== | ||
| Line 271: | Line 304: | ||
Loading station | Loading station | ||
Not controlled | Not controlled | ||
[[File:hidden gorge loading station1.png]] | |||
Loading station | Loading station | ||
Controlled by the Falcons | Controlled by the Falcons | ||
[[File:hidden gorge loading station2.png]] | |||
Loading station | Loading station | ||
Controlled by the Ravens | Controlled by the Ravens | ||
[[File:hidden gorge loading station3.png]] | |||
'''Status of Ceruleum Engines''' | '''Status of Ceruleum Engines''' | ||
| Line 282: | Line 318: | ||
The UI displays information on when a ceruleum engine will arrive, the supplies it carries, and which team occupies the loading station. | The UI displays information on when a ceruleum engine will arrive, the supplies it carries, and which team occupies the loading station. | ||
[[File:hidden gorge ceruleum engines status1.png]] | |||
[[File:hidden gorge ceruleum engines status2.png]] | |||
#Supply type | |||
#Members per team (up to four) | |||
#Occupied | |||
#Occupation gauge | |||
#Control gauge | |||
====Supplies==== | ====Supplies==== | ||
| Line 296: | Line 336: | ||
*Soaring Stack Increase: 1 | *Soaring Stack Increase: 1 | ||
*Effect: Each party on the team gains 50 ceruleum. | *Effect: Each party on the team gains 50 ceruleum. | ||
*Icon: | *Icon: [[File:hidden gorge main ceruleum tank1.png|40px]] | ||
*Notes: Hotly contested by both teams, as 50 ceruleum per party is enough to construct one machina per party. | |||
'''Gobbiejuice''' | '''Gobbiejuice''' | ||
*Arrives: During the first 12 minutes of the match | *Arrives: During the first 12 minutes of the match | ||
*Soaring Stack Increase: 1 | *Soaring Stack Increase: 1 | ||
*Effect: Fills the | *Effect: Fills the limit break gauge of every team member. | ||
*Icon: | *Icon: [[File:hidden gorge gobbiejuice icon1.png|40px]] | ||
*Notes: This should not be prioritized, as Limit Break gauges charge at a much faster rate since the PvP rework in [[Patch 6.1]]. | |||
'''Gobtanks''' | '''Gobtanks''' | ||
| Line 308: | Line 350: | ||
*Soaring Stack Increase: 1 | *Soaring Stack Increase: 1 | ||
*Effect: Two gobtanks will appear at the core and will travel down the north and south routes to the enemy base. | *Effect: Two gobtanks will appear at the core and will travel down the north and south routes to the enemy base. | ||
*Icon: | *Icon: [[File:hidden gorge gobtanks icon1.png|40px]] | ||
[[File:hidden gorge gobtanks1.png]] | |||
'''Gobcrates''' | '''Gobcrates''' | ||
| Line 314: | Line 358: | ||
*Soaring Stack Increase: 3 | *Soaring Stack Increase: 3 | ||
*Effect: Grant all of the effects of main ceruleum tanks, gobbiejuice, and gobtanks. | *Effect: Grant all of the effects of main ceruleum tanks, gobbiejuice, and gobtanks. | ||
*Icon: | *Icon: [[File:hidden gorge gobcrates icon1.png|40px]] | ||
===Goblin Mercenaries=== | ===Goblin Mercenaries=== | ||
After a certain amount of time has passed, goblin mercenaries will randomly appear from the north and south mercenary bases. Initially, they will not side with either team, and will attack any player that approaches. However, it is possible to have them ally with your team. | After a certain amount of time has passed, goblin mercenaries will randomly appear from the north and south mercenary bases. Initially, they will not side with either team, and will attack any player that approaches. However, it is possible to have them ally with your team. | ||
[[File:hidden gorge goblin mercenaries1.jpg]] | |||
====Allied Mercenaries==== | ====Allied Mercenaries==== | ||
If the damage your team deals to a goblin mercenary surpasses that of the opposing team by a certain amount, it will join your side. If the mercenary's HP reaches zero before this condition has been fulfilled, it will form an alliance with whichever team dealt the most damage to it. | If the damage your team deals to a goblin mercenary surpasses that of the opposing team by a certain amount, it will join your side. If the mercenary's HP reaches zero before this condition has been fulfilled, it will form an alliance with whichever team dealt the most damage to it. | ||
A gauge above the goblin mercenary shows the difference in damage dealt by each team. Falcons are shown in blue and Ravens are shown in red. | A gauge above the goblin mercenary shows the difference in damage dealt by each team. Falcons are shown in blue and Ravens are shown in red. | ||
[[File:hidden gorge allied mercenaries1.jpg]] | |||
====Mercenary Deployment==== | ====Mercenary Deployment==== | ||
Once you have formed an alliance with a mercenary, it will appear at your team's core and will attempt to destroy the enemy's towers and core, much like a mammet would. Forming an alliance with a mercenary that appeared from the north mercenary base will cause it to travel along the northern route, with the same being true of the south mercenary base and southern route. | Once you have formed an alliance with a mercenary, it will appear at your team's core and will attempt to destroy the enemy's towers and core, much like a mammet would. Forming an alliance with a mercenary that appeared from the north mercenary base will cause it to travel along the northern route, with the same being true of the south mercenary base and southern route. | ||
Mercenaries are also governed by the Contractual Obligation status, and they will leave the field of battle once the status counts down to zero. After a certain amount of time passes, they will reappear from their respective base and will no longer be allied with either team. | Mercenaries are also governed by the Contractual Obligation status, and they will leave the field of battle once the status counts down to zero. After a certain amount of time passes, they will reappear from their respective base and will no longer be allied with either team. | ||
[[File:hidden gorge mercenary deployment1.png]] | |||
===Soaring=== | ===Soaring=== | ||
When you defeat an enemy team member, your party receives the Soaring enhancing effect. When destroying an enemy tower, your party and all parties on your team will receive the Soaring enhancing effect. This effect can stack up to twenty times, increasing all party members' damage dealt and HP restored via healing magic, while also reducing damage taken. At twenty stacks, Soaring will be replaced with the Flying High effect, which confers even greater benefits, including an increase to the rate at which the adrenaline gauge fills. However, the effects of Soaring and Flying High are stopped when riding machina. | When you defeat an enemy team member, your party receives the Soaring enhancing effect. When destroying an enemy tower, your party and all parties on your team will receive the Soaring enhancing effect. This effect can stack up to twenty times, increasing all party members' damage dealt and HP restored via healing magic, while also reducing damage taken. At twenty stacks, Soaring will be replaced with the Flying High effect, which confers even greater benefits, including an increase to the rate at which the adrenaline gauge fills. However, the effects of Soaring and Flying High are stopped when riding machina. | ||
{| | Unlike {{questlink|pvp|Astragalos}} and {{questlink|PvP|Frontline}}, being KO'ed '''does not decrease or remove Soaring and Flying High'''. The effect is that both teams in lategame matches will quickly be able to KO enemy players due to Flying High. | ||
{| {{STDT| sortable align-center}} | |||
|- | |- | ||
! Status Effect | ! Status Effect | ||
| Line 343: | Line 392: | ||
* The effects of Soaring and Flying High are stopped when riding machina. | * The effects of Soaring and Flying High are stopped when riding machina. | ||
{| | {| {{STDT| sortable align-center}} | ||
|- | |||
! Action Type | |||
! colspan="2" | Recipient | |||
|- | |- | ||
|Defeating an enemy player with 0 to 9 stacks || Party || 1 | |Defeating an enemy player with 0 to 9 stacks || Party || 1 | ||
| Line 362: | Line 414: | ||
|- | |- | ||
|} | |} | ||
[[File:hidden gorge soaring1.jpg]] | |||
Gaining stacks of Soaring | Gaining stacks of Soaring | ||
[[File:hidden gorge soaring2.png]] | |||
An icon will also be displayed next to the name of players under the effects of Soaring. | An icon will also be displayed next to the name of players under the effects of Soaring. | ||
| Line 370: | Line 426: | ||
===Player Icons=== | ===Player Icons=== | ||
All players engaged in combat, including those experiencing | All players engaged in combat, including those experiencing Soaring or Flying High will appear on the map and minimap when nearby. | ||
===Miscellaneous=== | ===Miscellaneous=== | ||
Rival Wings makes use of a unique UI to display match information such as the deployment of machina by allies or enemy players and the units of ceruleum stored by your party. This UI also displays the number of stacks of Soaring accumulated by your party. | Rival Wings makes use of a unique UI to display match information such as the deployment of machina by allies or enemy players and the units of ceruleum stored by your party. This UI also displays the number of stacks of Soaring accumulated by your party. | ||
[[File:hidden gorge miscellaneous1.jpg]] | |||
The position of these UI elements can be changed via the Duty section in HUD Layout interface under System in the main menu. | The position of these UI elements can be changed via the Duty section in HUD Layout interface under System in the main menu. | ||
| Line 380: | Line 438: | ||
The duty list will not be displayed while participating in Rival Wings. | The duty list will not be displayed while participating in Rival Wings. | ||
{{PvP nav}} | |||
[[Category:Rival Wings]] [[Category:Patch 4.5 Features]] | |||
{ | |||
[[Category:Rival Wings]] [[Category:Patch 4. | |||
Latest revision as of 00:25, 12 November 2024
Hidden Gorge
- Level
- 30
- Difficulty
- Normal
- Unsyncing
- Not Allowed
- Time limit
- 15 minutes
- Tomestones
 50
50 - Req. quest
 Earning Your Wings
- Patch
- 4.55
“Developed by Amajina & Sons Mineral Concern at great cost, the mine at Hidden Gorge proved to be a flash in the pan, its veins running dry within a matter of years. For a time afterwards, the site in Thanalan lay abandoned, but now it has been revived as a training ground for adventurers. In tracks of steel the battle lines have been drawn, and Falcons and Ravens will lock beaks once more in a struggle for territorial supremacy!
— In-game description
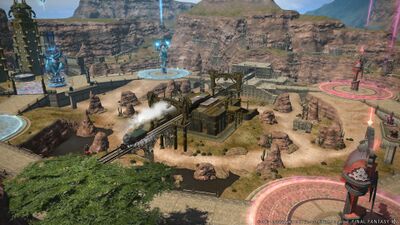
Hidden Gorge is a level 30 PvP duty introduced in patch 4.55 with Stormblood. It is a Rival Wings mode. During a Hidden Gorge campaign, teams vie for control of supplies delivered by ceruleum engines.
In a Nutshell
While Hidden Gorge may seem overwhelming at first, it is easy to increase chances of winning with a few rules of thumb.
- Beginning phase: Go to the center station, take out enemies, use your Limit Break to build Soaring stacks, and take out more enemies.
- Order of Battle: Mount warmachina → Take the center station if a train is incoming shortly → Take the Goblin Mercenary → Escort allied Oppressors → Destroy enemy Oppressors → Destroy enemy Mammets
- Kill Priority: Oppressor ≧ Brute Justice ≧ Goblin Mercenary ≧ Mammets >>> Other >>>>>>> People
- Avoid common mistakes:
- A common pitfall are alliances not using accumulated CE on warmachina and subsequently being unable to gain Soaring stacks. Don't be afraid to mount warmachina (colloquially called 'meching up').
- Don't fire Oppressor missiles at people. They are most effective against structures.
Overview
Abandoning Matches
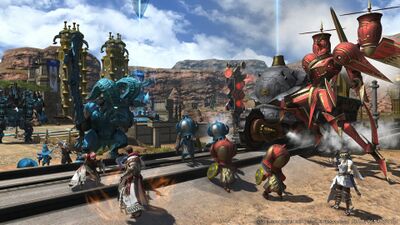
Players who abandon a Rival Wings campaign (not including players who join a match in progress or are vote kicked) will receive a penalty and be unable to register for duties for 30 minutes. Any players inactive for a period of two minutes will automatically be removed from play.
Preparing for Battle
Rival Wings participants will be placed on one of two teams: the Falcons or the Ravens. Players will then begin the match at their teams' respective landing points. Matches will begin after a 45-second countdown once all players are loaded in.
Chat
The Say, Party, Alliance, Yell, Shout, Free Company, Linkshell, PvP Team, and Novice Network chat channels can be used during Rival Wings.
- Say, Yell, and Shout can only be used with players on the same team.
Retaliation
Incapacitated players will be returned to their landing point, where they will be allowed to rejoin combat after a short delay. Furthermore, players will be invulnerable so long as they remain at their landing point. This effect will be lost upon returning to the battlefield.
Mounts
Players are free to use mounts during Rival Wings campaigns. However, players taking damage while mounted will be inflicted with the Hoofing It debuff, preventing using mounts for 5 seconds. This status cannot be cured with Purify.
- Flying and pillion riding are disabled.
Return
Using Return will teleport players back to their landing point. Moreover, this action has no recast time during Rival Wings campaigns. However, casting will be interrupted by attacks.
Victory Conditions, Cores and Towers
Rules of Engagement
The first team to destroy the core located on the opponent's base will be declared the winner. In the event neither team destroys a core, victory will be decided based on each team's remaining core HP, number of towers, and tower HP, in that order.
- In the event these values are the same for both teams, the match will end in a draw.
Cores and Towers
Cores
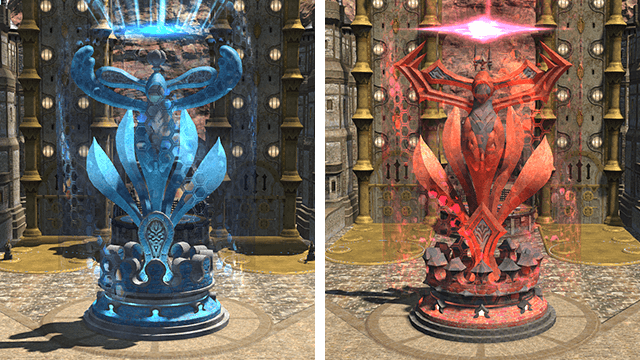
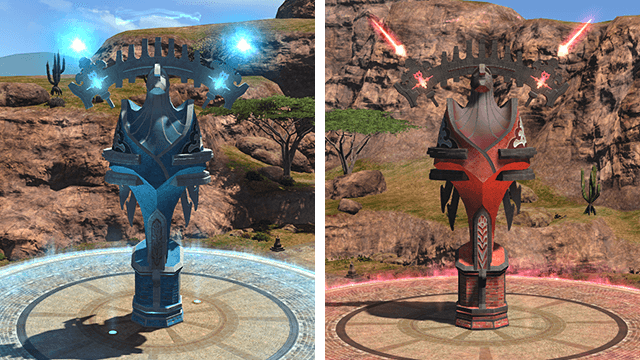
Each team has a core located at its base, and the chief objective is to destroy the enemy's core. The core is protected by a magitek field emanating from two towers. Attempting to enter the enemy's base with both towers active will result in an instant KO, so before you can strike at the core, you must first destroy at least one of the towers. With one tower destroyed, your team can begin to damage the core; however, damage will be significantly mitigated by the remainder of the magitek field until the second tower is eliminated.
Towers
Each team has two towers that serve to protect their core. Each tower is also enveloped in a defensive field that mitigates damage taken by team members and gradually restores their HP by 4,000 per tick. Players can take advantage of the additional protection when hard-pressed by the opposing team, though machina attacks ignore the increased damage resistance. Destroying the enemy team's towers will remove the defensive fields, allow the core to be damaged, and grant ceruleum and Soaring stacks to all parties on your team.
Display of Core and Tower HP
A unique UI is used to display the HP of cores and towers. Because each team's core cannot be damaged until one or more of their towers are destroyed, only the HP of towers will be displayed at the start of a match. Once the core is exposed by the destruction of at least one tower, however, its HP will also be displayed.
While cores and towers can be damaged by players directly, their high HP makes this unconventional outside of concentrated attacks from large groups.
Advanced Rules
Machina
Players can deploy three types of powerful machina in battle. While Machina are useful tools, their actions have a casting bar and telegraph, and require infantry support for maximum effectiveness.
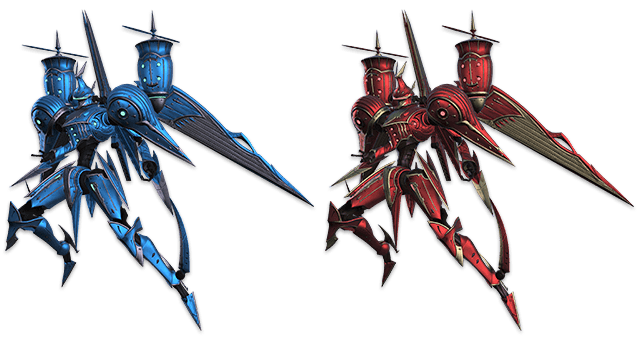
Cruise Chaser
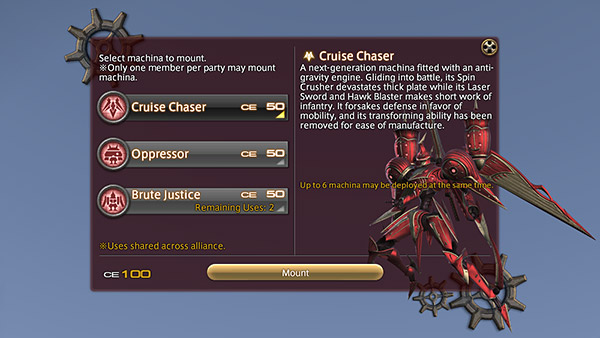
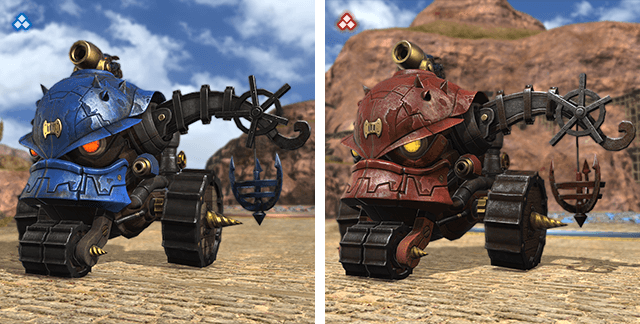
A next-generation machina ideal for combat against enemy players and machina. These excel at guarding the north and south bridge chokepoints.
- HP: 300,000
- Required Ceruleum (CE): 50
- Maximum Simultaneous Deployment: 6
- Requirements to Deploy: -
Actions
| Action Name | Cast | Recast | Cost | Range Radius |
Effect |
|---|---|---|---|---|---|
| Spin Crusher | Instant | 3s | 250 EP | 0y 5y |
Delivers an attack with a potency of 50,000 to all opposing warmachina in a cone before you. 5,000 when attacking a player, mammet, or object. |
| Laser X Sword | 1.5s | 10s | 1000 EP | 0y 15y |
Delivers an attack with a potency of 50,000 to all opposing players and warmachina in a cone before you. 5,000 when attacking a mammet or object. |
| Optical Sight | 1.5s | 5s | 500 EP | 50y 10y |
Deals damage with a potency of 30,000 to all opposing players and warmachina near point of impact. 3,000 when attacking a mammet or object. |
| Ceruleum Refill | Instant | 30s | 25 CE | 0y 0y |
Uses 25 units of ceruleum fuel (CE) to restore 5000 EP to currently mounted warmachina. |
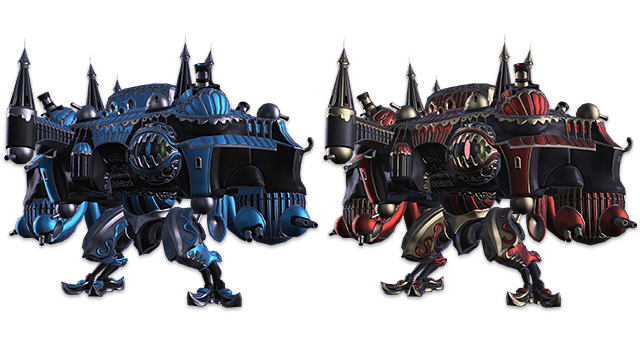
Oppressors
A hulking machina engineered for siege warfare, it excels at wreaking havoc upon structures. However, this machina is extremely slow and is almost helpless against infantry. 3000-tonze Missiles should be used only to attack structures as they will barely scratch infantry.
- HP: 600,000
- Required Ceruleum (CE): 50
- Maximum Simultaneous Deployment: 2
- Requirements to Deploy: -
Actions
| Action Name | Cast | Recast | Cost | Range Radius |
Effect |
|---|---|---|---|---|---|
| Steam Release | Instant | 5s | 50 EP | 0y 10y |
Deals damage to all opposing players and warmachina nearby with a potency of 10,000. 1,000 when attacking a mammet or object.
Additional Effect: 15-yalm knockback |
| 3000-tonze Missile | 2.5s | 15s | 200 EP | 75y 10y |
Deals damage with a potency of 1,000,000 to all objects near point of impact. 20,000 to opposing players, warmachina, or mammets.
Potency decreases the greater the target's distance from point of impact, to a maximum of 30 yalms. |
| Ceruleum Refill | Instant | 30s | 25 CE | 0y 0y |
Uses 25 units of ceruleum fuel (CE) to restore 500 EP to currently mounted warmachina. |
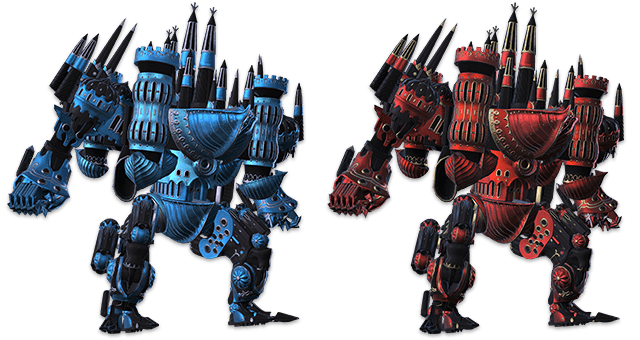
Brute Justice
Boasting unrivaled power, Brute Justice dominates opposing players and machina on the battlefield, while also laying waste to structures with its lethal armaments.
- HP: 450,000
- Required Ceruleum (CE): 50
- Maximum Simultaneous Deployment: 2
- Requirements to Deploy: Available after losing a tower.
Actions
| Action Name | Cast | Recast | Cost | Range Radius |
Effect |
|---|---|---|---|---|---|
| Flarethrower | 2s | 10s | 50 EP | 0y 31y |
Deals damage with a potency of 40,000 to all opposing players and warmachina in a cone before you. 4,000 when attacking a mammet or object.
Additional Effect: Inflicts Burns on opposing players and warmachina Potency: 10,000 Duration: 12s |
| Double Rocket Punch | Instant | 3s | 25 EP | 50y 3y |
Deals damage with a potency of 60,000 to all objects near point of impact. 30,000 when attacking opposing players, warmachina, or mammets.
Additional Effect: Stun Duration: 3s |
| Mega Beam | 2s | 15s | 100 EP | 0y 70y |
Delivers damage with a potency of 80,000 to all opposing players and warmachina in a straight line before you. 8,000 when attacking a mammet or object.
Additional Effect: 30-yalm knockback |
| Ceruleum Refill | Instant | 30s | 25 CE | 0y 0y |
Uses 25 units of ceruleum fuel (CE) to restore 500 EP to currently mounted warmachina. |
Deploying Machina
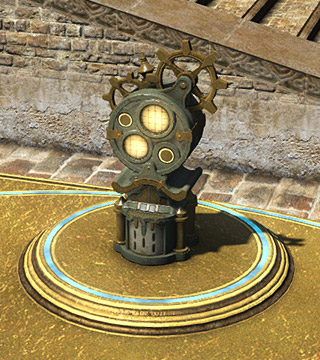
Hangar Terminal
Hangar terminals are located near the starting area for each team, from which machina can be deployed.
Accessing a terminal will display a unique UI containing information on available machina.
Ceruleum (CE)
Ceruleum (CE) is required to operate machina. Players can build up ceruleum stores for their party by collecting tanks in the field or defeating enemy players and mammets up to a maximum of 100 units.
| Action Type | Recipient | |
|---|---|---|
| Claiming a ceruleum tank | Party | 10 |
| Destroying a mammet | Party | Up to 20 |
| Destroying a gobtank | Party | Up to 20 |
| Claiming a main ceruleum tank | Team | 50 |
| Claiming a gobcrate | Team | 50 |
- Ceruleum awarded for destroying mammets and gobtanks is divided between each party according to the amount of damage caused. Ceruleum is not awarded for damage caused by allied mammets or gobtanks.
Machina Restrictions
Only one machina may be operated per party at any given time, regardless of type. In the case of the Oppressor, however, the limit is two per team. Two Brute Justices can be deployed by each team per match, one becoming available for each tower you lose.
- Warmachina can be deployed at any time once the requirements have been met.
Resource Management
When deploying a machina, its HP will be displayed in place of the player. Its HP cannot be restored by curative actions of teammates, nor will it restore automatically when out of combat. Machina actions will expend EP, a resource that can only be restored by using the Ceruleum Refill action. Be advised that use of this action will deplete your party's ceruleum stores.
| Action Name | Cast | Recast | Cost | Range Radius |
Effect |
|---|---|---|---|---|---|
| Ceruleum Refill | Instant | 30s | 25 CE | 0y 0y |
Uses 25 units of ceruleum fuel (CE) to restore 500 EP to currently mounted warmachina. |
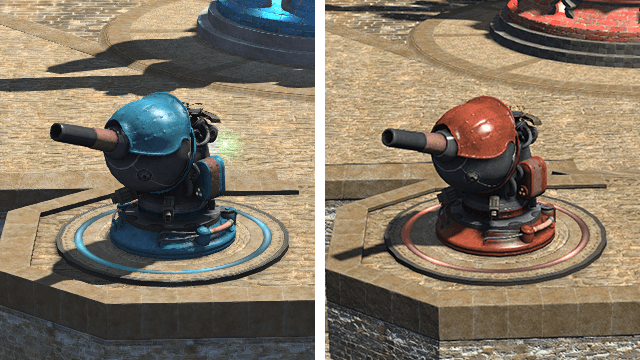
Steam Cannon
Two steam cannons are erected near each team's core. While they cannot be moved, they are powerful weapons which may prove useful in deterring enemy forces. Each cannon can be manned by one person at a time, though they are also susceptible to attack.
| Action Name | Cast | Recast | Cost | Range Radius |
Effect |
|---|---|---|---|---|---|
| Cannonfire | 1.5s | 1s | - | 60y 6y |
Deals damage with a potency of 20,000 to all opposing players and warmachina near point of impact. 2,000 when attacking a mammet or object. |
Mammets
Mammets are clockwork soldiers programmed to seek out and destroy towers and cores while ignoring players. They emerge from their own core at regular intervals before striking out on a set route, and will remain in battle for a set duration. Upon detecting an enemy mammet, they will engage and attack until either side is destroyed. Mammets that arrive at an enemy tower or core will perform a powerful self-sacrificing attack, dealing 400,000 damage. Mammets receive 50% less healing when targeted by players.
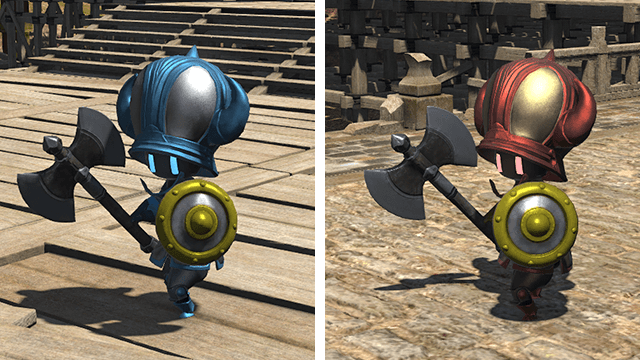
Wind-up Viking
These mammets boast high HP and specialize in fighting at close quarters.
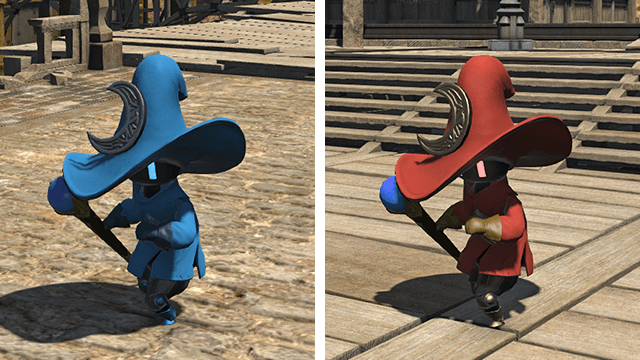
Wind-up Magus
These mammets specialize in long range combat with magic-based attacks.
Gaining Ceruleum from Mammets
Parties can gain up to twenty units of ceruleum upon defeating an enemy mammet. These units will be distributed to all parties that engage with the mammet based on the amount of damage inflicted. Ceruleum cannot be gained from damage inflicted by other mammets.
Ceruleum Engines, Loading Stations, and Supplies
Ceruleum Engines
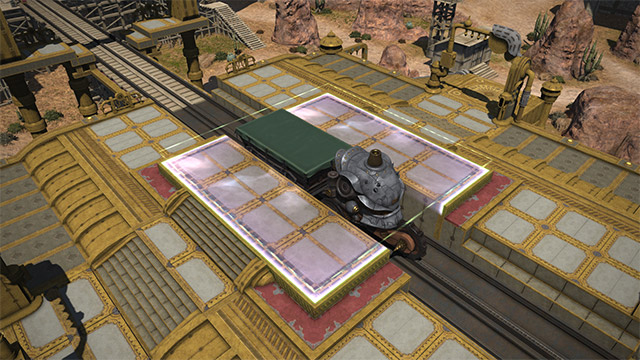
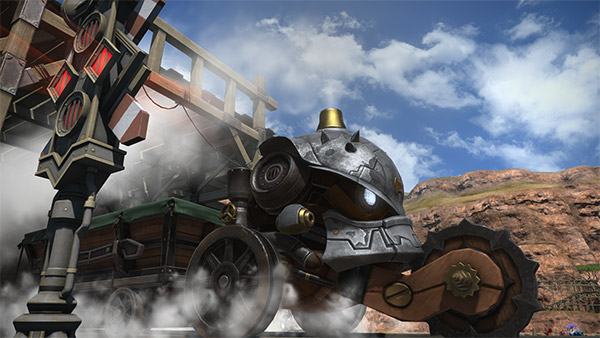
Ceruleum engines move across the map on rails at high speed, stopping at the loading stations in the center of the map. By taking control of the loading stations, teams can claim the supplies delivered by the ceruleum engines.
Ceruleum Engines in Motion
If you come into contact with a ceruleum engine while it is moving, you will incur potentially lethal damage.
A warning will sound to indicate the approach of a ceruleum engine.
Loading Stations
Ceruleum engines carry supplies to loading stations. It is not possible to enter a loading station while riding machina.
Occupying a Loading Station
When a ceruleum engine arrives at a station, standing in the area next to the engine will cause a gauge to fill. Once it is full, your team will occupy that station. The gauge fills more quickly when you have a higher number of team members near the engine than the opponent. The greater the difference in players, the quicker the gauge fills. However, only the first four players from each team are counted. Those standing near the engine will also gain the Sheer Will status, which greatly increases damage dealt. Making use of this status will help to reduce the number of enemies and occupy the station more quickly.
Controlling a Loading Station
Once a loading station has been occupied, a new gauge will appear indicating your control over the station. When filled, the station will be under your team's control, allowing you to claim its supplies. This gauge will only fill when your team has a number of members equal to or higher than the opponent in that area. When the supplies have been claimed, the ceruleum engine will leave the station and the gauges will be reset.
When a Ceruleum Engine is at a Loading Station
Loading station
Not controlled

Loading station
Controlled by the Falcons

Loading station
Controlled by the Ravens

Status of Ceruleum Engines
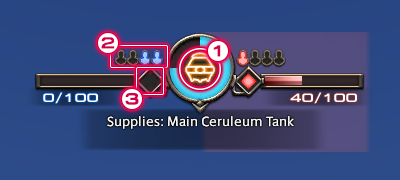
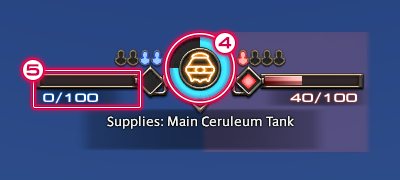
The UI displays information on when a ceruleum engine will arrive, the supplies it carries, and which team occupies the loading station.
- Supply type
- Members per team (up to four)
- Occupied
- Occupation gauge
- Control gauge
Supplies
There are four types of supplies. For the first half of the match, the ceruleum engine will deliver main ceruleum tanks, gobbiejuice, and gobtank keys at random. In the second half of the match, they will only deliver gobcrates. Each type grants its own benefits and increases the Soaring stacks of the whole team.
Main Ceruleum Tank
- Arrives: During the first 12 minutes of the match
- Soaring Stack Increase: 1
- Effect: Each party on the team gains 50 ceruleum.
- Icon:

- Notes: Hotly contested by both teams, as 50 ceruleum per party is enough to construct one machina per party.
Gobbiejuice
- Arrives: During the first 12 minutes of the match
- Soaring Stack Increase: 1
- Effect: Fills the limit break gauge of every team member.
- Icon:

- Notes: This should not be prioritized, as Limit Break gauges charge at a much faster rate since the PvP rework in Patch 6.1.
Gobtanks
- Arrives: During the first 12 minutes of the match
- Soaring Stack Increase: 1
- Effect: Two gobtanks will appear at the core and will travel down the north and south routes to the enemy base.
- Icon:

Gobcrates
- Arrives: After 12 minutes have passed
- Soaring Stack Increase: 3
- Effect: Grant all of the effects of main ceruleum tanks, gobbiejuice, and gobtanks.
- Icon:

Goblin Mercenaries
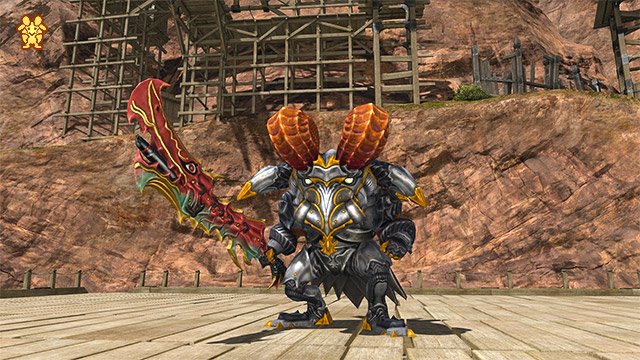
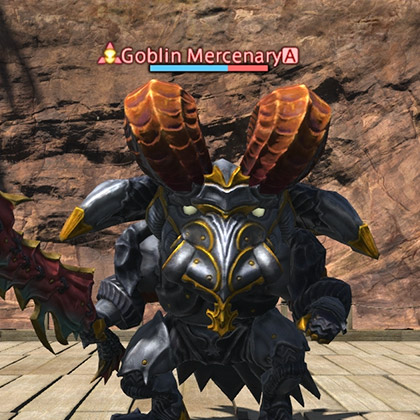
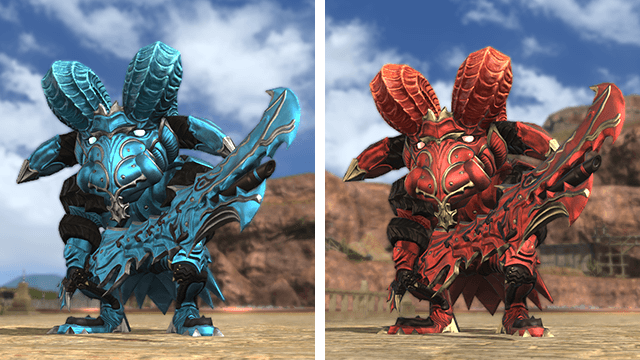
After a certain amount of time has passed, goblin mercenaries will randomly appear from the north and south mercenary bases. Initially, they will not side with either team, and will attack any player that approaches. However, it is possible to have them ally with your team.
Allied Mercenaries
If the damage your team deals to a goblin mercenary surpasses that of the opposing team by a certain amount, it will join your side. If the mercenary's HP reaches zero before this condition has been fulfilled, it will form an alliance with whichever team dealt the most damage to it. A gauge above the goblin mercenary shows the difference in damage dealt by each team. Falcons are shown in blue and Ravens are shown in red.
Mercenary Deployment
Once you have formed an alliance with a mercenary, it will appear at your team's core and will attempt to destroy the enemy's towers and core, much like a mammet would. Forming an alliance with a mercenary that appeared from the north mercenary base will cause it to travel along the northern route, with the same being true of the south mercenary base and southern route. Mercenaries are also governed by the Contractual Obligation status, and they will leave the field of battle once the status counts down to zero. After a certain amount of time passes, they will reappear from their respective base and will no longer be allied with either team.
Soaring
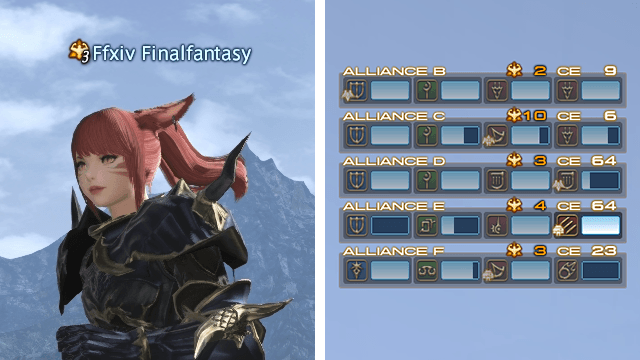
When you defeat an enemy team member, your party receives the Soaring enhancing effect. When destroying an enemy tower, your party and all parties on your team will receive the Soaring enhancing effect. This effect can stack up to twenty times, increasing all party members' damage dealt and HP restored via healing magic, while also reducing damage taken. At twenty stacks, Soaring will be replaced with the Flying High effect, which confers even greater benefits, including an increase to the rate at which the adrenaline gauge fills. However, the effects of Soaring and Flying High are stopped when riding machina.
Unlike ![]() Astragalos and
Astragalos and ![]() Frontline, being KO'ed does not decrease or remove Soaring and Flying High. The effect is that both teams in lategame matches will quickly be able to KO enemy players due to Flying High.
Frontline, being KO'ed does not decrease or remove Soaring and Flying High. The effect is that both teams in lategame matches will quickly be able to KO enemy players due to Flying High.
| Status Effect | Requirements to Deploy | Effect |
|---|---|---|
| Soaring | KO a player on the opposing team or destroy an enemy tower. | Increases damage dealt and HP restored via healing spells and skills by 2%. Effect stacks up to twenty times. |
| Flying High | Accrue twenty stacks of Soaring. | Increases damage dealt and HP restored via healing spells and skills by 50%, and the rate at which the adrenaline gauge fills by 100%. |
- The effects of Soaring and Flying High are stopped when riding machina.
| Action Type | Recipient | |
|---|---|---|
| Defeating an enemy player with 0 to 9 stacks | Party | 1 |
| Defeating an enemy player with 10 to 19 stacks | Party | 2 |
| Defeating an enemy player with Flying High status | Party | 3 |
| Destroying an enemy tower | Team | 1 |
| Claiming the gobtanks supply | Team | 1 |
| Claiming the main ceruleum tank supply | Team | 1 |
| Claiming the gobbiejuice supply | Team | 1 |
| Claiming the gobcrates supply | Team | 3 |
Gaining stacks of Soaring
An icon will also be displayed next to the name of players under the effects of Soaring.
The Soaring effect of other parties on your team can be confirmed via the alliance list.
Player Icons
All players engaged in combat, including those experiencing Soaring or Flying High will appear on the map and minimap when nearby.
Miscellaneous
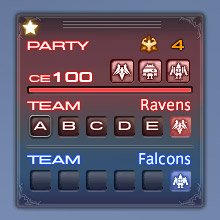
Rival Wings makes use of a unique UI to display match information such as the deployment of machina by allies or enemy players and the units of ceruleum stored by your party. This UI also displays the number of stacks of Soaring accumulated by your party.
The position of these UI elements can be changed via the Duty section in HUD Layout interface under System in the main menu.
- These UI elements can only be adjusted while participating in Rival Wings or while in the Wolves' Den.
The duty list will not be displayed while participating in Rival Wings.

