Difference between revisions of "Graphical user interface"
Freedom4556 (talk | contribs) |
Freedom4556 (talk | contribs) |
||
| (21 intermediate revisions by 3 users not shown) | |||
| Line 2: | Line 2: | ||
{{TOCRIGHT}} | {{TOCRIGHT}} | ||
[[Graphical user interface]] or '''user interface''' or '''UI''' | [[Graphical user interface]] or '''user interface''' or '''UI''' | ||
==[https://na.finalfantasyxiv.com/uiguide/ Official UI Guide on Lodestone]== | |||
==Heads Up Display== | ==Heads Up Display== | ||
[[File: | '''Out of Combat''' | ||
[[File:HUD 1.jpg|700px]] | |||
===Basic Information=== | |||
Displays your current/home world, any in-game mail you currently have not opened, your connection, as well as the various times, such as Local Time (LT), Server Time (ST) and Eorzea Time (ET). | |||
===Main Scenario Guide=== | |||
Displays the name of the next available main scenario quest. Clicking on the quest name will open the map and display where you can go to continue your journey through the story. | |||
=== | ===Party List=== | ||
The party list displays the vital stats of all current party members, with your character's information always appearing at the top. Individual party members can be targeted by clicking on their names. | The party list displays the vital stats of all current party members, with your character's information always appearing at the top. Individual party members can be targeted by clicking on their names. | ||
| Line 14: | Line 24: | ||
</blockquote> | </blockquote> | ||
=== | ===Log Window=== | ||
Quest dialogue, system messages, conversations with other players, and more are displayed | Quest dialogue, system messages, conversations with other players, and more are displayed here. The plus icon below the log window will add a new tab, while the cog icon will open the Log Window Settings menu. | ||
* ''' Using the Log Filter''' | * ''' Using the Log Filter''' | ||
Filters for text that appears in each tab of the log window can be customized, allowing players to hide or display information as they see fit. To access log filters, select the tab you wish to edit under the General tab of Log Window Settings in the Character Configuration menu. | Filters for text that appears in each tab of the log window can be customized, allowing players to hide or display information as they see fit. To access log filters, select the tab you wish to edit under the General tab of Log Window Settings in the Character Configuration menu. | ||
=== | ===Hotbar=== | ||
Player actions, emotes, items, macros | Player actions, emotes, items, macros and target markers can be set to these slots so that they can be accessed by selecting their respective icons. You can change the layout of the hotbars, and even their key settings as you see fit. | ||
'''Lockbar''' | '''Lockbar''' | ||
| Line 46: | Line 42: | ||
===4. Parameter Bar=== | ===4. Parameter Bar=== | ||
The parameter bar displays your current HP, MP/CP/GP, | The parameter bar displays your current HP, MP/CP/GP, and experience bar. Upon entering a sanctuary, such as an inn room or aetheryte camp, a crescent moon icon will appear next to your experience bar, indicating you are accruing rested bonus experience. | ||
'''Rested Bonus''' | '''Rested Bonus''' | ||
| Line 63: | Line 59: | ||
[[file:rested bonus accrued 2.png]] | [[file:rested bonus accrued 2.png]] | ||
=== | === Minimap=== | ||
Displays the current location of your character, as well as the location of nearby landmarks such as shops, aetherytes, and quest destinations. It also displays the location of enemies (red dots) and allies (blue dots). Additionally, the sun icon bordering the minimap moves to represent the time of day. | Displays the current location of your character, as well as the location of nearby landmarks such as shops, aetherytes, and quest destinations. It also displays the location of enemies (red dots) and allies (blue dots). Additionally, the sun icon bordering the minimap moves to represent the time of day. | ||
* ''To view the map when using a mouse and keyboard, click the minimap at the top right of the screen. When using a gamepad, press X''. | * ''To view the map when using a mouse and keyboard, click the minimap at the top right of the screen. When using a gamepad, press X''. | ||
=== | The map of low level areas will appear in their entirety upon visiting them for the first time. In later levels, however, you must explore maps to reveal them completely. That said, you should always remember to attune to local aetherytes. This will make it easier to return to these areas later. | ||
===Duty List=== | |||
Displays active quest titles and objectives. Clicking on the quest title opens the journal, while clicking on the objectives displays the location of those objectives on your map. | Displays active quest titles and objectives. Clicking on the quest title opens the journal, while clicking on the objectives displays the location of those objectives on your map. | ||
=== | ===Gear and Inventory Grid=== | ||
The set of dots on the left represent your character's gear slots. The set of dots on the right, your inventory. Clicking on the sets opens the respective menus. | The set of dots on the left represent your character's gear slots. The set of dots on the right, your inventory. Clicking on the sets opens the respective menus. | ||
=== | ===Main Menu=== | ||
* ''Some features cannot be accessed until they are unlocked, and therefore may not be available at the game's onset''. [[file:main menu icon1.png]] | * ''Some features cannot be accessed until they are unlocked, and therefore may not be available at the game's onset''. [[file:main menu icon1.png]] | ||
| Line 110: | Line 108: | ||
|- | |- | ||
| '''Recommendations''' || Displays a list of nearby quests and duties currently available.<br /> | | '''Recommendations''' || Displays a list of nearby quests and duties currently available.<br /> | ||
* ''This feature is unlocked after progressing to a certain point''. | |||
|- | |||
| '''Collection''' || Displays a list of collection items available.<br /> | |||
* ''This feature is unlocked after progressing to a certain point''. | * ''This feature is unlocked after progressing to a certain point''. | ||
|- | |- | ||
| Line 121: | Line 122: | ||
| '''Raid Finder''' || Challenge the latest high-level raids. Adjustable search settings allow for solo players or parties under the minimum member requirements to be matched with players with the same goals.<br /> | | '''Raid Finder''' || Challenge the latest high-level raids. Adjustable search settings allow for solo players or parties under the minimum member requirements to be matched with players with the same goals.<br /> | ||
* ''This feature is unlocked after progressing to a certain point.'' | * ''This feature is unlocked after progressing to a certain point.'' | ||
|- | |||
| '''V&C Dungeon Finder''' || Displays the Variant and Criterion Dungeons Finder window.<br /> | |||
* ''This feature is unlocked after progressing to a certain point''. | |||
|- | |||
| '''Duty Support''' || Duty Support allows the player to partake a more single-player experience, by participating on certain duties using allied/story related NPCs instead of forming groups with other players. | |||
|- | |||
| '''Trust''' || Similar to Duty Support, it allows the player to participate on duties from Shadowbringer and Endwalker expansions, accompanied by the Scions. | |||
|- | |||
| '''Duty Recorder''' || The Duty Recorder allows the player to record the game. | |||
|- | |||
| '''New Game+ ''' || New Game+ allows the player to revive previously completed chapters of the Main Story Quest, Chronicles of a New Era quests, Side Story quests, Role quests, Crafting quests and Gathering quests. | |||
|- | |- | ||
| '''Hall of the Novice''' || Grants entrance to the Hall of the Novice and access to their regimen of training exercises designed to teach new Disciples of War and Magic the basics of combat for tank, healer, and DPS roles. | | '''Hall of the Novice''' || Grants entrance to the Hall of the Novice and access to their regimen of training exercises designed to teach new Disciples of War and Magic the basics of combat for tank, healer, and DPS roles. | ||
| Line 227: | Line 239: | ||
|- | |- | ||
|} | |} | ||
===Gil=== | |||
Displays the amount of gil currently in your possession. Selecting the gil icon will open the Currency menu, which displays other currencies such as tomestones and Grand Company seals. | |||
=== | ===Notices=== | ||
All pending friend requests, party invites, etc., are displayed here. Clicking on the notice will bring up the confirmation prompt. | |||
'''In Combat''' | |||
[[File:HUD 2.jpg|800px]] | |||
===Status Effects=== | |||
Both enhancing effects and enfeebling effects are displayed as icons, with the duration of each [[status effect]] underneath. Any enhancing effect can be instantly removed by right clicking its icon. | Both enhancing effects and enfeebling effects are displayed as icons, with the duration of each [[status effect]] underneath. Any enhancing effect can be instantly removed by right clicking its icon. | ||
[[file:system icon1.png]] | [[file:system icon1.png]] | ||
=== | ===Target Bar=== | ||
Displays information on the object, character, or enemy currently targeted. The bar directly to the right of the target bar indicates the character with which the target is interacting. | |||
===Focus Target Bar=== | |||
In addition to your current target, you can also keep an eye on other enemies or allies by making them focus targets. This is a good way to keep track of one target's HP while dealing with another. | |||
'''Setting a Focus Target''' | |||
A focus target can be designated by clicking on the target and selecting Focus Target from the submenu, or by pressing Shift+F. | |||
===Enmity List=== | |||
Indicates the enmity levels of the target with which you are currently engaged. A red icon next to their name means they will attack you, so be careful. | |||
===Enmity=== | |||
Enmity is a measure of how likely an enemy is to attack a player. Your enmity in relation to that of party members is represented by numbers next to your names. The lower the number, the more enmity you have, with an "A" identifying the player currently targeted by the enemy. | |||
'''How does one build enmity?''' | |||
Attacks against an enemy and healing effects used on allies generate enmity. Tank classes are designed to generate higher levels of enmity than other classes, but there are occasions where a DPS or healer class will draw the enemy's attention. In such cases, one should stay close to the tank so they may build back enmity as quickly as possible. | |||
'''How should each role manage enmity?''' | |||
Tanks should make liberal use of enmity generating abilities to hold an enemy's attention. | |||
DPS should focus on the tank's target, making use of actions that reduce enmity as necessary. | |||
Healers must maintain the HP of party members, but try not to heal more than necessary. When using several powerful healing actions in quick succession, it is advisable to also use abilities that reduce enmity. | |||
Enmity management becomes increasingly important as you gain in levels, so it is important to learn the fundamentals of party dynamics early on. | |||
=== | ===Progress Bar=== | ||
Indicates the progress of any actions (spell casting, item usage, etc.) that are not instant. | Indicates the progress of any actions (spell casting, item usage, etc.) that are not instant. | ||
[[file:progress bar icon1.png]] | [[file:progress bar icon1.png]] | ||
=== | ===Flying Text=== | ||
Real-time messages and information indicating your character's actions (scrolls up), as well as actions conducted on your character (scrolls down). | Real-time messages and information indicating your character's actions (scrolls up), as well as actions conducted on your character (scrolls down). | ||
| Line 318: | Line 353: | ||
|- | |- | ||
|} | |} | ||
==Modifying the HUD== | |||
There are many options for customizing one's HUD layout, but everything starts with two key points: size and positioning of UI elements, which will be explained below. | |||
[[File:Adjust HUD 1.jpg|500px]] | |||
The screen will change to HUD Layout mode, wherein you can customize nearly every UI element. | |||
[[File:Adjust HUD 2.jpg|500px]] | |||
Choose from one of the UI element categories (Basic, System, Hotbars, and Duty), then select the UI element you wish to customize from the pulldown menu. Your selection will be outlined in gold. | |||
'''Positioning''' | |||
Use your mouse to drag the selected element to your desired position. | |||
'''Toggle Display''' | |||
Select the cog icon next to the pulldow menu to open the UI Element Settings menu. From there, uncheck the box labeled Display Element. The label of hidden UI elements will turn purple. | |||
This feature can also be accessed by right-clicking any HUD element. | |||
[[File:Adjust HUD 3.jpg|500px]] | |||
'''Size''' | |||
There are two methods for changing the size of UI elements. | |||
*Select the cog icon next to the pulldown menu to open the UI Element Settings menu. Here you can change the size of your selected UI element. In the case of hotbars, you can also change their orientation. | |||
*After making a selection from the Current UI Element pulldown menu, press Ctrl+Home to toggle through all available sizes. | |||
'''Transparency Settings''' | |||
You can adjust the transparency of most HUD elements. | |||
[[File:Adjust HUD 4.jpg|500px]] | |||
'''Copy Layouts''' | |||
Select the cog icon next to the numbered tabs to open the HUD Layout Settings menu. Here you can choose a layout from one of the four base slots to be copied to a new slot. | |||
[[File:Adjust HUD 5.jpg|500px]] | |||
When you have customized UI elements to your satisfaction, select Save and close the HUD Layout window. | |||
===Switching the Job Gauge to Simple Mode=== | |||
[[File:Adjust HUD 6.jpg|500px]] | |||
The job gauge is a UI element used to keep track of certain job-specific statuses and resources. | |||
The aesthetic design of this gauge is tailored to each job. The simple mode, however, is a minimalist layout that shows only essential information. | |||
To change the job gauge to simple mode, first select System from the main menu, then open the HUD Layout menu. From the Current UI Element drop-down menu, select the job gauge you wish to change, then use the neighboring gear icon button to access UI Element Settings. | |||
Selecting the box "Switch Job Gauge to Simple Mode" will change the appearance of the gauge. | |||
==Adding Abilities to the Hotbar/Crossbar== | |||
The cross hotbar can be used by holding either LT or RT (L2 or R2 on PS5™/PS4™) and the corresponding directional or action button. But first, you will need to register actions to the cross hotbar, as described below. | |||
[[File:Assign Abilities 1.jpg|500px]] | |||
From the main menu, select Character and open the Actions & Traits menu. From the tabs on the left you can peruse several categories containing various actions to register to your hotbar. | |||
[[File:Assign Abilities 4.jpg|500px]] | |||
When you've found an action you wish to register to the cross hotbar, press X (on PS5/PS4) to open the Hotbar Palette. | |||
[[File:Assign Abilities 3.jpg|500px]] | |||
[[File:Assign Abilities 2.jpg|600px]] | |||
With the Hotbar Palette open, press the button combination you wish to assign your selected action to. ALternatively, you can drag and drop the ability to the desired slot on PC. | |||
[[File:Assign Abilities 5.jpg|500px]] | |||
Once registered to your cross hotbar, actions can be used at any time via their corresponding button combinations. | |||
*For more information on Control layouts and options, please visit the [[Controls]] page. | |||
==Display Name Color== | ==Display Name Color== | ||
| Line 324: | Line 435: | ||
{| {{STDT| align-left}} | {| {{STDT| align-left}} | ||
|- | |- | ||
! | ! Color | ||
! Description | ! Description | ||
|- | |- | ||
| Line 346: | Line 457: | ||
{| {{STDT| align-left}} | {| {{STDT| align-left}} | ||
|- | |- | ||
! | ! Icon | ||
! Description | ! Description | ||
|- | |- | ||
| Line 357: | Line 468: | ||
| [[file:pvp mentor status icon1.png|link=Mentor_System_and_Novice_Network#Mentor_Types]] || Displayed over players with the PvP mentor status. | | [[file:pvp mentor status icon1.png|link=Mentor_System_and_Novice_Network#Mentor_Types]] || Displayed over players with the PvP mentor status. | ||
|- | |- | ||
| [[file:new adventurer status icon1.png|link=Mentor_System_and_Novice_Network#Novice_Network]] || Displayed over players with the new adventurer status, who have recently begun their adventures in Eorzea. | | [[file:new adventurer status icon1.png|32px|link=Mentor_System_and_Novice_Network#Novice_Network]] || Displayed over players with the new adventurer status, who have "recently" begun their adventures in Eorzea. | ||
|- | |- | ||
| [[file:returner status icon1.png|link=Returner Status and Returner's Bounty]] || Displayed over players with the returner status, who have at least one class at level 50 or above, and have not visited Eorzea in more than 45 days. | | [[file:returner status icon1.png|link=Returner Status and Returner's Bounty]] || Displayed over players with the returner status, who have at least one class at level 50 or above, and have not visited Eorzea in more than 45 days. | ||
|- | |- | ||
| [[file:partake in roleplaying in-game icon1.png|link=]] || Displayed over players who partake in roleplaying in-game | | [[file:partake in roleplaying in-game icon1.png|link=]] || Displayed over players who partake in roleplaying in-game. | ||
|- | |- | ||
| [[file:npcs offering main scenario quests icon1.png|link=Main Scenario Quests]] || Displayed over NPCs offering main scenario quests. | | [[file:npcs offering main scenario quests icon1.png|link=Main Scenario Quests]] || Displayed over NPCs offering main scenario quests. | ||
| Line 369: | Line 480: | ||
| [[file:npcs offering quests that unlock new duties icon1.png|link=Feature Quests]] || Displayed over NPCs offering quests that unlock new duties or features. | | [[file:npcs offering quests that unlock new duties icon1.png|link=Feature Quests]] || Displayed over NPCs offering quests that unlock new duties or features. | ||
|- | |- | ||
| [[file:npcs offering quests related to the Hall of the Novice icon.png|link=Hall of the Novice]] || Displayed over NPCs offering quests related to the Hall of the Novice. | | [[file:npcs offering quests related to the Hall of the Novice icon.png|32px|link=Hall of the Novice]] || Displayed over NPCs offering quests related to the Hall of the Novice. | ||
|- | |- | ||
| [[file:npcs offering leve quests icon1.png|link= | | [[file:npcs offering leve quests icon1.png|link=Guildleve]] || Displayed over NPCs offering leve quests. | ||
|- | |- | ||
| [[file:npcs offering guild hests icon1.png|link= | | [[file:npcs offering guild hests icon1.png|32px|link=Guildhest]] || Displayed over NPCs offering guild hests. | ||
|- | |- | ||
| [[file:npcs offering supplementary information icon1.png|link=]] || Displayed over NPCs offering supplementary information. | | [[file:npcs offering supplementary information icon1.png|link=]] || Displayed over NPCs offering supplementary information. | ||
|- | |- | ||
| [[file:npcs that initiate fates icon1.png|link= | | [[file:npcs that initiate fates icon1.png|link=FATEs]] || Displayed over NPCs that initiate FATEs. | ||
|- | |- | ||
| [[file:npcs that play Triple Triad icon1.png|link=Triple Triad]] || Displayed over NPCs that play Triple Triad. | | [[file:npcs that play Triple Triad icon1.png|link=Triple Triad]] || Displayed over NPCs that play Triple Triad. | ||
|- | |- | ||
| [[file:npcs that initiate gates icon1.png|link=GATEs]] || Displayed over NPCs that initiate GATEs. | | [[file:npcs that initiate gates icon1.png|32px|link=GATEs]] || Displayed over NPCs that initiate GATEs. | ||
|- | |- | ||
|} | |} | ||
===Icons displayed over enemies=== | ===Icons displayed over enemies=== | ||
{| {{STDT| align-left}} | {| {{STDT| align-left}} | ||
|- | |- | ||
! | ! Icon | ||
! Description | ! Description | ||
|- | |- | ||
| [[file:will not attack unless provoked icon1.png]] || Displayed over passive enemies that will not attack unless provoked. | | [[file:will not attack unless provoked icon1.png|link=]] || Displayed over passive enemies that will not attack unless provoked. | ||
|- | |- | ||
| [[file:will attack when within range icon1.png]] || Displayed over aggressive enemies that will attack when within range. | | [[file:will attack when within range icon1.png|link=]] || Displayed over aggressive enemies that will attack when within range. | ||
|- | |- | ||
| [[file:enemies that are the objective of fates icon1.png]] || Displayed over enemies that are the objective of FATEs. | | [[file:enemies that are the objective of fates icon1.png|link=FATEs]] || Displayed over enemies that are the objective of FATEs. | ||
|- | |- | ||
| [[file:enemies that are the objective of main scenario quests icon1.png]] || Displayed over enemies that are the objective of main scenario quests. | | [[file:enemies that are the objective of main scenario quests icon1.png|link=Main Scenario Quests]] || Displayed over enemies that are the objective of main scenario quests. | ||
|- | |- | ||
| [[file:enemies that are the objective of sidequests icon1.png]] || Displayed over enemies that are the objective of sidequests. | | [[file:enemies that are the objective of sidequests icon1.png|link=Side Quests]] || Displayed over enemies that are the objective of sidequests. | ||
|- | |- | ||
| [[file:enemies that are the objective of quests that unlock new duties icon1.png]] || Displayed over enemies that are the objective of quests that unlock new duties or features. | | [[file:enemies that are the objective of quests that unlock new duties icon1.png|link=Feature Quests]] || Displayed over enemies that are the objective of quests that unlock new duties or features. | ||
|- | |- | ||
| [[file:enemies that are the objective of hunting log entries icon1.png]] || Displayed over enemies that are the objective of hunting log entries. | | [[file:enemies that are the objective of hunting log entries icon1.png|link=Hunting Log]] || Displayed over enemies that are the objective of hunting log entries. | ||
|- | |- | ||
| [[file:enemies that are the objective of leve quests icon1.png]] || Displayed over enemies that are the objective of leve quests. | | [[file:enemies that are the objective of leve quests icon1.png|link=Guildleve]] || Displayed over enemies that are the objective of leve quests. | ||
|- | |- | ||
| [[file:enemies that are the objective of treasure hunts icon1.png]] || Displayed over enemies that are the objective of treasure hunts. | | [[file:enemies that are the objective of treasure hunts icon1.png|link=Treasure Hunt]] || Displayed over enemies that are the objective of treasure hunts. | ||
|- | |- | ||
| [[file:enemies that are the objective of the Hunt icon1.png]] || Displayed over enemies that are the objective of the Hunt. | | [[file:enemies that are the objective of the Hunt icon1.png|link=The Hunt]] || Displayed over enemies that are the objective of the Hunt. | ||
|- | |- | ||
|} | |} | ||
==Quest Icons== | |||
Important quests, such as main scenario quests or those that unlock game content, are identified by unique icons. | |||
[[File:Quest Types 1.jpg|500px]] | |||
Certain quests offer large amounts of experience points, which are ideal when leveling your character. Others unlock helpful game features such as chocobo companions and the ability to dye equipment. Of course, if you're not certain of which quests to undertake, it is always recommended to continue progression through main scenario quests. | |||
===Changing Icons=== | |||
Quest icons may change as you progress, indicating NPCs or places where you may proceed. Should they turn red, it means you do not meet the requirements to do so. In such cases, check the duty list or journal for hints on how to continue. The journal can be found under Duty in the main menu. | |||
[[File:Quest Changes.jpg|500px]] | |||
Other icons may also appear over the heads of NPCs, indicating the availability of content. | |||
Revision as of 21:23, 19 December 2022
|
Graphical user interface or user interface or UI
Official UI Guide on Lodestone
Heads Up Display
Out of Combat
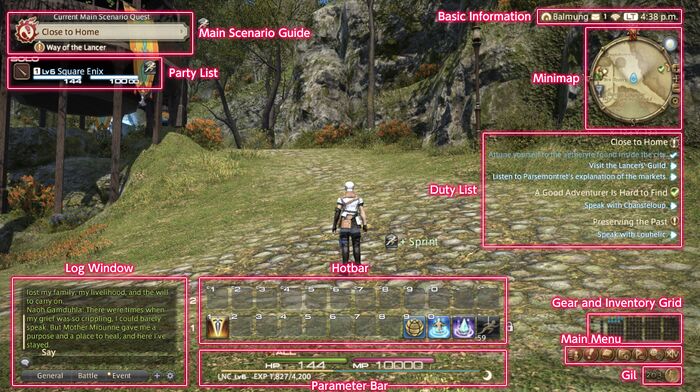
Basic Information
Displays your current/home world, any in-game mail you currently have not opened, your connection, as well as the various times, such as Local Time (LT), Server Time (ST) and Eorzea Time (ET).
Main Scenario Guide
Displays the name of the next available main scenario quest. Clicking on the quest name will open the map and display where you can go to continue your journey through the story.
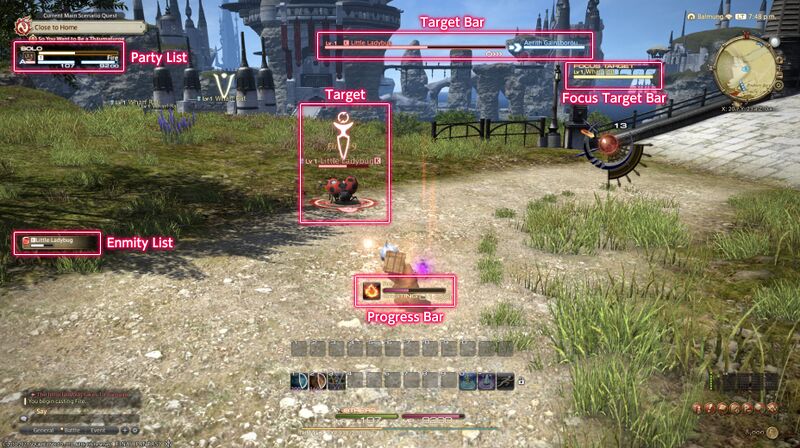
Party List
The party list displays the vital stats of all current party members, with your character's information always appearing at the top. Individual party members can be targeted by clicking on their names.
- Hiding the Party List
If you wish to hide the party list when you are not in a party, access the Party List tab under UI Settings in the Character Configuration menu and select "Hide party list when solo."
- This option is set to ON by default.
Log Window
Quest dialogue, system messages, conversations with other players, and more are displayed here. The plus icon below the log window will add a new tab, while the cog icon will open the Log Window Settings menu.
- Using the Log Filter
Filters for text that appears in each tab of the log window can be customized, allowing players to hide or display information as they see fit. To access log filters, select the tab you wish to edit under the General tab of Log Window Settings in the Character Configuration menu.
Hotbar
Player actions, emotes, items, macros and target markers can be set to these slots so that they can be accessed by selecting their respective icons. You can change the layout of the hotbars, and even their key settings as you see fit.
Lockbar
- The lock setting for hotbars is independent of cross hotbar settings.
4. Parameter Bar
The parameter bar displays your current HP, MP/CP/GP, and experience bar. Upon entering a sanctuary, such as an inn room or aetheryte camp, a crescent moon icon will appear next to your experience bar, indicating you are accruing rested bonus experience.
Rested Bonus
| Upon entering a sanctuary, such as an inn room or aetheryte camp, this icon will appear beneath your experience bar, indicating that you are currently accruing a rested bonus. |
Rested bonus accrued.
Rested bonus accrued beyond current level.
Minimap
Displays the current location of your character, as well as the location of nearby landmarks such as shops, aetherytes, and quest destinations. It also displays the location of enemies (red dots) and allies (blue dots). Additionally, the sun icon bordering the minimap moves to represent the time of day.
- To view the map when using a mouse and keyboard, click the minimap at the top right of the screen. When using a gamepad, press X.
The map of low level areas will appear in their entirety upon visiting them for the first time. In later levels, however, you must explore maps to reveal them completely. That said, you should always remember to attune to local aetherytes. This will make it easier to return to these areas later.
Duty List
Displays active quest titles and objectives. Clicking on the quest title opens the journal, while clicking on the objectives displays the location of those objectives on your map.
Gear and Inventory Grid
The set of dots on the left represent your character's gear slots. The set of dots on the right, your inventory. Clicking on the sets opens the respective menus.
Main Menu
- Some features cannot be accessed until they are unlocked, and therefore may not be available at the game's onset.

Gil
Displays the amount of gil currently in your possession. Selecting the gil icon will open the Currency menu, which displays other currencies such as tomestones and Grand Company seals.
Notices
All pending friend requests, party invites, etc., are displayed here. Clicking on the notice will bring up the confirmation prompt.
In Combat
Status Effects
Both enhancing effects and enfeebling effects are displayed as icons, with the duration of each status effect underneath. Any enhancing effect can be instantly removed by right clicking its icon.
![]()
Target Bar
Displays information on the object, character, or enemy currently targeted. The bar directly to the right of the target bar indicates the character with which the target is interacting.
Focus Target Bar
In addition to your current target, you can also keep an eye on other enemies or allies by making them focus targets. This is a good way to keep track of one target's HP while dealing with another.
Setting a Focus Target
A focus target can be designated by clicking on the target and selecting Focus Target from the submenu, or by pressing Shift+F.
Enmity List
Indicates the enmity levels of the target with which you are currently engaged. A red icon next to their name means they will attack you, so be careful.
Enmity
Enmity is a measure of how likely an enemy is to attack a player. Your enmity in relation to that of party members is represented by numbers next to your names. The lower the number, the more enmity you have, with an "A" identifying the player currently targeted by the enemy.
How does one build enmity?
Attacks against an enemy and healing effects used on allies generate enmity. Tank classes are designed to generate higher levels of enmity than other classes, but there are occasions where a DPS or healer class will draw the enemy's attention. In such cases, one should stay close to the tank so they may build back enmity as quickly as possible.
How should each role manage enmity?
Tanks should make liberal use of enmity generating abilities to hold an enemy's attention. DPS should focus on the tank's target, making use of actions that reduce enmity as necessary. Healers must maintain the HP of party members, but try not to heal more than necessary. When using several powerful healing actions in quick succession, it is advisable to also use abilities that reduce enmity.
Enmity management becomes increasingly important as you gain in levels, so it is important to learn the fundamentals of party dynamics early on.
Progress Bar
Indicates the progress of any actions (spell casting, item usage, etc.) that are not instant.
![]()
Flying Text
Real-time messages and information indicating your character's actions (scrolls up), as well as actions conducted on your character (scrolls down).
Flying text indicating party and enemy actions is distinguished by color.
| Flying Text | Description |
|---|---|
| Party member actions | |
| Enemy actions | |
| Enhancing effects and restorative actions |
Modifying the HUD
There are many options for customizing one's HUD layout, but everything starts with two key points: size and positioning of UI elements, which will be explained below.
The screen will change to HUD Layout mode, wherein you can customize nearly every UI element.
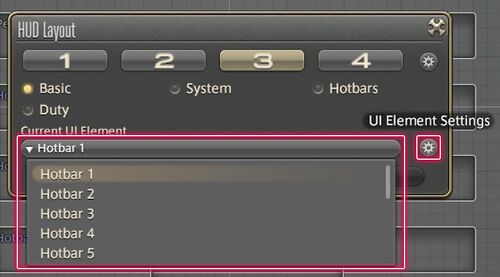
Choose from one of the UI element categories (Basic, System, Hotbars, and Duty), then select the UI element you wish to customize from the pulldown menu. Your selection will be outlined in gold.
Positioning
Use your mouse to drag the selected element to your desired position.
Toggle Display
Select the cog icon next to the pulldow menu to open the UI Element Settings menu. From there, uncheck the box labeled Display Element. The label of hidden UI elements will turn purple. This feature can also be accessed by right-clicking any HUD element.
Size
There are two methods for changing the size of UI elements.
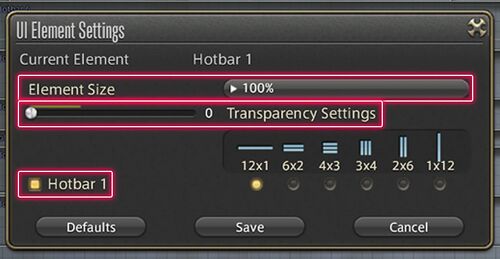
- Select the cog icon next to the pulldown menu to open the UI Element Settings menu. Here you can change the size of your selected UI element. In the case of hotbars, you can also change their orientation.
- After making a selection from the Current UI Element pulldown menu, press Ctrl+Home to toggle through all available sizes.
Transparency Settings
You can adjust the transparency of most HUD elements.
Copy Layouts
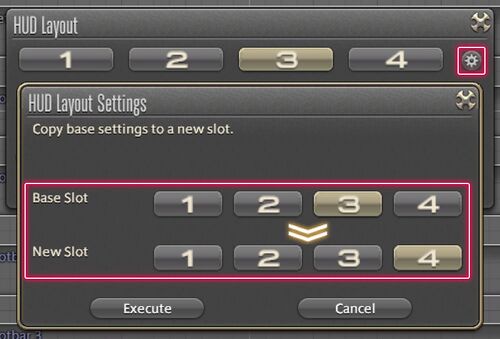
Select the cog icon next to the numbered tabs to open the HUD Layout Settings menu. Here you can choose a layout from one of the four base slots to be copied to a new slot.
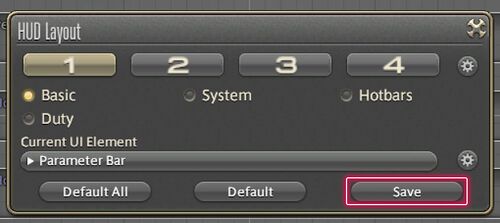
When you have customized UI elements to your satisfaction, select Save and close the HUD Layout window.
Switching the Job Gauge to Simple Mode
The job gauge is a UI element used to keep track of certain job-specific statuses and resources.
The aesthetic design of this gauge is tailored to each job. The simple mode, however, is a minimalist layout that shows only essential information.
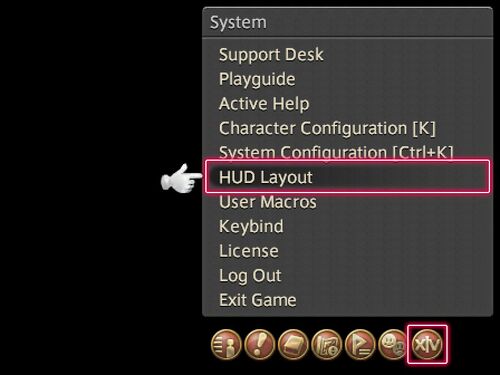
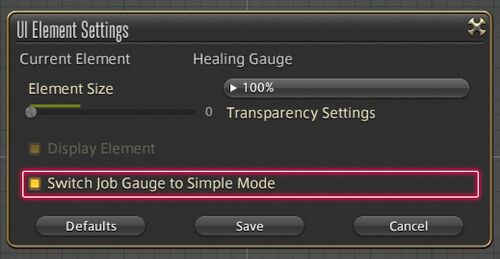
To change the job gauge to simple mode, first select System from the main menu, then open the HUD Layout menu. From the Current UI Element drop-down menu, select the job gauge you wish to change, then use the neighboring gear icon button to access UI Element Settings.
Selecting the box "Switch Job Gauge to Simple Mode" will change the appearance of the gauge.
Adding Abilities to the Hotbar/Crossbar
The cross hotbar can be used by holding either LT or RT (L2 or R2 on PS5™/PS4™) and the corresponding directional or action button. But first, you will need to register actions to the cross hotbar, as described below.
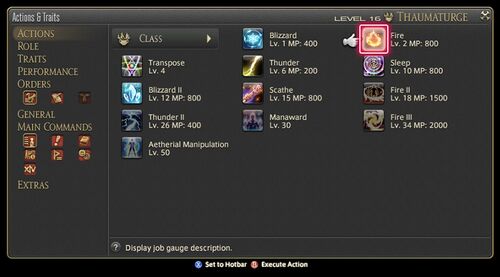
From the main menu, select Character and open the Actions & Traits menu. From the tabs on the left you can peruse several categories containing various actions to register to your hotbar.
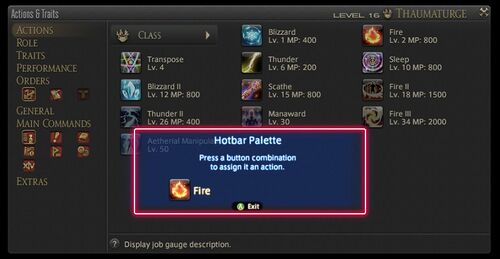
When you've found an action you wish to register to the cross hotbar, press X (on PS5/PS4) to open the Hotbar Palette.
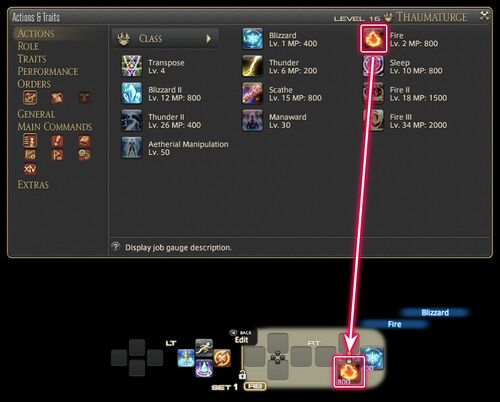
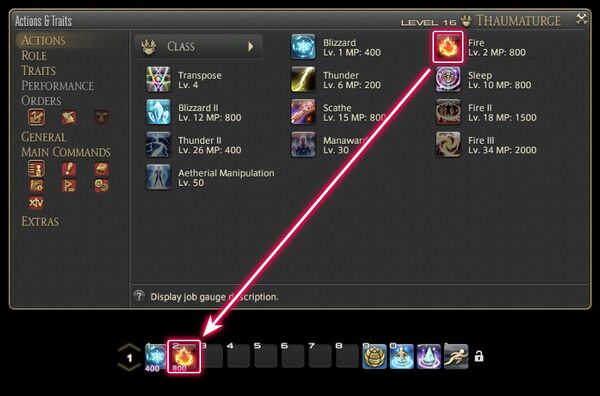
With the Hotbar Palette open, press the button combination you wish to assign your selected action to. ALternatively, you can drag and drop the ability to the desired slot on PC.
Once registered to your cross hotbar, actions can be used at any time via their corresponding button combinations.
- For more information on Control layouts and options, please visit the Controls page.
Display Name Color
| Color | Description |
|---|---|
| Yellow | Unclaimed
(Exp / credit in hunting log / quest items / loot awarded if claimed and defeated) |
| Red | Claimed by you or your party
(Exp / credit in hunting log / quest items / loot awarded upon defeat) |
| Orange | Unclaimed, yet attacking you or your party
(Exp / credit in hunting log / quest items / loot awarded if claimed and defeated) |
| Purple | Claimed by another party or individual
(Exp / credit in hunting log / quest items awarded if sufficient damage contributed) |
Display Name Icons
Icons displayed over NPCs and PCs
Note: Click the icons to learn more.
Icons displayed over enemies
Quest Icons
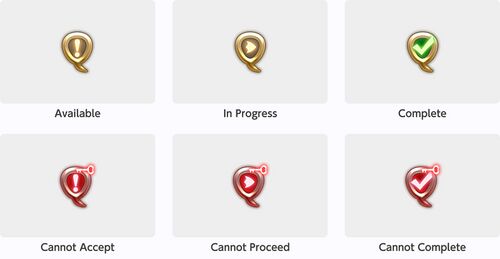
Important quests, such as main scenario quests or those that unlock game content, are identified by unique icons.
Certain quests offer large amounts of experience points, which are ideal when leveling your character. Others unlock helpful game features such as chocobo companions and the ability to dye equipment. Of course, if you're not certain of which quests to undertake, it is always recommended to continue progression through main scenario quests.
Changing Icons
Quest icons may change as you progress, indicating NPCs or places where you may proceed. Should they turn red, it means you do not meet the requirements to do so. In such cases, check the duty list or journal for hints on how to continue. The journal can be found under Duty in the main menu.
Other icons may also appear over the heads of NPCs, indicating the availability of content.
