Difference between revisions of "Job Gauge"
Freedom4556 (talk | contribs) m |
(Attempt to modernize page. Still incomplete, I don't have enough knowledge to describe every job. It's also unclear whether job gauge means specific resource or UI element. Ingame tooltips seem to use it interchangeably.) |
||
| Line 2: | Line 2: | ||
{{TOCRIGHT}} | {{TOCRIGHT}} | ||
==Introduction== | ==Introduction== | ||
[[ | Job Gauge refers to an either UI element used to track [[Job|Job's]] specific resources or to resource itself. | ||
This includes, but is not limited, to: | |||
* Elements used to track uptime of [[Job|Job's]] specific buffs. For example [[Dark Knight|Dark Knight's]] [[Darkside]] or [[Ninja|Ninja's]] [[Huton]]. | |||
* Elements used to track numerical value (usually 0 to 100) of available resources. For example [[Paladin|Paladin's]] [[Shield Oath]] or [[Samurai|Samurai's]] [[Kenki Gauge|Kenki]]. | |||
* Elements used to track number of available stacks (usually 0 to 3) of specific Job Gauge. For example [[White Mage|White Mage's]] lillies or [[Scholar|Scholar's]] Aetherflow. | |||
Multiple resources can be shown in single UI element, for example [[Sage|Sage's]] [[Addersgall]] gauge shows progress bar for replenishing [[Addersgall]], current amount of [[Addersgall]] stacks and current amount of [[Addersting]] stacks. | |||
Some gauges can be unevenly split into multiple UI elements, for example [[Samurai]] has 3 resources - [[Sen]], [[Kenki Gauge|Kenki]] and Meditation stacks. [[Sen]] has individual UI element, while [[Kenki Gauge|Kenki]] and Meditation stacks share same UI element. | |||
==Simple Job Gauge== | ==Simple Job Gauge== | ||
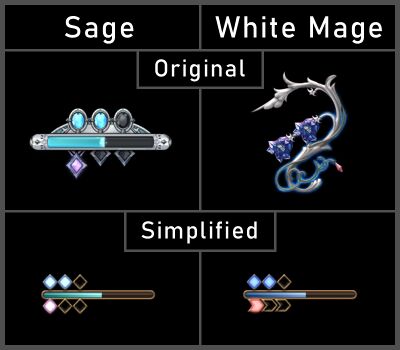
Simple job gauges are simplified version of the original UI element. Simplified job gauges contain same information as the original, but they do not contain unnecessary graphical elements, like background images. Simplified job gauges of different [[Job]]s often look very similar if they work on similar basis. For example, simplified version of [[White Mage|White Mage's]] lilies and blood lilies are nearly identical to [[Sage|Sage's]] [[Addersgall]] and [[Addersting]], while their original version are easily distinguishable because of their very distinct graphical design. | |||
[[ | |||
[[File: | [[File:sge_whm_gauge_comparison.jpg|400px]] | ||
===Switching between Normal/Simple Modes=== | ===Switching between Normal/Simple Modes=== | ||
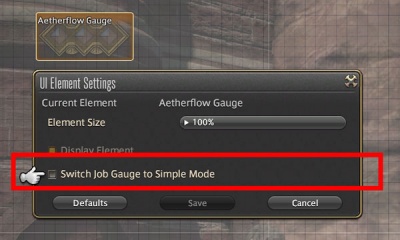
You can switch between the normal and simple versions of the job gauge display through the individual HUD layout options. | You can switch between the normal and simple versions of the job gauge display through the individual HUD layout options. | ||
* You'll need to be on the job you want to change your job gauge. | * You'll need to be on the job you want to change your job gauge. | ||
[[File:simple job gauge3.jpg|400px]] | [[File:simple job gauge3.jpg|400px]] | ||
You can also switch between the two versions using the following text command: | You can also switch between the two versions using the following text command: | ||
/jobhudmode | /jobhudmode | ||
If there are two job gauges available, assign a number to switch the specific job gauge display: | If there are two job gauges available, assign a number to switch the specific job gauge display: | ||
/jobhudmode [number] | /jobhudmode [number] | ||
| Line 36: | Line 32: | ||
[[File:simple job gauge4.jpg|400px]] | [[File:simple job gauge4.jpg|400px]] | ||
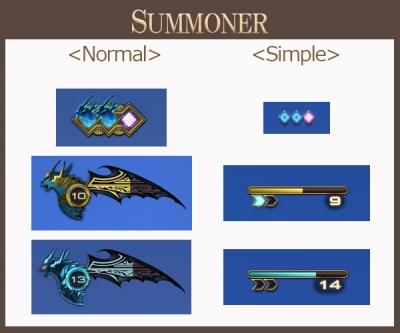
And for jobs that have more than one gauge, you'll still be able to use the text command by adding a "1" or "2". Using the summoner's job gauge as an example: | And for jobs that have more than one gauge, you'll still be able to use the text command by adding a "1" or "2". Using the summoner's job gauge as an example: | ||
/jobhudmode 1 will change the Aetherflow Gauge, and | /jobhudmode 1 will change the Aetherflow Gauge, and | ||
| Line 47: | Line 43: | ||
===Job Gauge Settings and Layout=== | ===Job Gauge Settings and Layout=== | ||
If [[Job]] has multiple UI elements, you can mix and match them however you want. You can use simplified [[Kenki Gauge|Kenki]] gauge while simultaniously use normal [[Sen]] gauge. | |||
[[File:simple job gauge7.jpg|400px]] | [[File:simple job gauge7.jpg|400px]] | ||
Machinist above has a normal Ammunition Gauge, but is also using the simplified Heat Gauge. | |||
[[File:simple job gauge8.jpg|400px]] | [[File:simple job gauge8.jpg|400px]] | ||
Last but not least, the settings for both styles of job gauges can be saved on the HUD layouts 1 through 4 individually, so you can switch between all sorts of modes as you like. | |||
Last but not least, the settings for both styles of job gauges can be saved on the HUD layouts 1 through 4 individually, so you can switch between all sorts of modes as you like | |||
== Tanks == | == Tanks == | ||
All | All Tanks have gauges that change their design to reflect whether they have their respective tank stance active. | ||
=== [[Paladin]] === | === [[Paladin]] === | ||
The Paladin's Oath Gauge is charged by | The Paladin's Oath Gauge is charged by auto-attacks. Auto-attack for Paladin occur every 2.24, meaning it takes nearly 45 seconds to charge gauge from 0 to 100. The accumulated Oath can then be consumed for [[Sheltron]], [[Holy Sheltron]], [[Intervention]] or [[Cover]]. | ||
Whether tank stance [[Iron Will]] is active is indicated by golden background picture in normal gauge, or by small symbol on the left of the gauge in simplified version. | |||
=== [[Warrior]] === | === [[Warrior]] === | ||
The Warrior's Beast Gauge | The Warrior's Beast Gauge charges by using most of the regular [[weaponskill]]s and by ability [[Infuriate]]. Gauge can be spend for heavy hitting attacks like [[Fell Cleave]]. | ||
Whether tank stance [[Defiance]] is active is indicated by background picture in normal gauge, or by small symbol on the left of the gauge in simplified version. | |||
=== [[Dark Knight]] === | === [[Dark Knight]] === | ||
Dark Knight has 2 UI elements, both convey multiple information. | |||
Blood Gauge: | |||
* Similar to Warrior's Beast Gauge. It is charged by using [[weaponskill]]s [[Souleater]] or [[Stalwart Soul]]. Gauge can be spent on [[Living Shadow]], [[Bloodspiller]] or [[Quietus]]. Using [[Delirium]] provides 3 stacks, which can be used for [[Bloodspiller]] or [[Quietus]] without using up Blood Gauge. | |||
* Whether tank stance [[Grit]] is active is indicated by glow and animation of picture on the left side in normal gauge, or by small symbol on the left of the gauge in simplified version. | |||
Darkside: | |||
* Shows remaining duration of Darkside. | |||
* Shows whether [[Dark Arts]] is available | |||
* Show remaining time of [[Living Shadow]] | |||
=== [[Gunbreaker]] === | |||
Incomplete, requires updating | |||
== Healers == | == Healers == | ||
=== [[White Mage]] === | === [[White Mage]] === | ||
Every 30 seconds in combat a White Mage will gain a Lily | Every 30 seconds in combat a White Mage will gain a Lily and they may hold up to 3 at any time. Lilies can be spent on the spells [[Afflatus Solace]] and [[Afflatus Rapture]]. After using 3 Lilies, the White Mage will have nourished the Blood Lily, allowing them to cast [[Afflatus Misery]]. | ||
=== [[Scholar]] === | === [[Scholar]] === | ||
The Scholar has two gauges; one for Aetherflow, and one for their Faerie; | The Scholar has two gauges; one for Aetherflow, and one for their Faerie; | ||
* The Aetherflow Gauge | * The Aetherflow Gauge is charged by using [[Aetherflow]], which is spent to execute certain actions such as [[Energy Drain]] and [[Sacred Soil]]. | ||
* The Faerie Gauge tracks Aether accumulated within the Scholar's Faerie, which is increased by executing certain actions (such as [[Energy Drain]]) and then consumed by others, most notably [[Aetherpact]]. | * The Faerie Gauge tracks Aether accumulated within the Scholar's Faerie, which is increased by executing certain actions (such as [[Energy Drain]]) and then consumed by others, most notably [[Aetherpact]]. | ||
=== [[Astrologian]] === | === [[Astrologian]] === | ||
The Astrologian's Arcana Gauge tracks the currently held card ( | The Astrologian's Arcana Gauge tracks the currently held card ([[Astrologian#Arcana|Arcana]]) in the left and [[Minor Arcana]] (either [[Lady of the Crowns]] or [[Lord of the Crows]]) on the right. 3 icons on top represent previously used types of cards - Lunar sign (halfmoon symbol) gained from cards [[The Arrow]] and [[The Ewer]], Celestial sign (circle symbol) gained from cards [[The Spear]] and [[The Spire]] and Solar sign (sun symbol) gained from cards [[The Balance]] and [[The Bole]]. Your goal is to get collect 3 ideally distinct symbols, in order to receive better boons from using [[Astrodyne]] | ||
=== [[Sage]] === | |||
Sage has 3 resources split into 2 UI elements: | |||
* Eukrasia, which indicates whether you're able to execute special Eukrasian abilities. For example, without [[Eukrasia]] active, [[Diagnosis]] has only weak healing effect. With [[Eukrasia]] active, it changes to [[Eukrasian Diagnosis]], which additionally erects barrier on target. | |||
* Addersgall, which charges passively, with maximum of 3 stacks. It takes 30 seconds to charge single stack. Additionaly, one stack can be gained from [[ability]] [[Rhizomata]]. [[Addersgall]] can be used for healing abilities. Each of those abilities additionally restore 700 MP, meaning that usage of this gauge helps with regaining mana. | |||
* Addersting stack is gained whenever barrier created by [[Eukrasian Diagnosis]] is destroyed. Addersting can be used to execute [[Toxikon]] or [[Toxikon II]]. | |||
== Melee DPS == | == Melee DPS == | ||
| Line 100: | Line 114: | ||
=== [[Samurai]] === | === [[Samurai]] === | ||
The Samurai has | The Samurai has 3 gauges split into 2 UI elements: | ||
* | * Sen Gauge. This tracks the three Sen (Setsu, Getsu, and Ka) that Samurai can acquire by executing [[Weaponskill]]s [[Yukikaze]], [[Gekko]] and [[Kasha]] individually. Sen allows you to execute Iaijutsu actions. Type of actions depends on current amount of Sen - single Sen for [[Higanbana]], 2 Sen for [[Tenka Goken]] and 3 Sen for [[Midare Setsugekka]]. | ||
* | * Kenki gauge is gained through executing most regular [[Weaponskill]]s or with ability [[Ikishoten]]. Kenki can be spent for Hissatsu abilities. | ||
* Meditation gauge requires 3 Meditation stacks in order to execute [[Shoha]] or [[Shoha II]]. Meditation stacks can be gained by executing [[Iaijutsu]] moves, [[Ogi Namikiri]] or by ability [[Meditation]]. | |||
=== [[Reaper]] === | |||
Incomplete, requires updating | |||
== Physical Ranged DPS == | == Physical Ranged DPS == | ||
| Line 114: | Line 132: | ||
=== [[Machinist]] === | === [[Machinist]] === | ||
The Machinist has two seperate gauges - one for Ammunition, and one for Heat. | The Machinist has two seperate gauges - one for Ammunition, and one for Heat. | ||
* The Ammunition Gauge simply tracks how many special rounds the Machinist has loaded. | * The Ammunition Gauge simply tracks how many special rounds the Machinist has loaded. | ||
* The Heat Gauge is only available whilst using [[Gauss Barrel]], and pushing the Heat Gauge to maximum causes the Machinist's weapon to overheat. This increases weapon power for a short time, then renders the weapon unusable for a short time. At higher levels, the Machinist has access to special Heated versions of the three basic weaponskills, further increasing damage whilst the Heat Gauge is within a certain range; careful heat management is required for maximum firepower. | * The Heat Gauge is only available whilst using [[Gauss Barrel]], and pushing the Heat Gauge to maximum causes the Machinist's weapon to overheat. This increases weapon power for a short time, then renders the weapon unusable for a short time. At higher levels, the Machinist has access to special Heated versions of the three basic weaponskills, further increasing damage whilst the Heat Gauge is within a certain range; careful heat management is required for maximum firepower. | ||
=== [[Dancer]] === | |||
Incomplete, requires updating | |||
== Magical Ranged DPS == | == Magical Ranged DPS == | ||
Revision as of 13:50, 29 May 2022
Introduction
Job Gauge refers to an either UI element used to track Job's specific resources or to resource itself. This includes, but is not limited, to:
- Elements used to track uptime of Job's specific buffs. For example Dark Knight's Darkside or Ninja's Huton.
- Elements used to track numerical value (usually 0 to 100) of available resources. For example Paladin's Shield Oath or Samurai's Kenki.
- Elements used to track number of available stacks (usually 0 to 3) of specific Job Gauge. For example White Mage's lillies or Scholar's Aetherflow.
Multiple resources can be shown in single UI element, for example Sage's Addersgall gauge shows progress bar for replenishing Addersgall, current amount of Addersgall stacks and current amount of Addersting stacks. Some gauges can be unevenly split into multiple UI elements, for example Samurai has 3 resources - Sen, Kenki and Meditation stacks. Sen has individual UI element, while Kenki and Meditation stacks share same UI element.
Simple Job Gauge
Simple job gauges are simplified version of the original UI element. Simplified job gauges contain same information as the original, but they do not contain unnecessary graphical elements, like background images. Simplified job gauges of different Jobs often look very similar if they work on similar basis. For example, simplified version of White Mage's lilies and blood lilies are nearly identical to Sage's Addersgall and Addersting, while their original version are easily distinguishable because of their very distinct graphical design.
Switching between Normal/Simple Modes
You can switch between the normal and simple versions of the job gauge display through the individual HUD layout options.
- You'll need to be on the job you want to change your job gauge.
You can also switch between the two versions using the following text command:
/jobhudmode
If there are two job gauges available, assign a number to switch the specific job gauge display:
/jobhudmode [number]
And for jobs that have more than one gauge, you'll still be able to use the text command by adding a "1" or "2". Using the summoner's job gauge as an example:
/jobhudmode 1 will change the Aetherflow Gauge, and
/jobhudmode 2 will change the Trance Gauge.
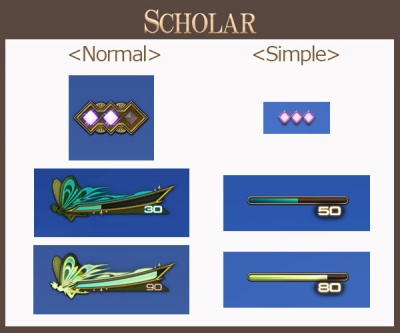
For scholar, job gauge 1 is the Aetherflow Gauge, and 2 is the Faerie Gauge!
Job Gauge Settings and Layout
If Job has multiple UI elements, you can mix and match them however you want. You can use simplified Kenki gauge while simultaniously use normal Sen gauge.
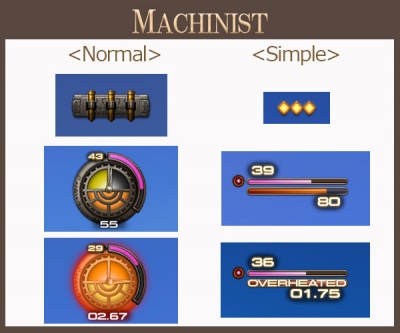
Machinist above has a normal Ammunition Gauge, but is also using the simplified Heat Gauge.
Last but not least, the settings for both styles of job gauges can be saved on the HUD layouts 1 through 4 individually, so you can switch between all sorts of modes as you like.
Tanks
All Tanks have gauges that change their design to reflect whether they have their respective tank stance active.
Paladin
The Paladin's Oath Gauge is charged by auto-attacks. Auto-attack for Paladin occur every 2.24, meaning it takes nearly 45 seconds to charge gauge from 0 to 100. The accumulated Oath can then be consumed for Sheltron, Holy Sheltron, Intervention or Cover. Whether tank stance Iron Will is active is indicated by golden background picture in normal gauge, or by small symbol on the left of the gauge in simplified version.
Warrior
The Warrior's Beast Gauge charges by using most of the regular weaponskills and by ability Infuriate. Gauge can be spend for heavy hitting attacks like Fell Cleave. Whether tank stance Defiance is active is indicated by background picture in normal gauge, or by small symbol on the left of the gauge in simplified version.
Dark Knight
Dark Knight has 2 UI elements, both convey multiple information.
Blood Gauge:
- Similar to Warrior's Beast Gauge. It is charged by using weaponskills Souleater or Stalwart Soul. Gauge can be spent on Living Shadow, Bloodspiller or Quietus. Using Delirium provides 3 stacks, which can be used for Bloodspiller or Quietus without using up Blood Gauge.
- Whether tank stance Grit is active is indicated by glow and animation of picture on the left side in normal gauge, or by small symbol on the left of the gauge in simplified version.
Darkside:
- Shows remaining duration of Darkside.
- Shows whether Dark Arts is available
- Show remaining time of Living Shadow
Gunbreaker
Incomplete, requires updating
Healers
White Mage
Every 30 seconds in combat a White Mage will gain a Lily and they may hold up to 3 at any time. Lilies can be spent on the spells Afflatus Solace and Afflatus Rapture. After using 3 Lilies, the White Mage will have nourished the Blood Lily, allowing them to cast Afflatus Misery.
Scholar
The Scholar has two gauges; one for Aetherflow, and one for their Faerie;
- The Aetherflow Gauge is charged by using Aetherflow, which is spent to execute certain actions such as Energy Drain and Sacred Soil.
- The Faerie Gauge tracks Aether accumulated within the Scholar's Faerie, which is increased by executing certain actions (such as Energy Drain) and then consumed by others, most notably Aetherpact.
Astrologian
The Astrologian's Arcana Gauge tracks the currently held card (Arcana) in the left and Minor Arcana (either Lady of the Crowns or Lord of the Crows) on the right. 3 icons on top represent previously used types of cards - Lunar sign (halfmoon symbol) gained from cards The Arrow and The Ewer, Celestial sign (circle symbol) gained from cards The Spear and The Spire and Solar sign (sun symbol) gained from cards The Balance and The Bole. Your goal is to get collect 3 ideally distinct symbols, in order to receive better boons from using Astrodyne
Sage
Sage has 3 resources split into 2 UI elements:
- Eukrasia, which indicates whether you're able to execute special Eukrasian abilities. For example, without Eukrasia active, Diagnosis has only weak healing effect. With Eukrasia active, it changes to Eukrasian Diagnosis, which additionally erects barrier on target.
- Addersgall, which charges passively, with maximum of 3 stacks. It takes 30 seconds to charge single stack. Additionaly, one stack can be gained from ability Rhizomata. Addersgall can be used for healing abilities. Each of those abilities additionally restore 700 MP, meaning that usage of this gauge helps with regaining mana.
- Addersting stack is gained whenever barrier created by Eukrasian Diagnosis is destroyed. Addersting can be used to execute Toxikon or Toxikon II.
Melee DPS
Monk
The Monk has two simple gauges;
- The Lightning Gauge tracks the current level and remaining duration of Greased Lightning.
- The Chakra Gauge tracks how many Chakra the monk has opened.
Dragoon
The Dragoon's Dragon Gauge appears when Blood of the Dragon is active, and indicates the remaining time until the effect expires. At higher levels, it also tracks the First Brood's Gaze. Once the Gaze reaches its maximum level, the Dragoon can execute Geirskogul to engage Life of the Dragon, changing the appearance of the Dragon Gauge and allowing use of the Nastrond weaponskill.
Ninja
The Ninja has two relatively simple gauges;
- The Huton Gauge is a simple countdown, tracking the time remaining.
- The Ninki Gauge is slowly built with successful autoattacks, and can be used to power new special abilities such as Hellfrog Medium, Bhavacakra, and Ten Chi Jin.
Samurai
The Samurai has 3 gauges split into 2 UI elements:
- Sen Gauge. This tracks the three Sen (Setsu, Getsu, and Ka) that Samurai can acquire by executing Weaponskills Yukikaze, Gekko and Kasha individually. Sen allows you to execute Iaijutsu actions. Type of actions depends on current amount of Sen - single Sen for Higanbana, 2 Sen for Tenka Goken and 3 Sen for Midare Setsugekka.
- Kenki gauge is gained through executing most regular Weaponskills or with ability Ikishoten. Kenki can be spent for Hissatsu abilities.
- Meditation gauge requires 3 Meditation stacks in order to execute Shoha or Shoha II. Meditation stacks can be gained by executing Iaijutsu moves, Ogi Namikiri or by ability Meditation.
Reaper
Incomplete, requires updating
Physical Ranged DPS
Bard
The Bard's gauge appears whilst singing Mage's Ballad, Army's Paeon, or The Wanderer's Minuet, and displays a timer that tracks the remaining duration of the song.
In addition, a series of musical notes or arrowheads appear when using Army's Paeon or The Wanderer's Minuet respectively. Whenever certain damage over time skills deal critical damage, these symbols will light up, granting the following effects;
- For each note of Army's Paeon that is lit up, the Bard's weaponskills and spells are cast faster and have shorter recast times, and autoattacks are faster.
- For each note of The Wanderer's Minuet that is lit up, the potency of the new Pitch Perfect skill is increased (up to a maximum of 420).
Machinist
The Machinist has two seperate gauges - one for Ammunition, and one for Heat.
- The Ammunition Gauge simply tracks how many special rounds the Machinist has loaded.
- The Heat Gauge is only available whilst using Gauss Barrel, and pushing the Heat Gauge to maximum causes the Machinist's weapon to overheat. This increases weapon power for a short time, then renders the weapon unusable for a short time. At higher levels, the Machinist has access to special Heated versions of the three basic weaponskills, further increasing damage whilst the Heat Gauge is within a certain range; careful heat management is required for maximum firepower.
Dancer
Incomplete, requires updating
Magical Ranged DPS
Black Mage
The Black Mage has a single, multi-part gauge that tracks the following;
- Astral Fire/Umbral Ice status
- Umbral Heart status (gained by casting Blizzard IV)
- Enochian timer and status
- Foul spell readiness
Summoner
The Summoner has two gauges; an Aetherflow Gauge, and later, a Trance Gauge.
- The Aetherflow Gauge tracks Aethertrail Attunement level. When fully charged, the Summoner may enter the Dreadwyrm Trance.
- The Trance Gauge has three functions. First, it tracks Dreadwyrm Aether. Second, it tracks the current duration of the Dreadwyrm Trance. Finally, after summoning Demi-Bahamut, the gauge indicates the remaining time before Demi-Bahamut disappears.
Red Mage
The Red Mage has a single three-part gauge that tracks their accumulated Black Mana and White Mana, along with a small crystal at the top that changes colour when one element becomes too dominant. When both kinds of Mana are charged up, certain melee attacks are Enchanted, and will deal significantly increased damage.
